


 Jag har en MacBook som jag köpte förra året 2014. Jag älskar att använda den för att redigera mina videor och lägga upp dem på sociala medier. Nyligen fick jag veta att det finns ett nytt operativsystem, OS X Yosemite. Jag kollade systemkraven och har fått veta att min MacBook uppfyller alla krav. Vad ska jag göra innan... uppgradering till Yosemite och hur uppgraderar jag mitt operativsystem till OS X Yosemite?
Innehåll: Del 1. Vad ska man förbereda innan man uppgraderar till Yosemite?Del 2. Hur uppgraderar jag OS X Yosemite?Del 3. Hur skapar man en säkerhetskopia av sin Mac?Del 4. Hur installerar man OS X Yosemite?
Del 1. Vad ska man förbereda innan man uppgraderar till Yosemite?
Apple introducerar nya versioner av sitt operativsystem någon gång. Detta beror på att de behöver hålla sig uppdaterade med den senaste tekniken. Vanligtvis presterar nyare versioner av ett operativsystem bättre än äldre. De har också fler funktioner och applikationer att använda. Naturligtvis är detta alltid fallet. Skulle du vilja uppgradera till ett nytt operativsystem som presterar sämre?
Ett nytt operativsystem som Apple introducerat är OS X YosemiteKan jag uppgradera från Mavericks till Yosemite? Svaret är ja. Att uppgradera till det här operativsystemet är inte särskilt svårt. Det kräver bara lite av din tid. Innan du uppgraderar till det här operativsystemet måste du dock se till att du uppfyller alla systemkrav för det. När du har checkat ut systemkraven för Yosemite och fick veta att du träffat dem alla, då är det dags att uppgradera din Mac till OS X Yosemite.
Den här artikeln är en guide som berättar hur du gör det. Du måste lära dig det. uppgradering till Yosemite kräver tre steg. Dessa steg kommer att ses som olika delar av den här guiden.
Steg 1 - Rengör din Mac
Steg 2 - Skapa en säkerhetskopia av din Mac
Steg 3 - Uppgradera din Mac till OS X Yosemite
Del 2. Hur uppgraderar jag OS X Yosemite?
Att uppgradera till Yosemite kräver en bättre status för din Mac. Att rensa bort alla skräpfiler från Mac-datorn hjälper till att optimera den och köra den snabbare.
Därför måste du använda ett verktyg för att göra detta. På så sätt orsakar du inga problem på din Mac-enhet. Ett verktyg vi rekommenderar är iMyMac PowerMyMacHär är funktionerna och fördelarna med nämnda verktyg:
- Den visar din Macs systemstatus inklusive CPU, minne och disk.
- Den gör en omfattande skanning av din Mac, inklusive iTunes, säkerhetskopia, e-postbilagor, papperskorgar och gamla mappar.
- Den har en funktion som kräver ett enda klick. Det betyder att du kan göra en omfattande skanning och rensning av din Mac med ett enda klick.
- Den är mycket kraftfull och låter dig skanna hela din enhet heltäckande.
- Den låter dig förhandsgranska filerna på din Mac-enhet. Den låter dig också sortera enheten efter olika egenskaper som namn, storlek, tid etc.
- Det ger dig kontroll över vilka filer du vill ta bort och behålla. – Det är gratis att prova de första 500 MB. Du kan fritt uppleva verktygets funktioner.
Om du vill uppgradera Yosemite till High Sierra, klicka här för att lära dig hur.
Så här använder du PowerMyMac steg för steg:
Steg 1. Ladda ner och starta PowerMyMac på Mac
Innan du uppgraderar till Yosemite, ladda ner PowerMyMac från den officiella webbplatsen. Starta programvaran på din Mac-enhet. Det kommer att visa ett systemstatusgränssnitt för din enhet.
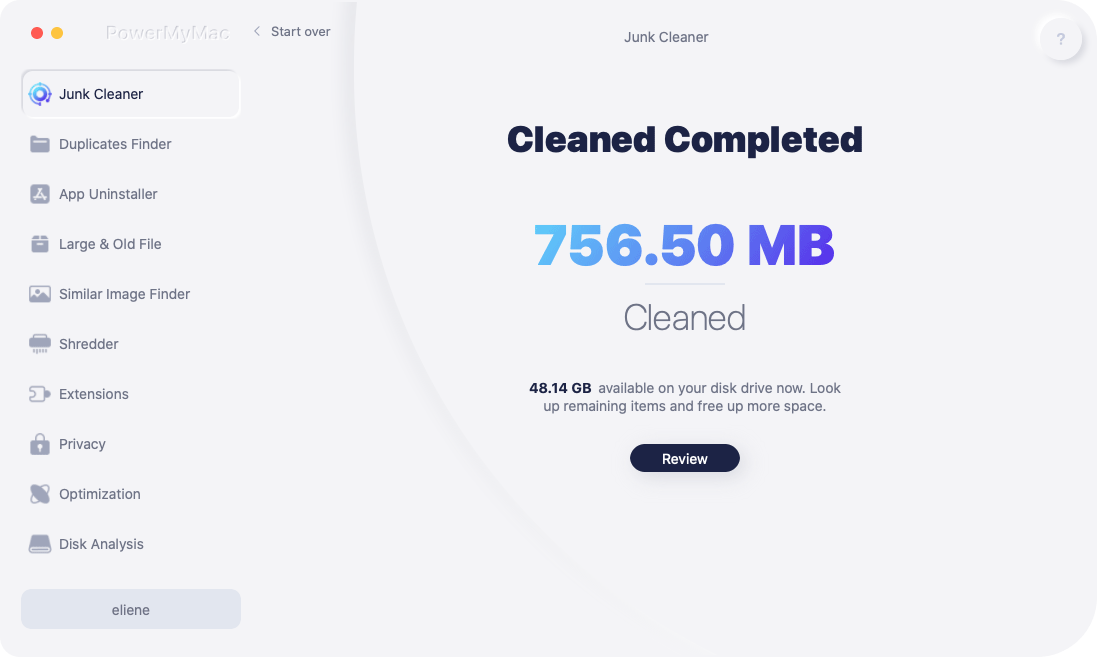
Steg 2. Skanna systemskräp
Klicka på modulen med namnet Skräpstädare på vänster sida av programvaran. Klicka på knappen SCAN. Vänta en liten stund.

Steg 3. Granska och välj objekt att rensa upp
När skanningen är klar visas de olika skräpfilerna i kategorier. Kategorierna inkluderar bland annat programcache, fotoskräp, e-postskräp, systemloggar, systemcache, användarloggar och papperskorgen. Välj de data du vill rensa. Klicka på REN.

Steg 4. Rensa upp systemskräp är klart
Vänta tills rensningsprocessen är klar. När den är klar visas noll kB för mappar du har raderat. Vissa mappar kommer inte att markeras som sådana eftersom de är automatiskt återskapade mappar.
När du har rengjort din Mac är det dags att göra en säkerhetskopia.
Del 3. Hur skapar man en säkerhetskopia av sin Mac?
Det är nödvändigt att säkerhetskopiera din Mac innan du uppgraderar till Yosemite i händelse av dataförlust.
- Gå till mappen med namnet Program.
- Välj Tidsmaskin.
- Tryck på "Välj Backup Disk".
- Välj den plats där du vill spara din Macs säkerhetskopia. Det bästa alternativet vore din externa hårddisk.
- På vänster sida av fönstret klickar du på "On”-knappen. Detta är för att aktivera tidsmaskinen.
- På höger sida av skärmen, under lagringsenhetens namn, ser du tre rader som anger: "Nästa säkerhetskopia", "Senaste säkerhetskopia" och "Äldsta säkerhetskopia". En säkerhetskopia kommer att schemaläggas och starta inom de närmaste 5 minuterna. När den är klar börjar du installera OS X Yosemite.
Del 4. Hur installerar man OS X Yosemite?
Att uppgradera till Yosemite är inte komplicerat, du kan göra detta genom att installera Yosemite.
Här är stegen för att installera OS X Yosemite:
- Besök Mac App Store.
- Använd sökfältet uppe till vänster och leta efter OS X Yosemite.
- Tryck på Ladda ner
- När nedladdningsprocessen är klar klickar du på “Installera OS X Yosemite".
- Följ instruktionerna på skärmen. Slutför installationen av nämnda operativsystem.
- Starta om din Mac-enhet.
Apple släpper alltid nya versioner av sitt operativsystem. En sådan uppgradering är OS X Yosemite. Detta operativsystem är fyllt med funktioner och ger snabbare prestanda för din Mac-enhet. Att uppgradera till OS X Yosemite är enkelt. Det kan göras i tre enkla steg.
Du kan uppgradera till Yosemite, eller uppgradera Yosemite till Sierra, High Sierra, Big Sur, Catalina, etc. Du måste dock se till att du rengör din Mac som en del av hela processen. Detta kan göras med PowerMyMac verktyg.
Människor Läs också:Hur man uppdaterar MacHur man rensar upp skräpfiler på Mac

