New Launch Sale
for Screen Recorder


iMyMac Video Converter allows you to convert video and audio files to any formats you like for playback compatibility. You can choose output formats such as MP4, MKV, MOV, WMV, AVI, FLV, M4V, 3GP, VOB, SWF, M4A, MP3, AAC, AC3, FLAC, WAV, OGG, WMA and more.
How to Use iMyMac Video Converter
When you first launch iMyMac Video Converter, a window will pop up and show you some information below.
For Starters: There is a 15-day trial period, but complete video conversion and ongoing technical support are not available.
For Registered User: The days of usage are unlimited and ongoing technical support is available. But no complete video conversion is supported.
For Subscribers: Days of usage are unlimited. Both complete video conversion and ongoing technical support are supported.
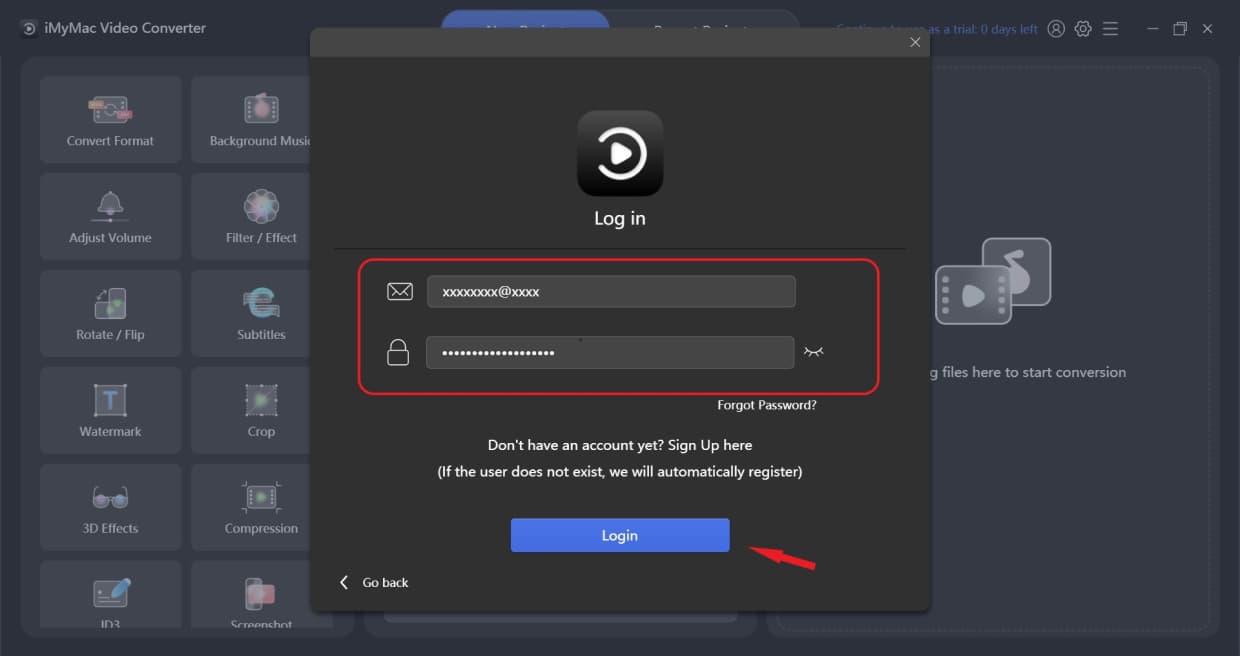
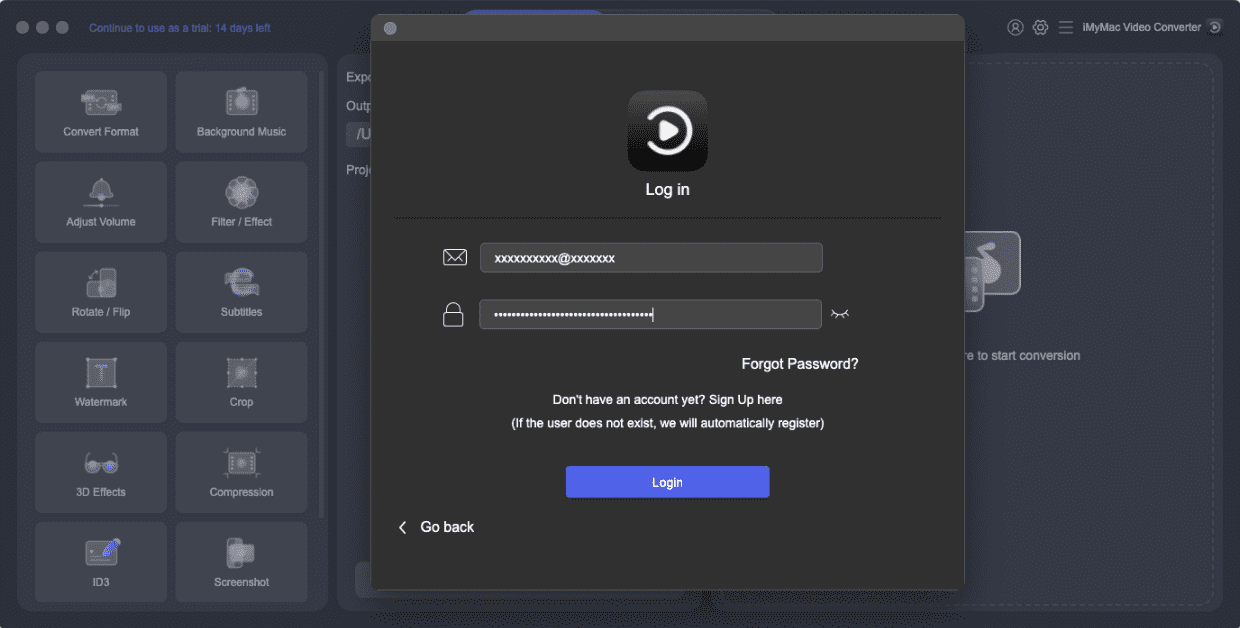
You can directly log in by clicking the Log in button on the bottom right corner.
You can click Skip to try the product first or become a registered user to remove the 15-day trial time limit. To register, click login in, a window pops up. Click "Don't have an account yet? Sign Up here", then tap your Email Address and Password. Noted that the Password should be 8-18 characters. Press Sigh Up. Then you have successfully created an account and logged in.
To get a subscription, you can click Buy Now. There are three kinds of Licenses: Monthly License, Yearly License, and Lifetime License.
Monthly License: Supports login on 1 PC for one month
Yearly License: Supports login on 1 PC for one year
Lifetime License: Supports login on 1 PC or 5 PCs for a lifetime
After buying the license, you will receive an email involving your order information and registration code. Then come back to iMyMac Video Converter and click Log in, using the purchase email and registration code to activate the software, no need to create a new account.
When you first launch iMyMac Video Converter, a window will pop up and show you some information below.
For Starters: There is a 15-day trial period, but complete video conversion and ongoing technical support are not available.
For Registered User: The days of usage are unlimited and ongoing technical support is available. But no complete video conversion is supported.
For Subscribers: Days of usage are unlimited. Both complete video conversion and ongoing technical support are supported.
You can directly log in by clicking the Log in button on the bottom right corner.
You can click Skip to try the product first or become a registered user to remove the 15-day trial time limit. To register, click login in, a window pops up. Click "Don't have an account yet? Sign Up here", then tap your Email Address and Password. Noted that the Password should be 8-18 characters. Press Sigh Up. Then you have successfully created an account and logged in.
To get a subscription, you can click Buy Now. There are three kinds of Licenses: Monthly License, Yearly License, and Lifetime License.
Monthly License: Supports login on 1 Mac for one month
Yearly License: Supports login on 1 Mac for one year
Lifetime License: Supports login on 1 Mac or 5 Macs for a lifetime
After buying the license, you will receive an email involving your order information and registration code. Then come back to iMyMac Video Converter and click Log in, using the purchase email and registration code to activate the software, no need to create a new account.
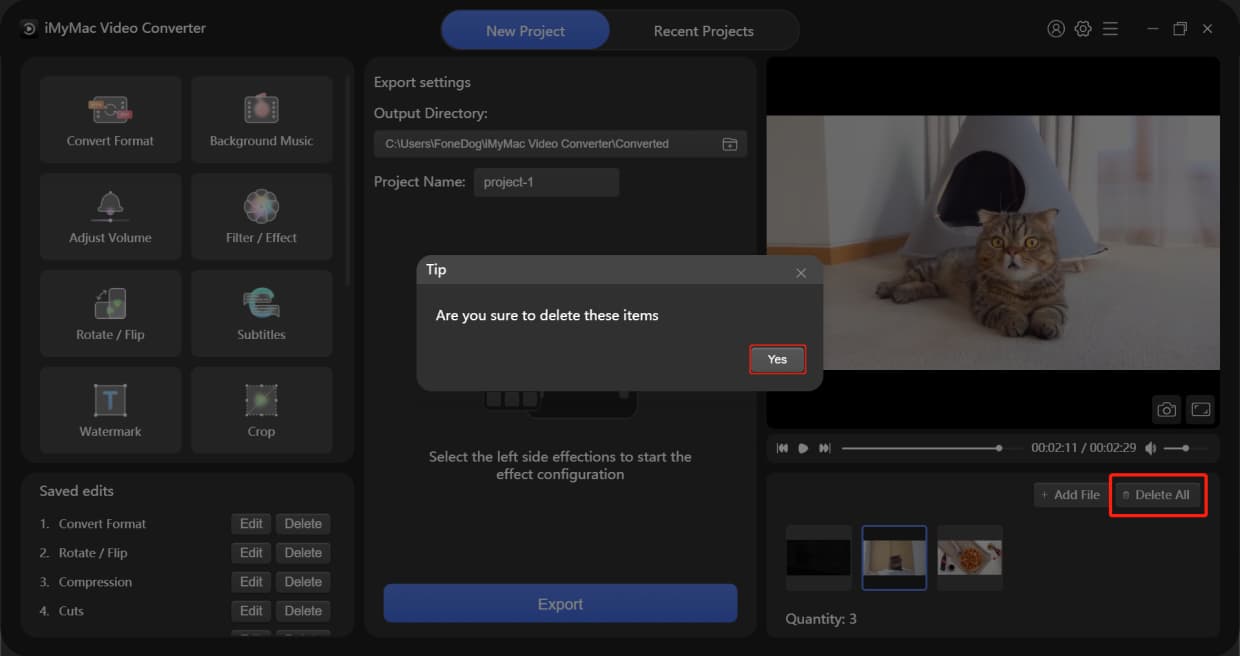
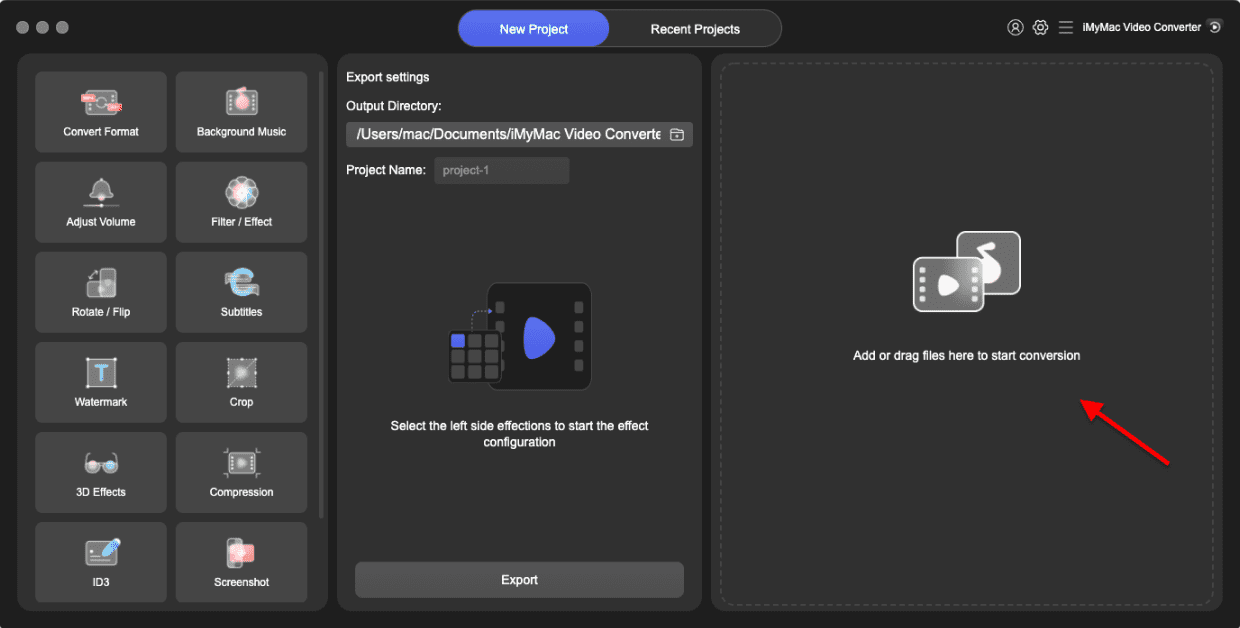
First, add video or audio from the right side of the main interface or simply drag files here to start conversion. It supports adding multiple videos and audios at the same time. You can add more files by clicking + Add File, and delete all videos or audios by clicking Delete All.
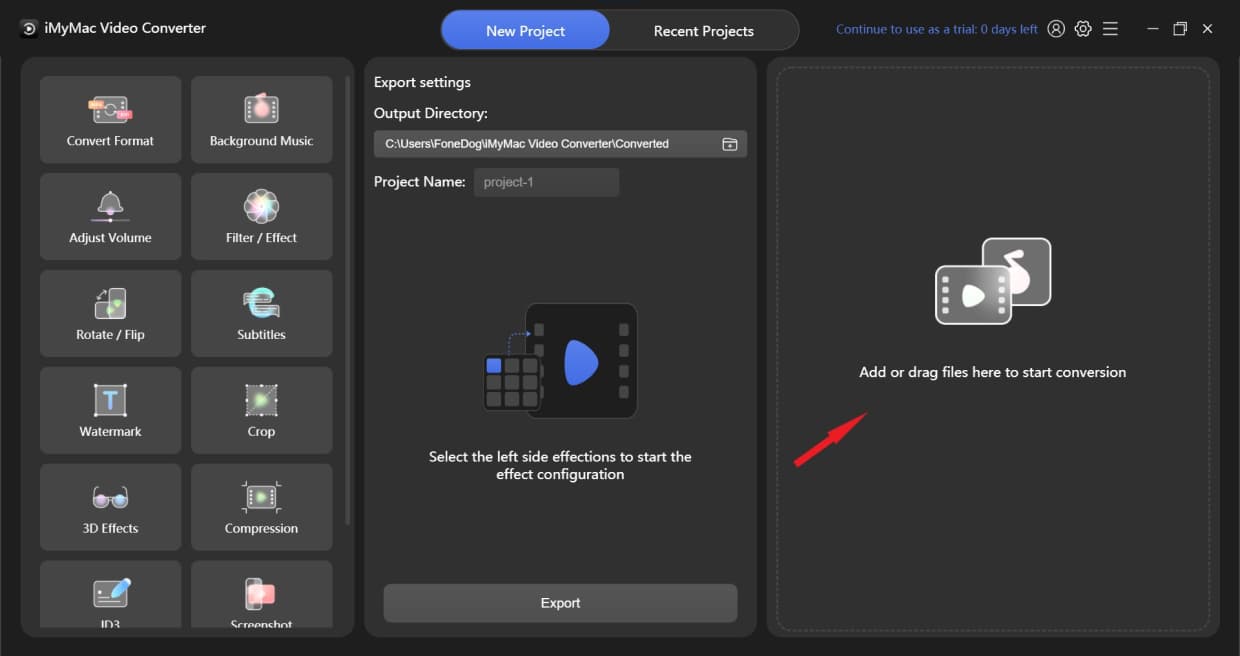
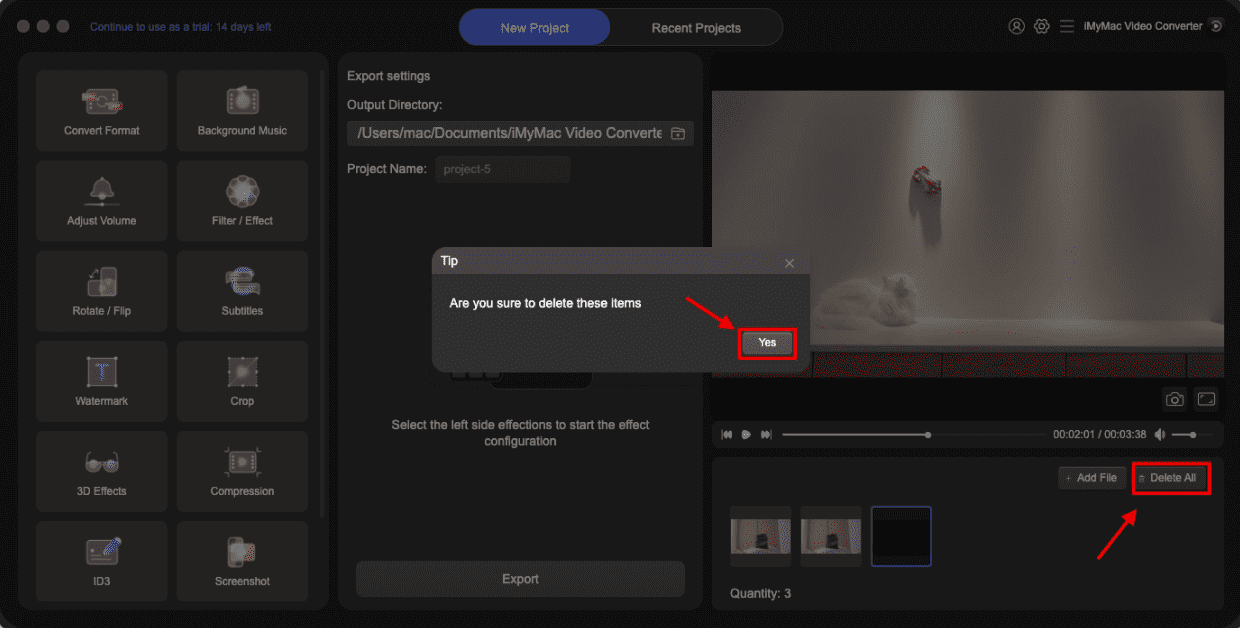
If you only want to delete one of the files, put your mouse pointer on the unwanted file and an X button will show up. Press the X button, then click "Yes" on the "Are you sure to delete these items" pop-up.
First, add video or audio from the right side of the main interface or simply drag files here to start conversion. It supports adding multiple videos and audios at the same time. You can add more files by clicking + Add File, and delete all videos or audios by clicking Delete All.
If you only want to delete one of the files, put your mouse pointer on the unwanted file and an X button will show up. Press the X button, then click "Yes" on the "Are you sure to delete these items" pop-up.
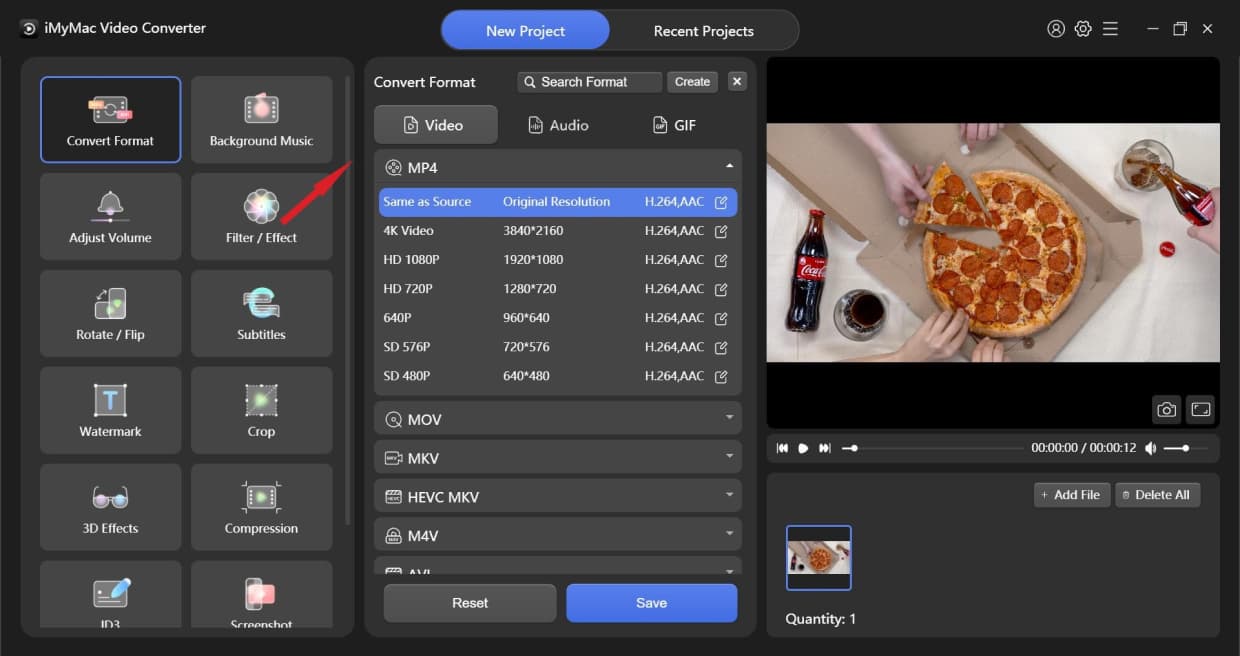
To convert your video/audio files, just need to click the Convert Format button locates at the top left corner. Then move to the middle part to choose the output format, you will see 3 types of format: Video, Audio, and GIF. To see optional resolution, click the down arrow button.
Video output formats include MP4, MOV, MKV, HEVC MKV, M4V, AVI, DIVX AVI, XVID AVI, HEVC MP4, WMV, MXF, MPEG-1, MPEG-2, VOB, 3GP, OGV, VP8 WebM, VP9 WebM, ASF, FLV, F4V, TS, YouTube, Facebook, Vimeo, Instagram, Amazon, APPLE, Android, SAMSUME, HUAWEI, LG, XIAOMI, SONI, HTC, TV.
Audio output formats include MP3, M4A, AIFF, FLAC, AC3, OGG, CAF, AU, WAV, WMA.
You can also create your own output format: click Create on the upper right corner beside the X button. From here, you can tap Title to name your format, and choose Quality. Then you can customize parameters for Video and Audio. After selecting all the parameters, click Create. If you want to reset the format, click Default and select again. After choosing the output format you wanted, click Save.
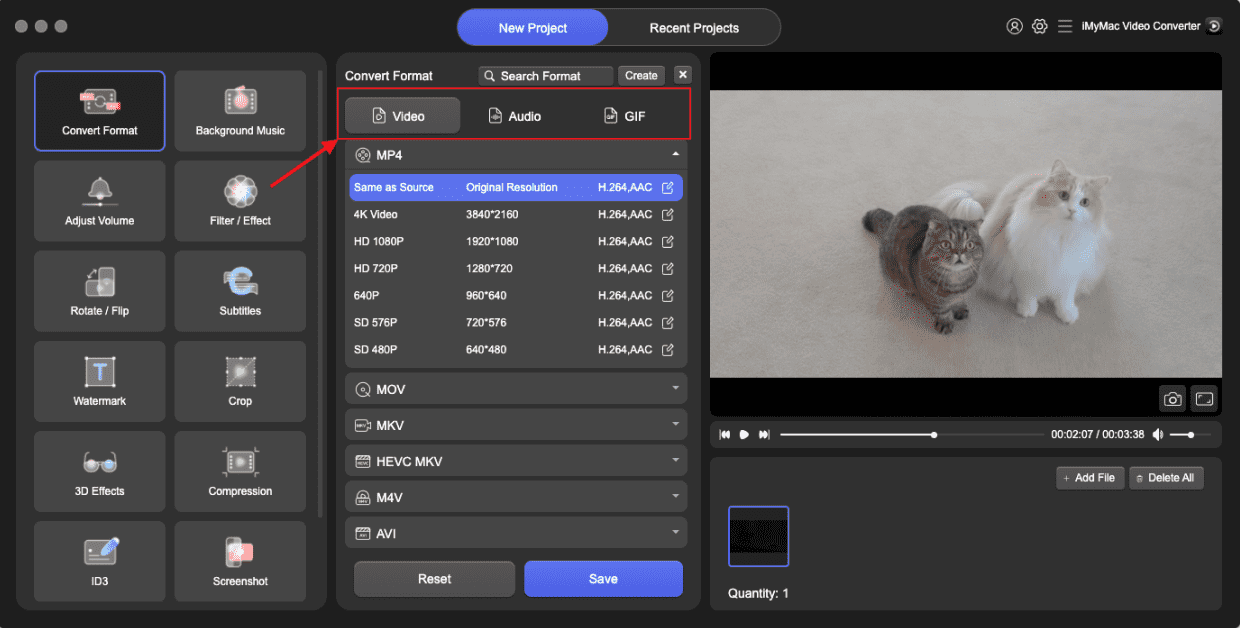
Output formats contain Video, Audio, and GIF. To see optional resolution, click the down arrow button.
Video output formats include MP4, MOV, MKV, HEVC MKV, M4V, AVI, DIVX AVI, XVID AVI, HEVC MP4, WMV, MXF, MPEG-1, MPEG-2, VOB, 3GP, OGV, VP8 WebM, VP9 WebM, ASF, FLV, F4V, TS, YouTube, Facebook, Vimeo, Instagram, Amazon, APPLE, Android, SAMSUME, HUAWEI, LG, XIAOMI, SONI, HTC, TV.
Audio output formats include MP3, M4A, AIFF, FLAC, AC3, OGG, CAF, AU, WAV, WMA.
You can create your own output format. Click Create on the upper right corner beside the X button. From here, you can tap Title to name your format, and choose Quality from High Quality, Custom to Small Size. Then you can customize parameters for Video and Audio. After selecting all the parameters, click Create. If you want to reset the format, click Default and select again.
After choosing the output format you wanted, click Save. You can also click Apply to All if you want to apply the output format to all the videos or audios you previously added.
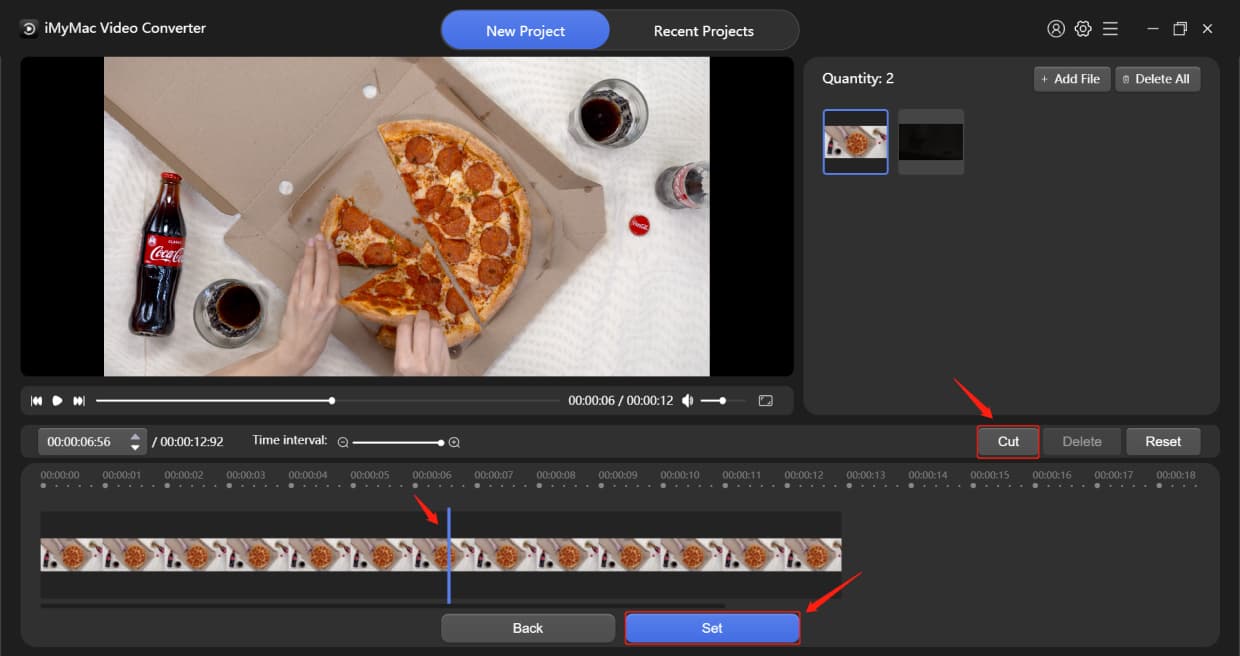
Put the mouse pointer on the videos or audios from the bottom right part of the interface, then a scissors icon shows up. Press it. Then you can play the video or audio to locate where you want to cut from.
If you want to cut the video from the beginning or the end, click the Play key. When it comes to the position that you want, click the Pause button and then the Cut button to cut the video into two parts. After that, click the unwanted part, press Delete, and then click "Yes" on the "Are you sure to delete these items" pop-up. When the cutting is done, press Set. Or you can simply drag the Sliders on both sides of the Timeline to cut from the beginning or the end of the video, then press Set. You can also locate the cutting position by clicking on the Process Bar or dragging the Time Slider. If you want to re-edit the clip, click Reset to restart the cutting.
If you want to cut a long video into several clips, you can locate the cutting position, and then click the Cut button, repeat this step. The video will be divided into several clips. After cutting is complete, click the Set button. And You will see all cut video clips in the main interface.
Besides the Time interval is the area where you can locate the cutting positions by clicking the up arrow or down arrow. Click the + or - button to zoom in or zoom out the Time Interval, which helps you locate the cutting position more accurately.
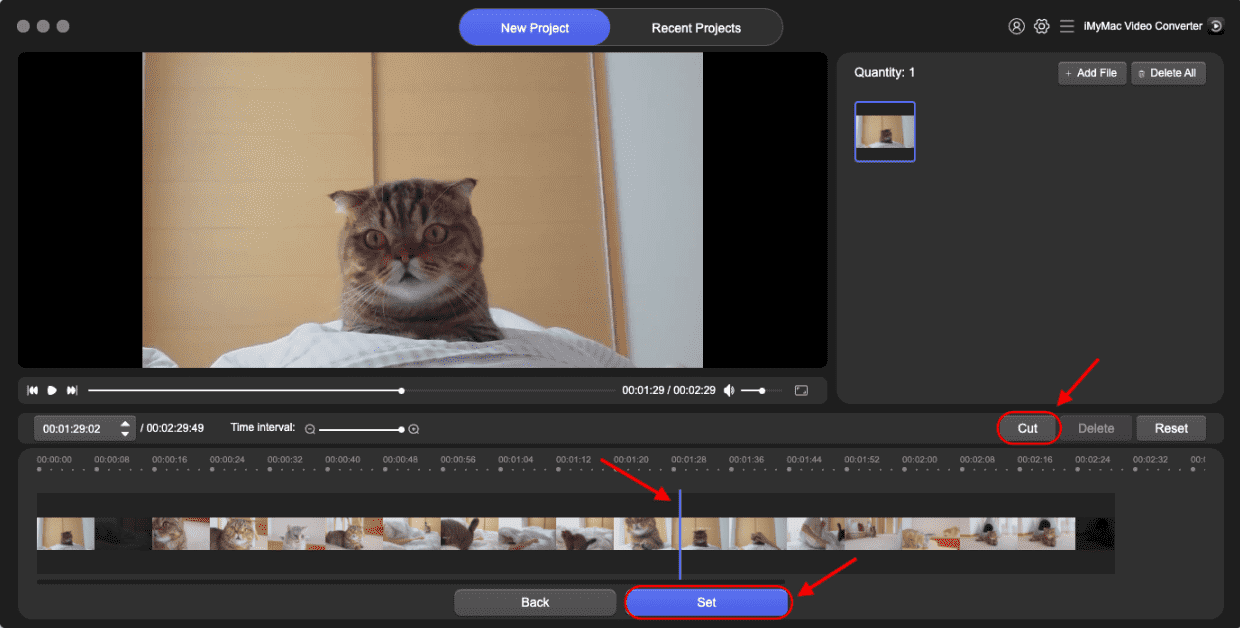
Put the mouse pointer on the videos or audios from the bottom right part of the interface, then a scissors icon shows up. Press it. Then you can play the video or audio to locate where you want to cut from.
If you want to cut the video from the beginning or the end, click the Play key. When it comes to the position that you want, click the Pause button and then the Cut button to cut the video into two parts. After that, click the unwanted part, press Delete, and then click "Yes" on the "Are you sure to delete these items" pop-up. When the cutting is done, press Set. Or you can simply drag the Sliders on both sides of the Timeline to cut from the beginning or the end of the video, then press Set. You can also locate the cutting position by clicking on the Process Bar or dragging the Time Slider. If you want to re-edit the clip, click Reset to restart the cutting.
If you want to cut a long video into several clips, you can locate the cutting position, and then click the Cut button, repeat this step. The video will be divided into several clips. After cutting is complete, click the Set button. And You will see all cut video clips in the main interface.
Beside the Time interval is the area where you can locate the cutting positions by clicking the up arrow or down arrow. Click the + or - button to zoom in or zoom out the Time Interval, which helps you locate the cutting position more accurately.
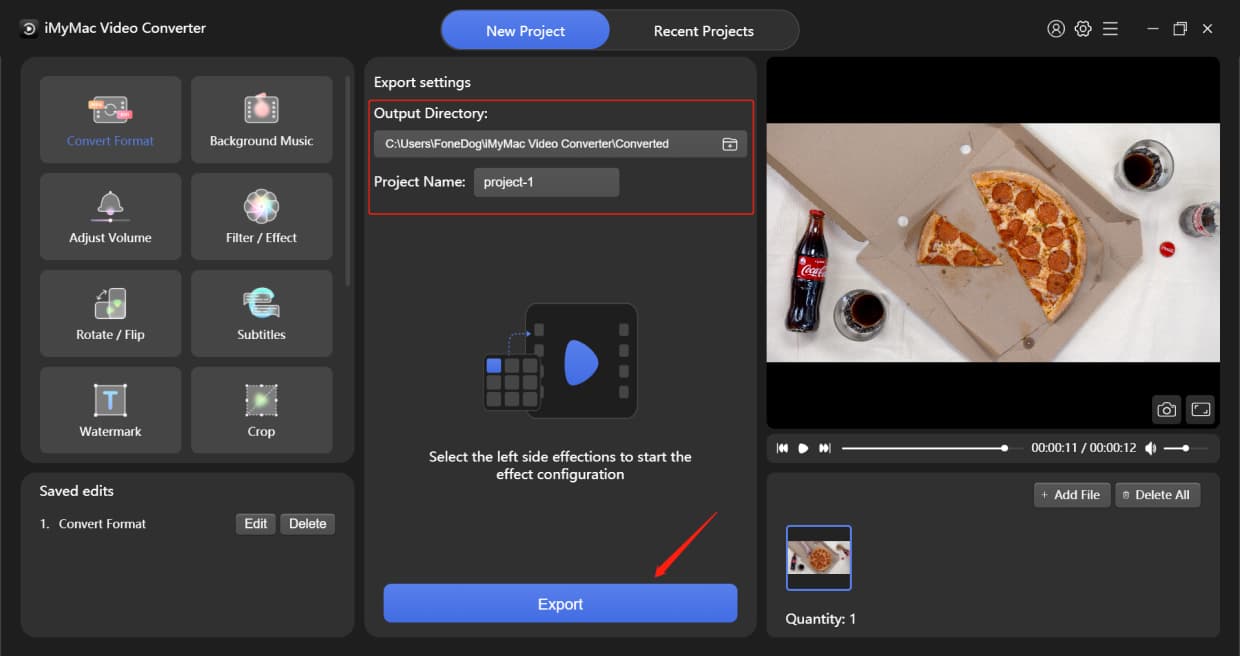
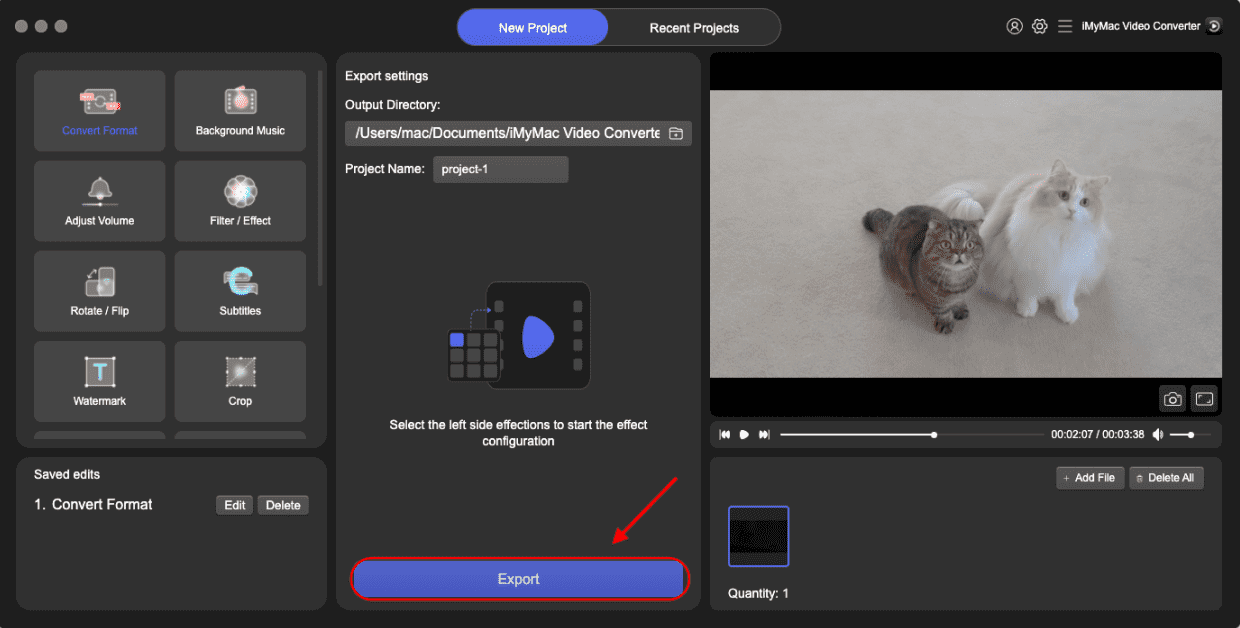
If you want to make some effects to your video or audio files, you can choose from the various effect options on the left side. The bottom left part is the Effect Setting Record. When all the settings are done, click the Export button at the bottom of the middle part to start converting.
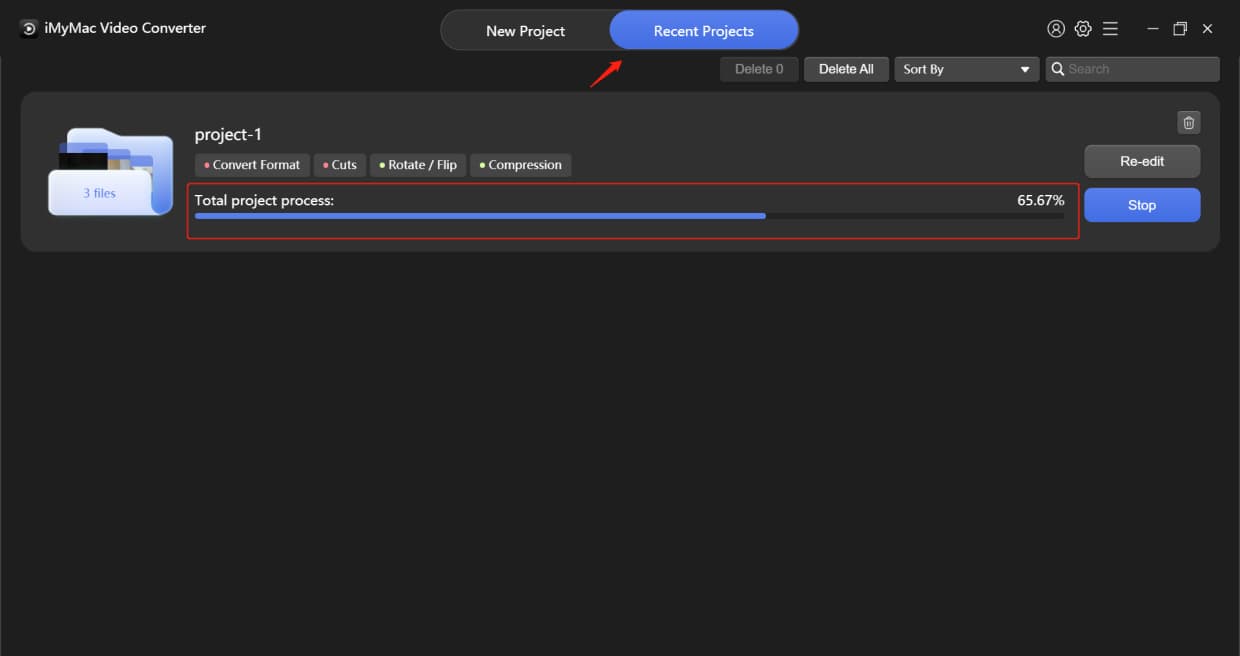
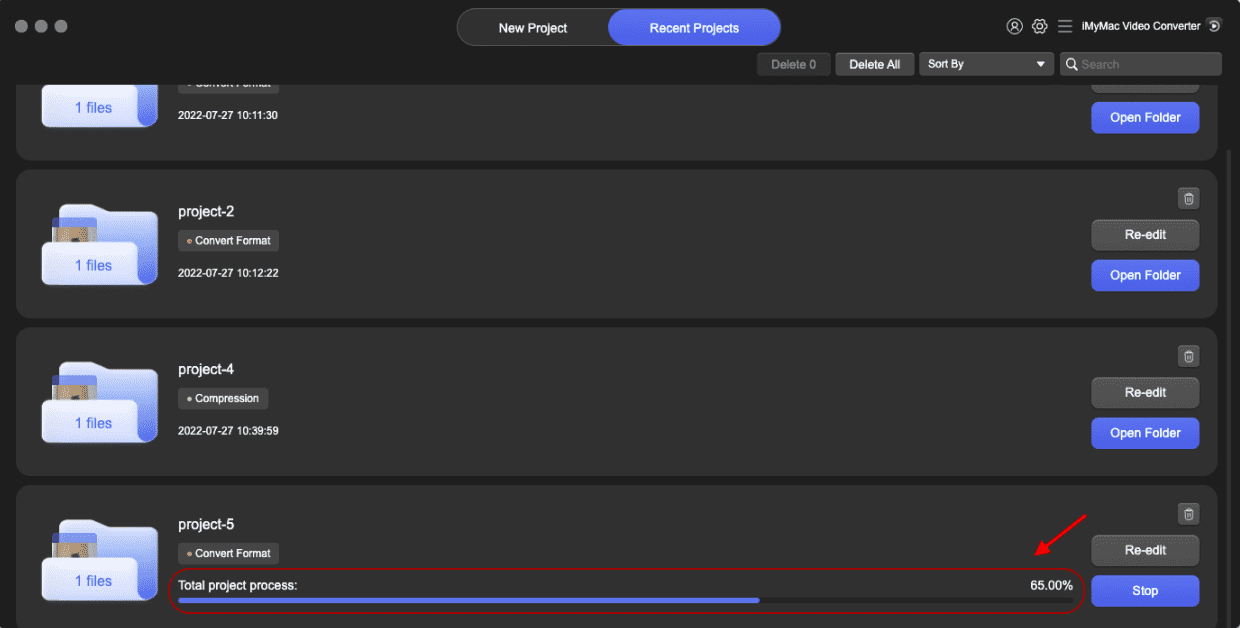
When you start converting videos or audios, all converting videos or audios will be displayed in the "Recent Projects" interface. When the converting process is done, you can sort them by Creation Time, Number of Functions, or Converted Files. You can also find the files that you want through the search bar. Then just press the Open Folder to enjoy your converted files.
If you want to make some effects to your video or audio files, you can choose from the various effect options on the left side. The bottom left part is the Effect Setting Record. When all the settings are done, click the Export button at the bottom of the middle part to start converting.
When you start converting videos or audios, all converting videos or audios will be displayed in the "Converting" interface. When the converting is done, you can find the converted videos or audios in the "Recent Projects" interface. You can sort them by Creation Time, Number of Functions, or Converted Files. You can also find the files that you want through the search bar. Then just enjoy your converted files by clicking the Open Folder.
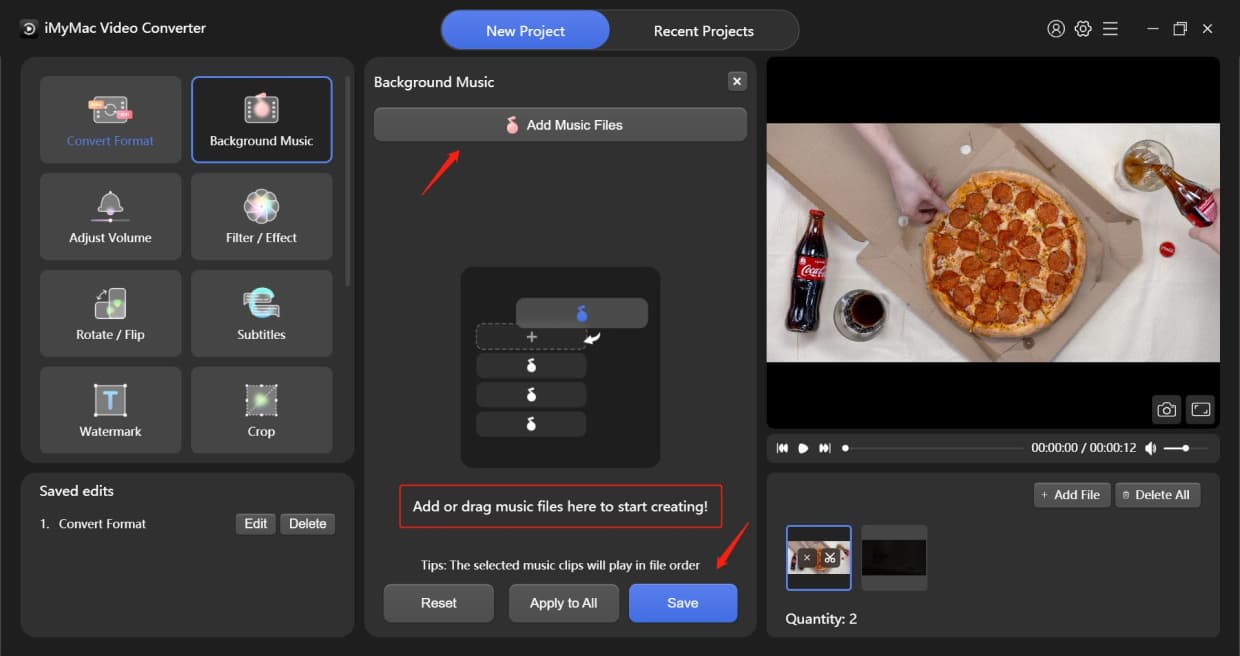
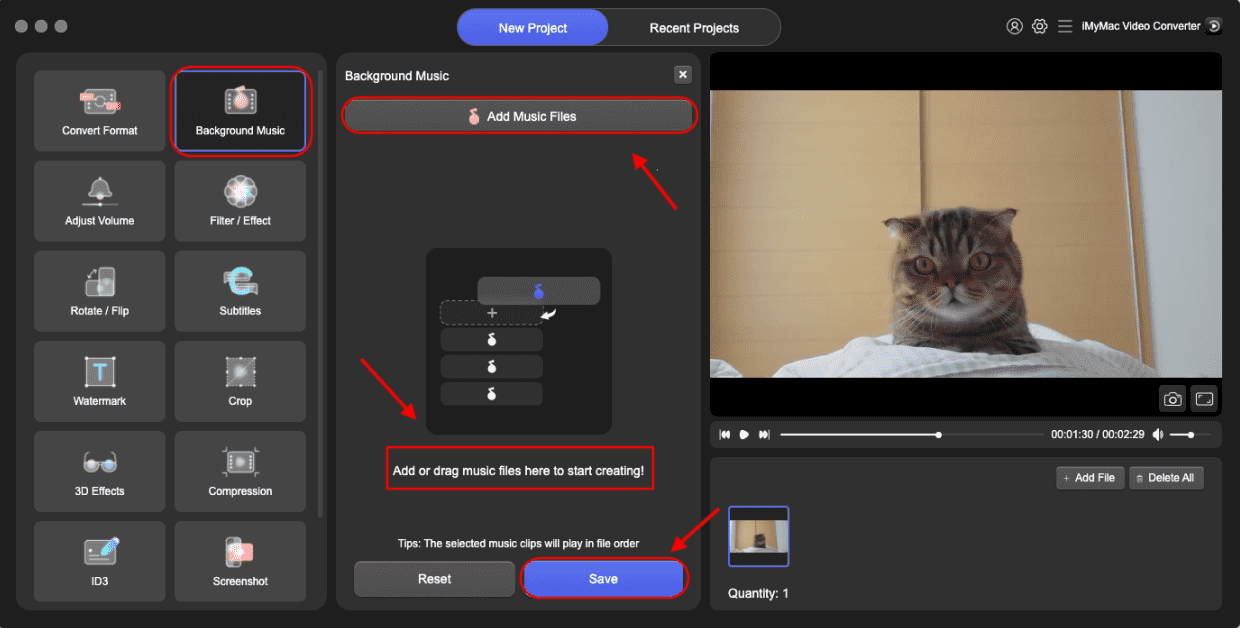
Simply click Add Music Files or drag music files to the interface to start creating. You can add multiple music clips and they will be played in order. When you finish adding music clips, press Save or Apply to All if you are satisfied.
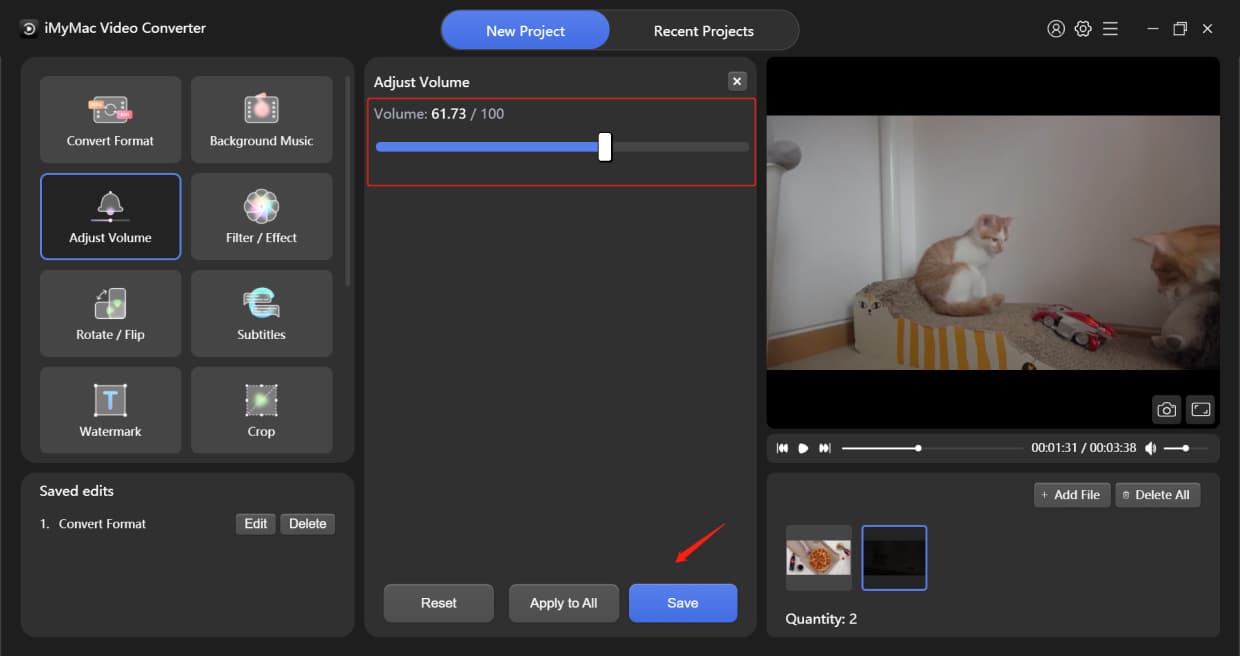
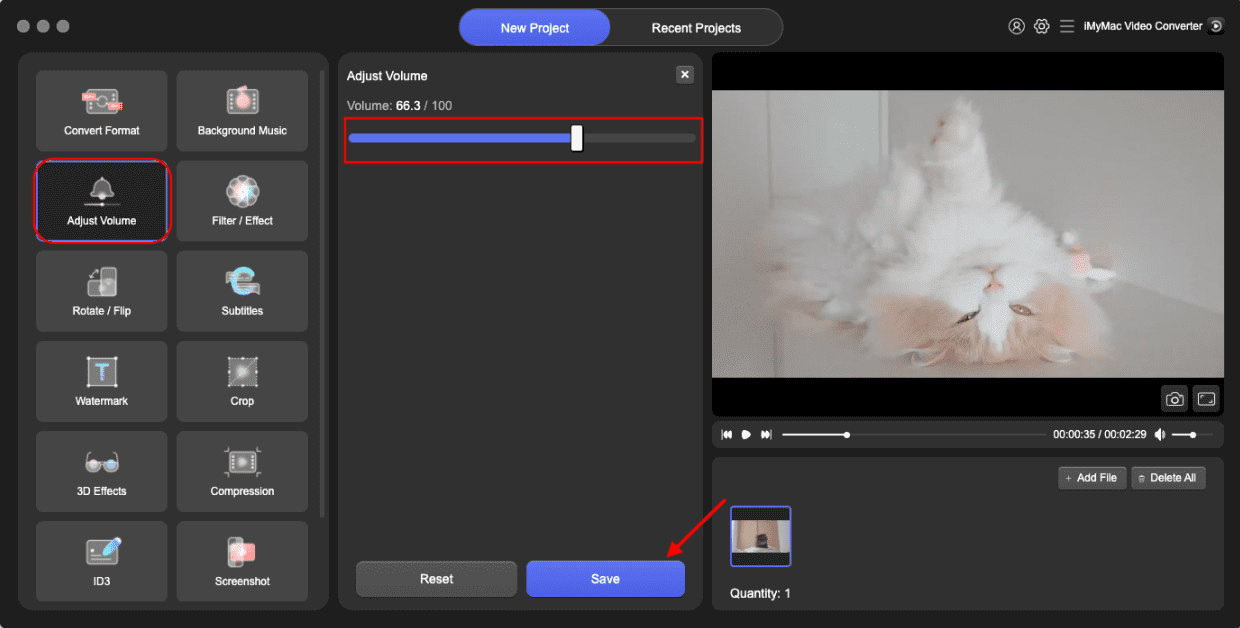
Adjust Volume by dragging or clicking the Volume Bar, then click Save.
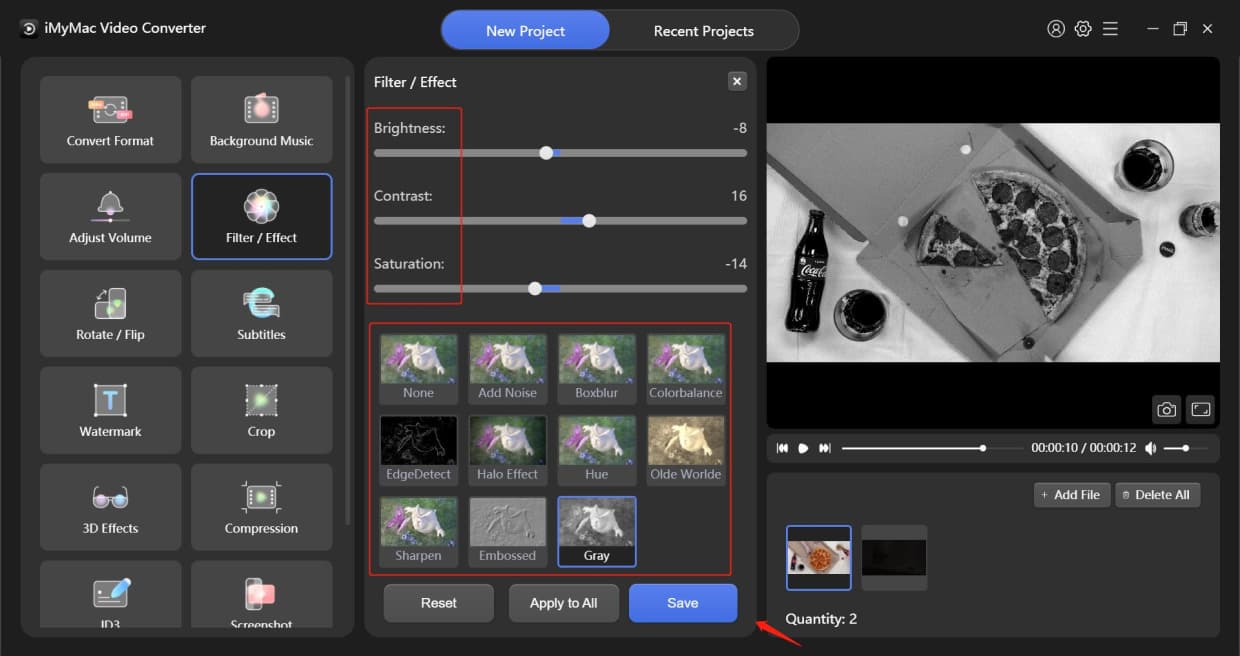
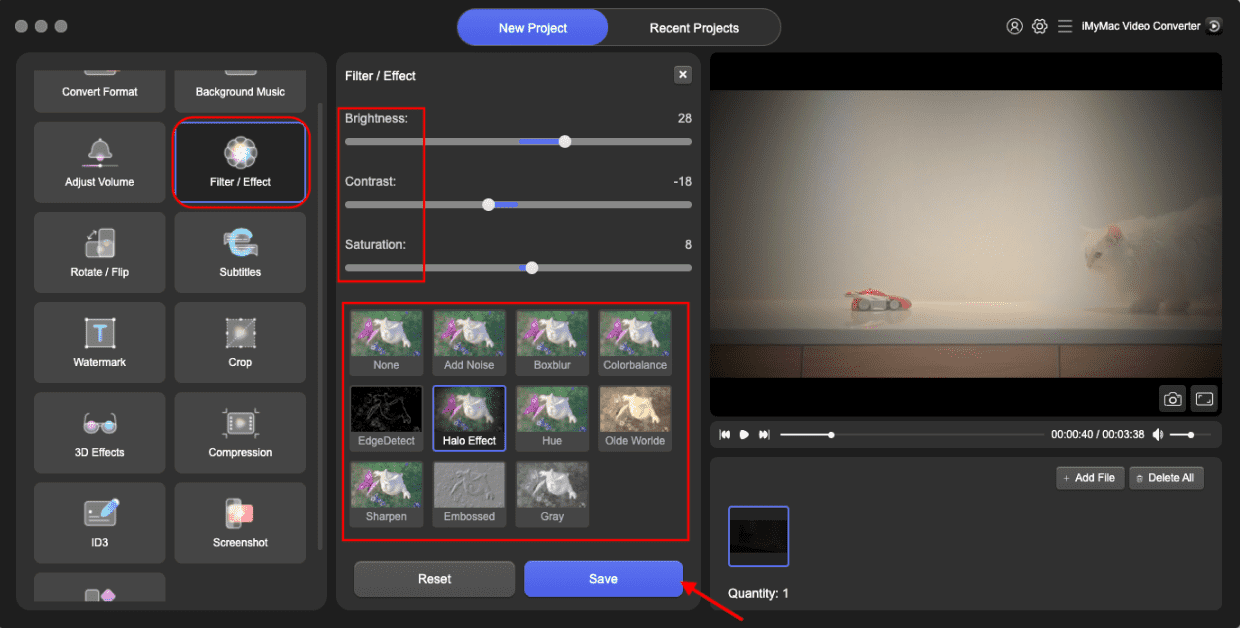
Click the below Filters options first, then drag or click the bars to adjust Brightness, Contrast, and Saturation. Then press Save.
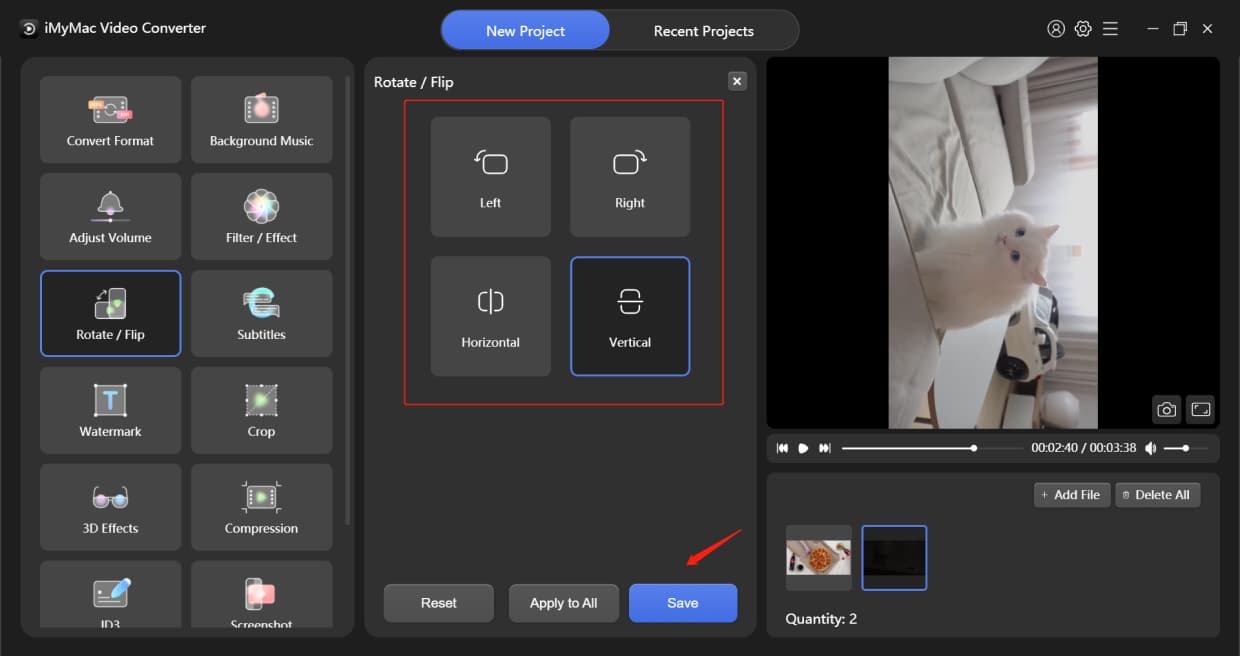
You can choose to rotate your video Left or Right, flip it horizontally or vertically. Then press Save.
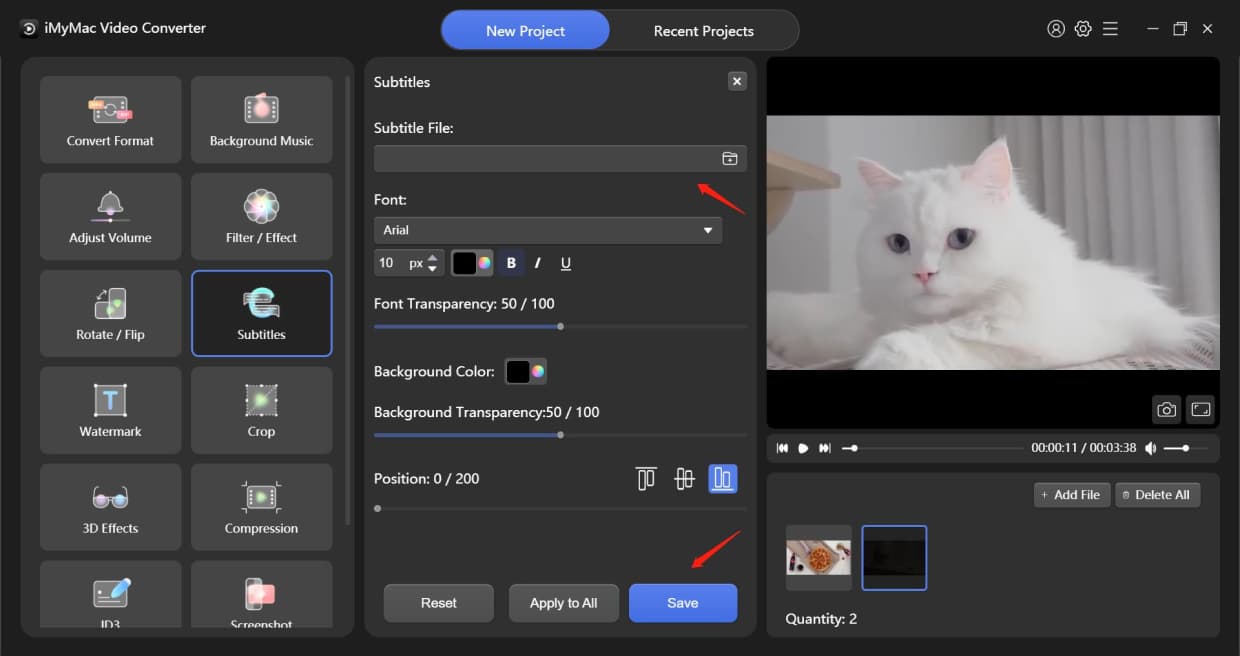
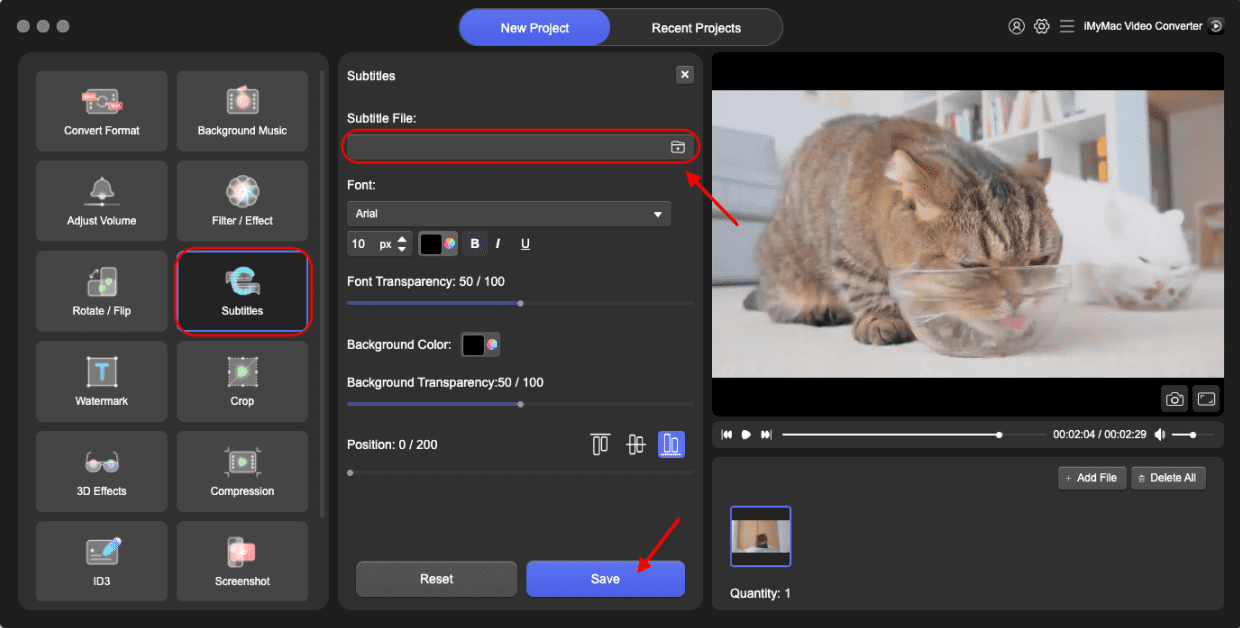
Add Subtitle File first, then you can choose the Font, including Size, Color, and so on. You can also adjust the Font and Background Transparency and subtitle Position as you want. Then press Save.
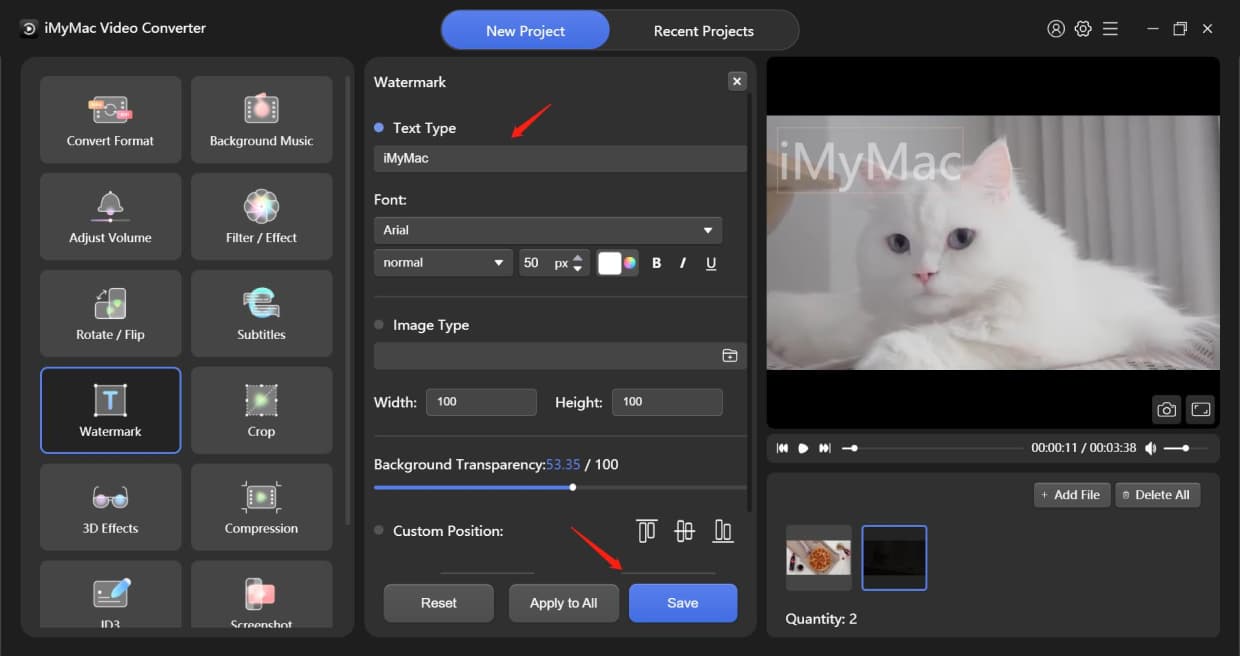
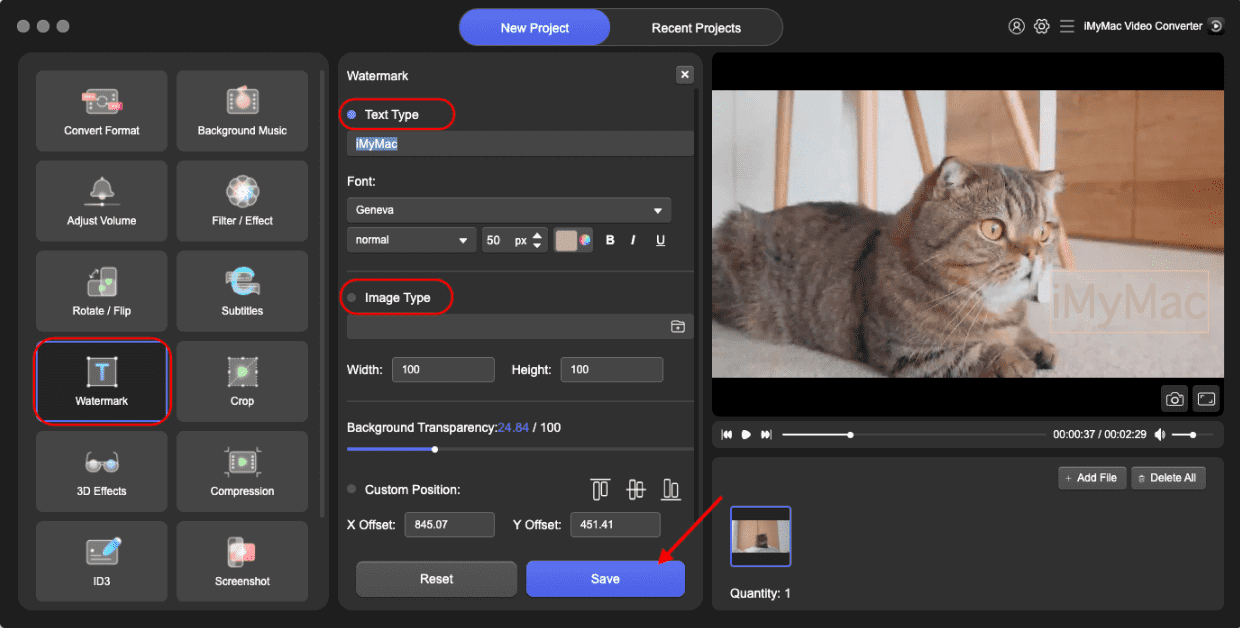
There are two types of Watermark to choose from: Text Type and Image Type. Click the little round spot beside them to choose Watermark Type.
Text Type: Tap the text you want and select the Font
Image Type: Add image file and adjust the Width, Height, and Background Transparency
You can also choose Custom Position or Tiled. If you choose Custom Position, you can select one of the position formats or choose the best position by setting the X and Y Offset. If you choose Tiled, drag the Bar to decide the spacing of your Watermark. Then press Save.
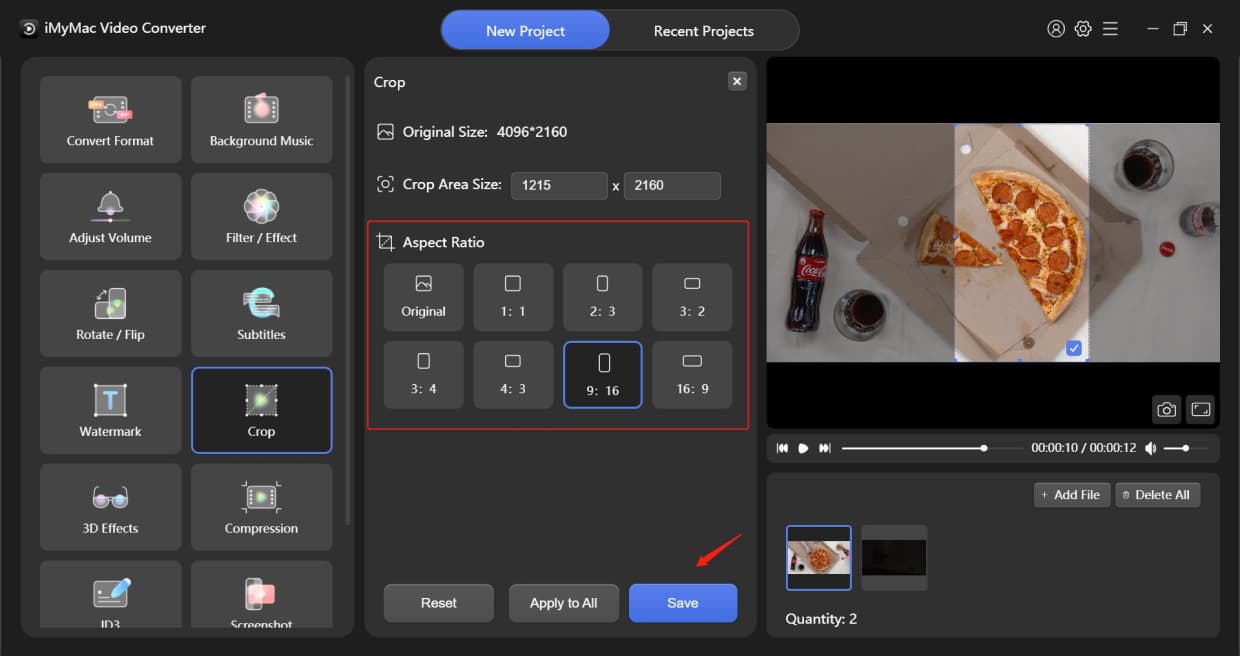
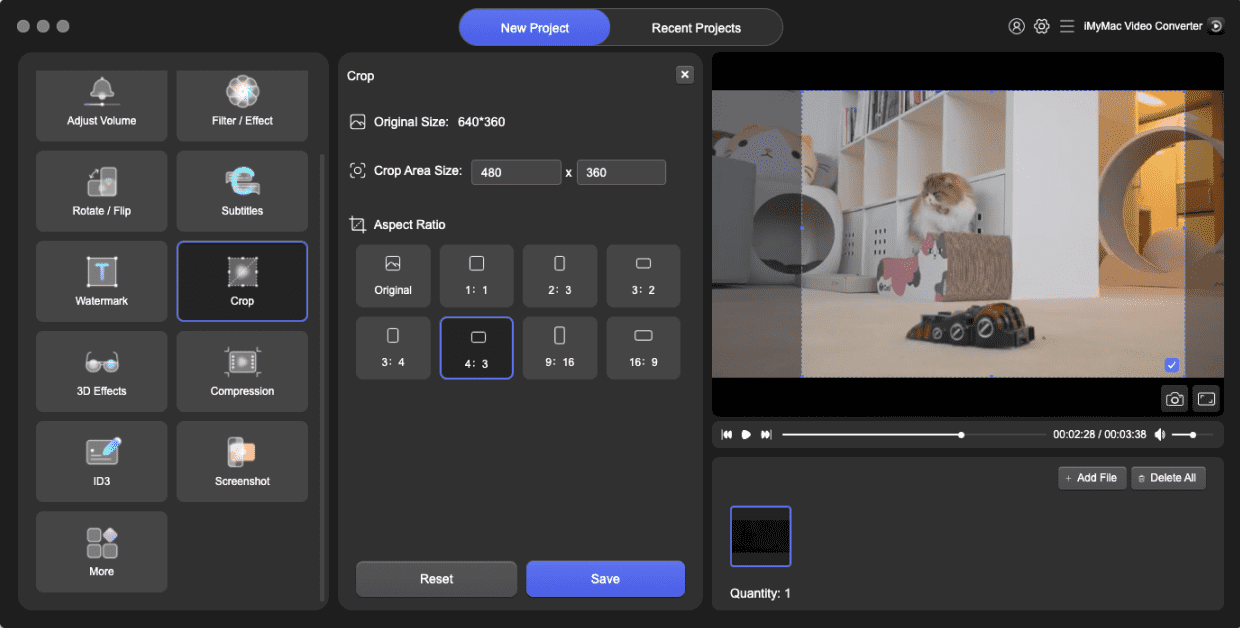
Decide Crop Area Size by changing the number or simply select an Aspect Ratio below. The position of the Crop Area can be moved by dragging. Then press Save.
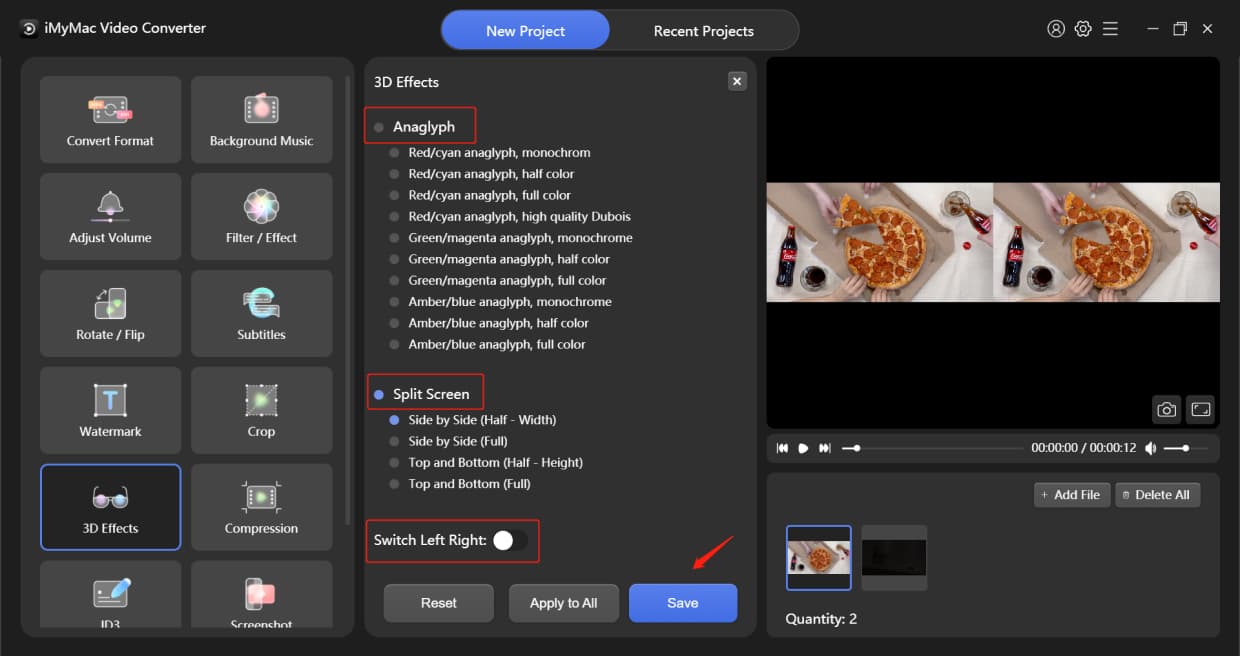
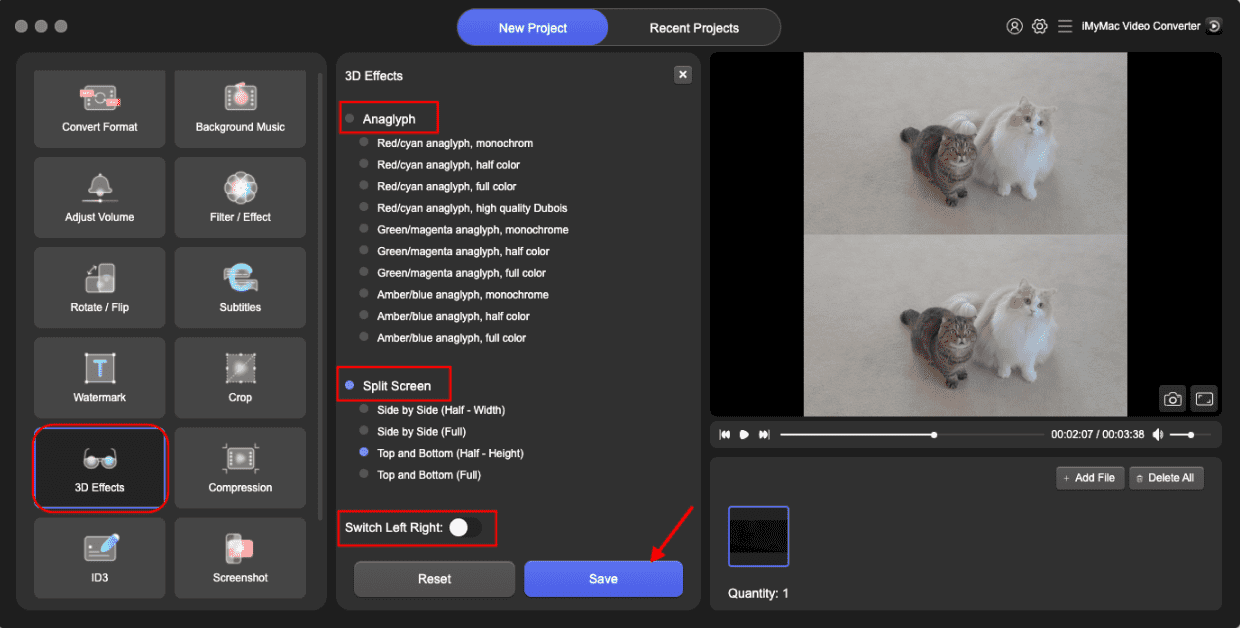
Two main types for option: Anaglyph and Split Screen. Choose one by clicking the little round spot. Then select the effect that you want below. You can turn on "Switch Left Right" to switch playback of left and right eye images of your 3D videos. Then press Save.
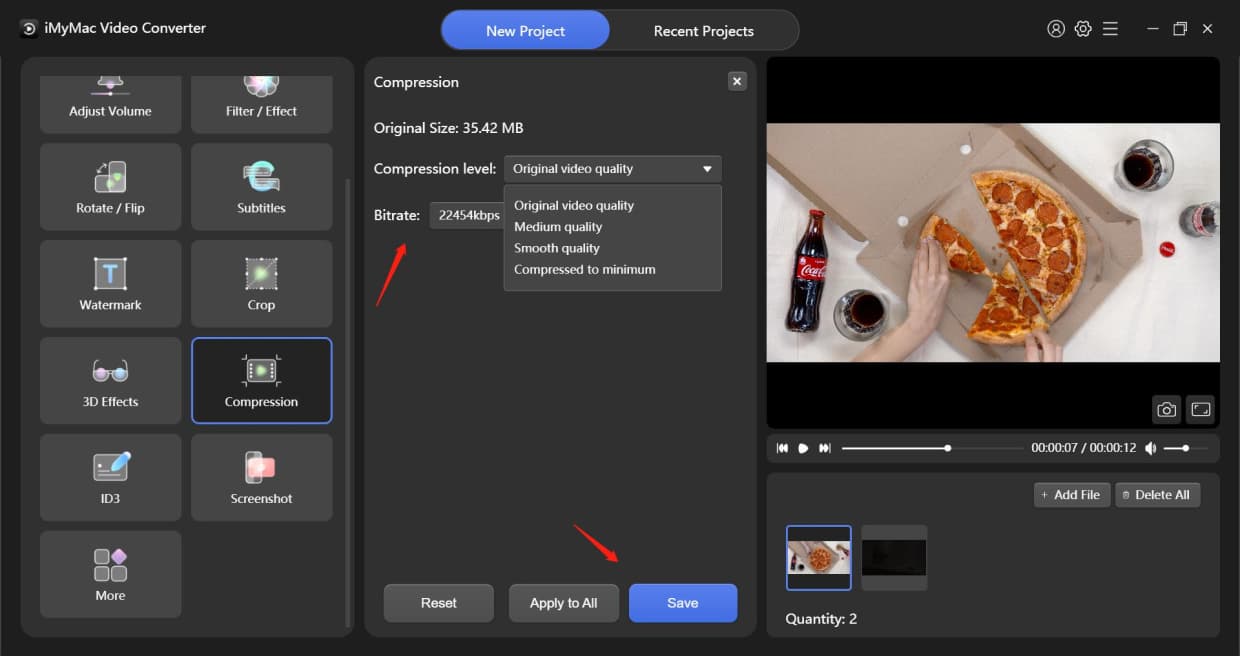
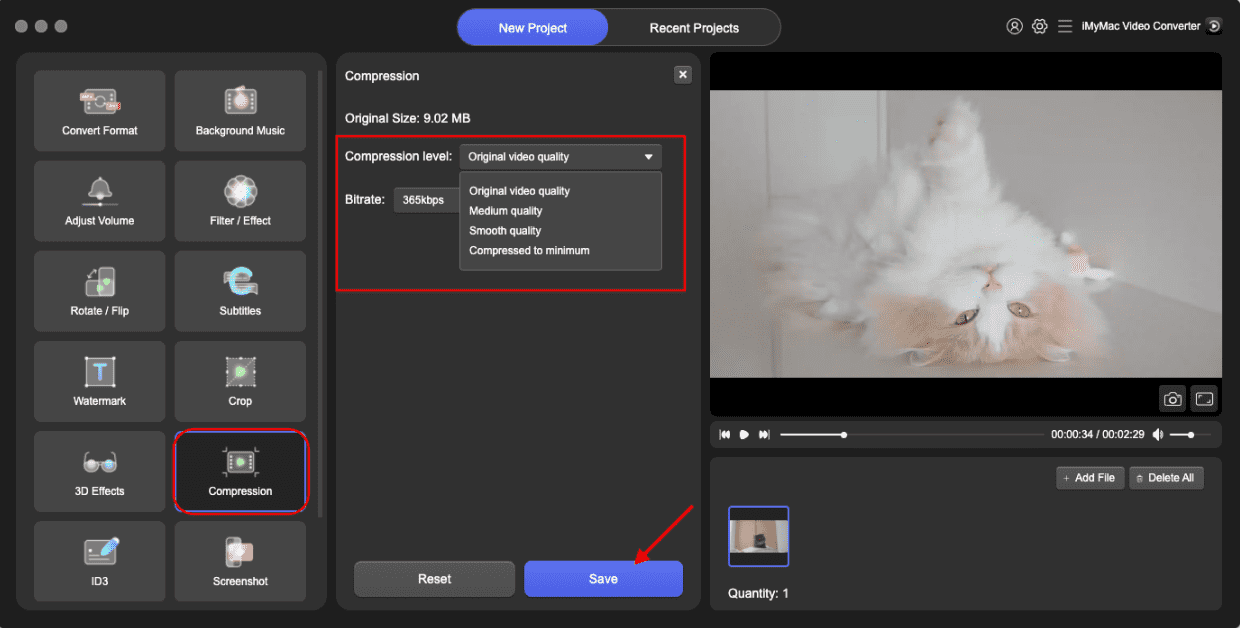
You are able to choose Compression levels (Original video quality, Medium quality, Smooth quality and Compressed to minimum) and Bitrate to compress your files. Then press Save.
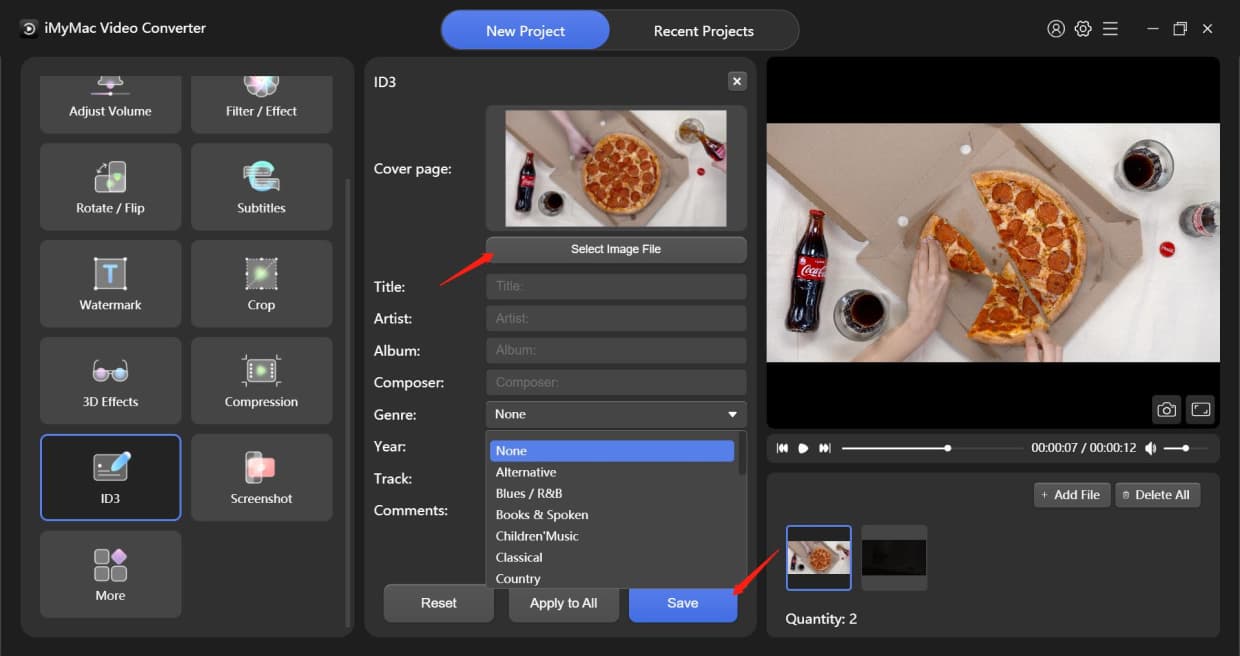
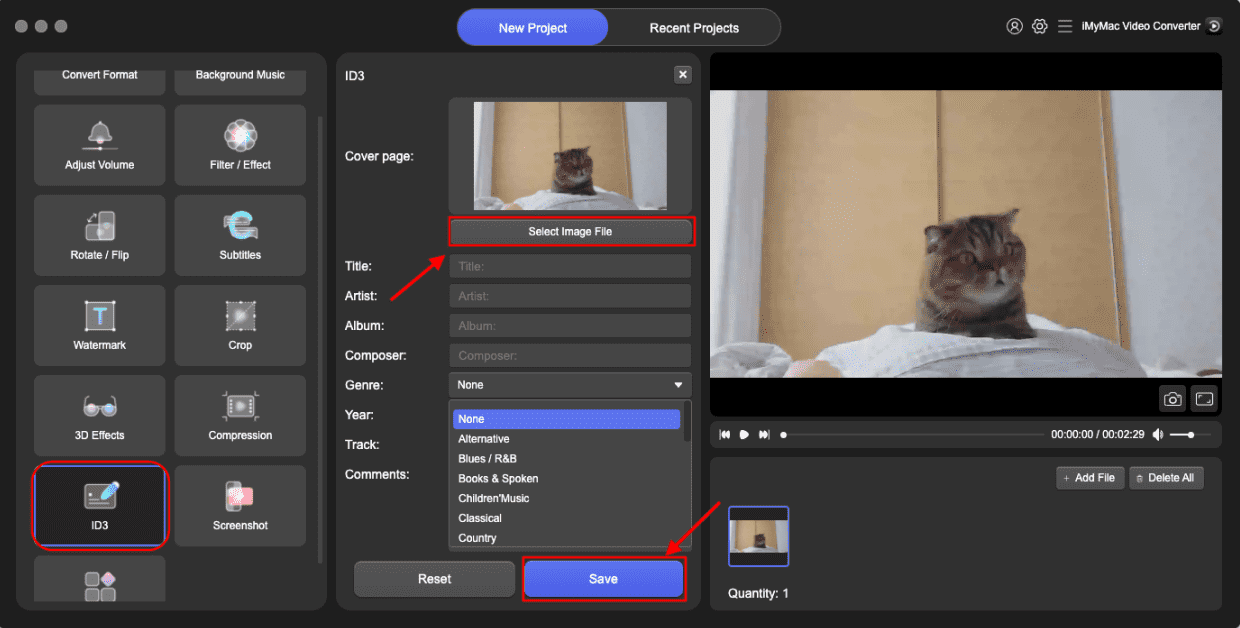
Click Select Image File to add an image as the Cover Page. Fill in the Title, Artist, Album, Composer, Year, Track, Comments and choose the Genre.
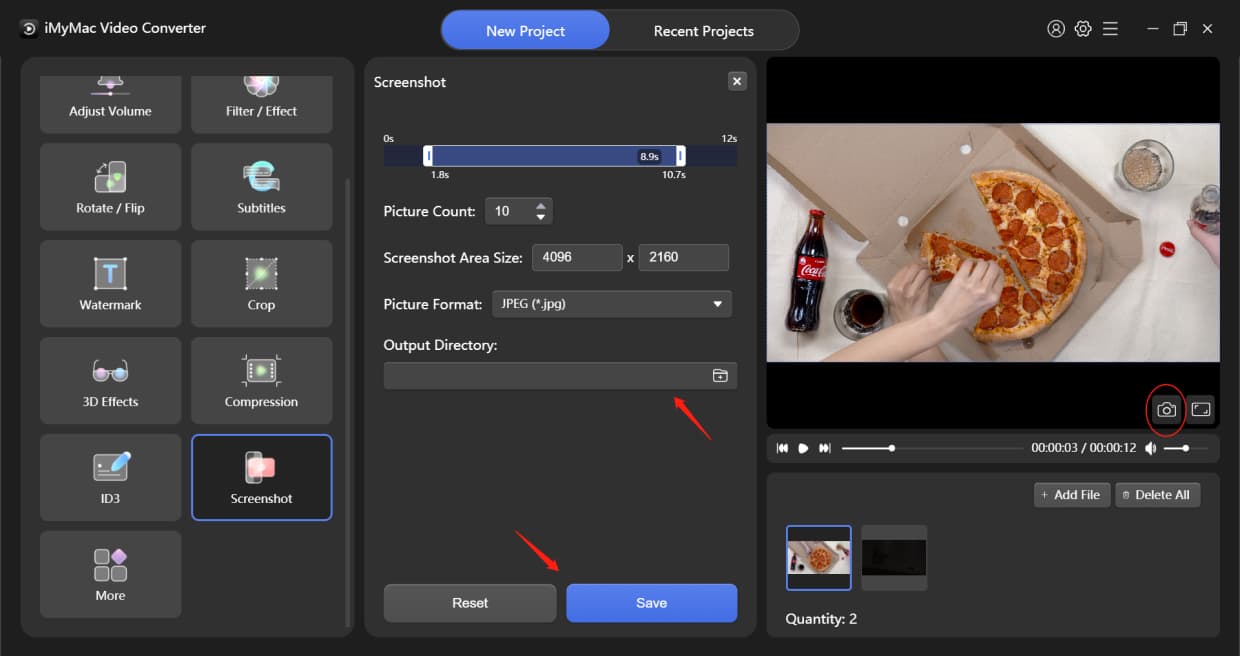
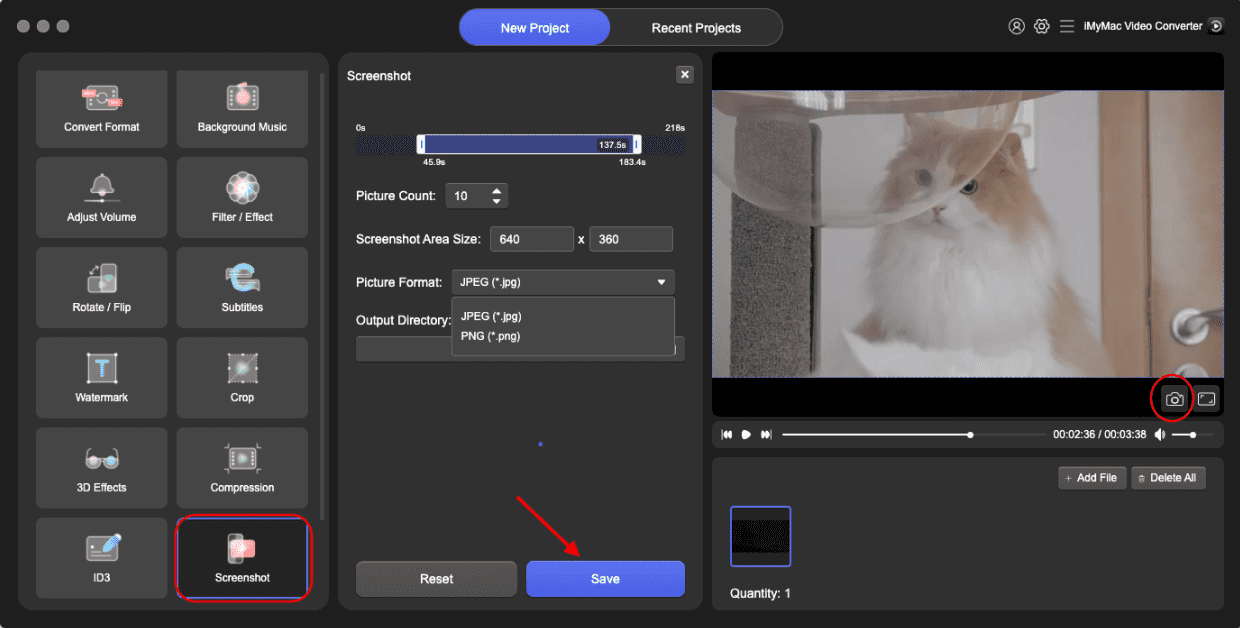
You can choose which clip (like from 2.0s to 7.0s) that you want the screenshots, then fill in a number that how many screenshots you want in the Picture Count. Then customize the Screenshot Area Size, Picture Format, and Output Directory, press Save.
Tips: There are other functions like Enhance Video Quality and Merge All Videos under the More module. You can opt for these functions if you need that.
Simply click Add Music Files or drag music files here to start creating. You can add multiple music clips and they will be played in order. When you finish adding music clips, press Save or Apply to All if you are satisfied. After that, select the Output Directory and change a Project Name to Convert your files.
Adjust Volume by dragging or clicking the Volume Bar, then click Save. After that, select the Output Directory and change a Project Name to Convert your files.
Click the below Filters options first, then drag or click the bars to adjust Brightness, Contrast, and Saturation. Press Save, then select the Output Directory and change a Project Name to Convert your files.
You can choose to rotate your video Left or Right, flip it horizontally or vertically. Press Save, then select the Output Directory and change a Project Name to Convert your files.

Add Subtitle File first, then you can choose the Font, including Size, Color, and so on. Adjust the Font and Background Transparency and subtitle Position as you want. Press Save, then select the Output Directory and change a Project Name to Convert your files.
There are two types of Watermark to choose from: Text Type and Image Type. Click the little round spot beside them to choose Watermark Type.
Text Type: Tap the text you want and select the Font
Image Type: Add image file and adjust the Width, Height, and Background Transparency
You can choose Custom Position or Tiled. If you choose Custom Position, you can select one of the position formats or choose the best position by setting the X and Y Offset. If you choose Tiled, drag the Bar to decide the spacing of your Watermark. Press Save, then select the Output Directory and change a Project Name to Convert your files.
Decide Crop Area Size by changing the number or simply select an Aspect Ratio below. The position of the Crop Area can be moved by dragging. Press Save, then select the Output Directory and change a Project Name to Convert your files.
Two main types for option: Anaglyph and Split Screen. Choose one by clicking the little round spot. Then select the effect that you want below. You can turn on "Switch Left Right" to switch playback of left and right eye images of your 3D videos. Press Save, then select the Output Directory and change a Project Name to Convert your files.
You are able to choose Compression levels (Original video quality, Medium quality, Smooth quality and Compressed to minimum) and Bitrate. Press Save, then select the Output Directory and change a Project Name to Convert your files.
Click Select Image File to add an image as the Cover Page. Fill in the Title, Artist, Album, Composer, Year, Track, Comments and choose the Genre. Press Save, then select the Output Directory and change a Project Name to Convert your files.
You can choose which clip (like from 2.0s to 7.0s) that you want the screenshots, then fill in a number that how many screenshots you want in the Picture Count. Then customize the Screenshot Area Size and Picture Format, select the Output Directory and change a Project Name to Convert your files after pressing Save.
Copyright © 2025 iMyMac. All rights reserved.
![]() uses cookies to ensure you get the best experience on our website. Click Privacy Policy to learn more.
uses cookies to ensure you get the best experience on our website. Click Privacy Policy to learn more.
You're almost done.
Subscribe to our best deals and news about iMyMac apps.
Warm Prompt
This software can only be This software can only be downloaded and used on Mac. You can enter your email address to get the download link and coupon code. If you want to buy the software, please click store.
Please enter a valid email address.
Thanks for your subscription!
Thanks for your subscription!
The download link and coupon code has been sent to your email user@email.com. You can also click the button to purchase the software directly.
Buy Now