


When it comes to Apple, the iPhone is to mobile devices as Mac is to computers. And these two types of devices are very popular, especially for Apple fans out there. These two are from the same platforms as they are both created by the same company. This means that if you want to know how to transfer videos from iPhone to Mac, it would be easy. The task is “not” a cross-platform move and would entail easy-to-do techniques and steps since they are both from Apple.
This article will provide you with the details you need on how to transfer videos from iPhone to Mac. We will be helping you learn the ropes by giving you various techniques you can use to get the job done. We will also share with you the best video editing tool for Mac computers. Let’s get to business with moving your videos from your mobile device to your computer.
Contents: Part 1. How Do I Transfer Files from iPhone to Mac?Part 2. How to Transfer Videos from iPhone to Mac without iTunesPart 3. Recommendation: Convert Your Video FilesPart 4. Conclusion
Part 1. How Do I Transfer Files from iPhone to Mac?
Before we dig into how to transfer videos from iPhone to Mac, let’s answer a question asked by many. Transferring files from your iPhone to that of your Mac computer is similar to transferring videos.
You can use a variety of tools and platforms at your disposal. AirDrop, which is similar to Bluetooth on Android, is one thing you can use. This is a great way to transfer large-sized video files and other file types because of its reliability.
Another option would be to use email messaging services, especially if the files are not that huge. Cloud storage services such as iCloud, Dropbox, and Google Drive are other options you might consider when transferring files from iPhone to Mac for free.
The option you will consider will depend on the number of files you are sending to your Mac computer. It will also depend on the size of the files. Of course, convenience also plays a role in choosing the right one for your needs.

Part 2. How to Transfer Videos from iPhone to Mac without iTunes
You might want to know what is the easiest way to transfer videos from iPhone to computer. The techniques below are easier to implement because it is a move between the same platforms created by the same company. Let’s get started.
Method 01. How to Transfer Videos from iPhone to Mac with Cable?
How do I transfer video from iPhone to computer for free? This will need the lightning or USB cable that comes with your iPhone. Of course, you have to use this cable to make the connection and start transferring videos. Here are the steps you should follow:
- Connect your iPhone to your Mac computer using the USB cable.
- Launch the Photos app within your computer if it doesn’t open automatically.
- On the sidebar of the Photos app (the left side), click the iPhone device you have just connected.
- Click the option that says “Import All New Videos” or you can also select the specific videos you want to add to your Mac and then click “Import Selected”.
- Wait for the transferring process to complete. By now, you have moved your videos from iPhone to Mac for free using a USB cable.
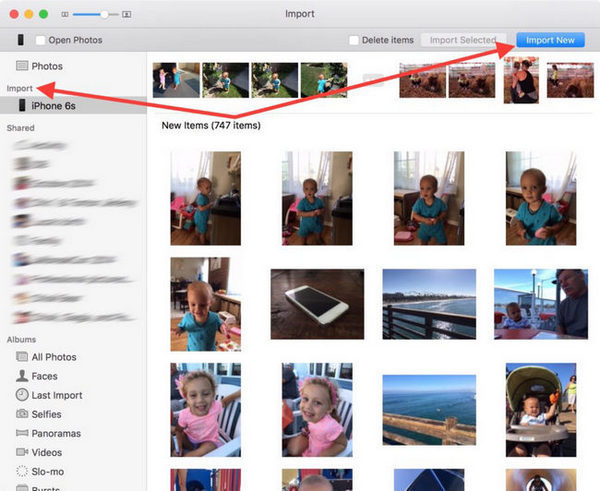
If you don’t need the videos after transferring them to your Mac, you might want to turn on the option labeled “Delete Item”. In this way, it won’t be kept in your iPhone and you can free up more space on the said device. The Photos App is free and easy-to-use. Thus, it is a popular option among users and we totally agree with the craze!
Method 02. How To Transfer Videos From iPhone To Mac Wirelessly Using AirDrop
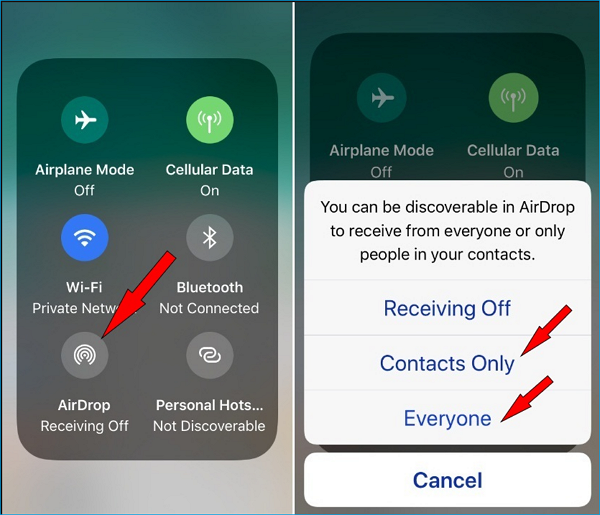
Can you AirDrop videos from iPhone to Mac? AirDrop is a file-sharing technology developed by Apple in order to move files between their devices. It can be used to transfer files from Mac to Mac, from iOS to iOS, and from iOS to Mac. It is important to note that if you want to know how to sync videos from iPhone to Mac with airdrop, the iOS device has to be open or awake during the entire process.
In addition, Bluetooth and Wi-Fi must be turned on. The two devices must be in the same Wi-Fi network for the transfer to happen. How do I airdrop from iPhone to Mac? Steps to use it are below:
- Activate AirDrop on your iPhone device. Choose Everyone right after connecting two of your devices to the same network.
- Go to your Mac device and run Finder. Locate AirDrop and activate Everyone. This can be done within the Discovery Settings.
- Once AirDrop is connected, choose the videos from your iPhone and move them to your Mac computer. Do this by pressing the Share icon.
It is recommended that you choose the option “Everyone” as you can turn off this feature later. Again, make sure the iOS device is turned on or awake during the process. This is to allow AirDrop to actually be activated. Then, simply share the video file. You will notice that Mac will receive the file instantly or after a few minutes depending on the size and number of the files.
It is essential to note that a weak Internet connection would result in a long time to transfer files. However, if you do have a blazing fast connection, the transfer rate would be fast as well. Also some file types aren’t great for AirDrop. Thus, you can opt for other methods we will outline here. Check out the next one to see how to transfer videos from your iPhone to Mac without Airdrop.
Method 03. How to Transfer Videos from iPhone to Mac Using Email?
How to transfer videos from iPhone to Mac without cable? If you’re sending one or two video files with small file sizes, then using your email would be a great option. You can use the built-in Email app within your iOS device or you can use Gmail to transmit videos from iPhone to Mac for free.
Of course, to do this, you simply create an email, attach your video files, and send them to yourself. Then, you open your Mac computer and launch the browser to visit the email service provider. You go to the email you sent and voila! You download the video attachments. The downside to this is there are limits to the number of files you can attach or the size of the entire list of attachments you will make. This will depend on your email service provider so you still have to check it out for yourself.
Method 04. How to Transfer Videos from iPhone to Mac Using Dropbox
Another method you can use is Dropbox. This cloud storage platform is one of the most popular in its industry. It gives you a free storage space of about 2GB. Which “may be enough” for your video files.
Dropbox places security as a top priority so you won’t have to worry about your video files being “leaked”. Plus, you can separate your videos into folders if you wish, thus keeping it organized. Dropbox is available for both Windows and macOS computers and it can be used on Android and iOS devices as well.
Here are the steps to use it to move videos from iPhone to Mac:
- Use your iPhone and download the Dropbox app within it. Sign in to your Dropbox account or you can create a new account using the options provided by the app.
- Simply upload your video files to the Dropbox account you have signed into. Wait until the upload process is complete.
- Now, use your macOS computer and its browser. Log into the same Dropbox account you used to upload files earlier.
- Locate the video files on your browser within the same Dropbox account. Download the video files you have uploaded to your Mac computer.

That’s it! If you have video files that are larger than 2GB in size, you can opt for Google Drive (see next section). Or, you can purchase their plans at $9.99 per month for 2TB worth of storage space.
The price for this “Plus” plan is $9.99 per month if you pay for it on an annual basis. On the other hand, if you wish for a file recovery system within your Dropbox account, you can opt for the Professional Package which costs $16.58 per month if billed annually.
Method 05. How to Transfer Videos from iPhone to Mac Using Google Drive
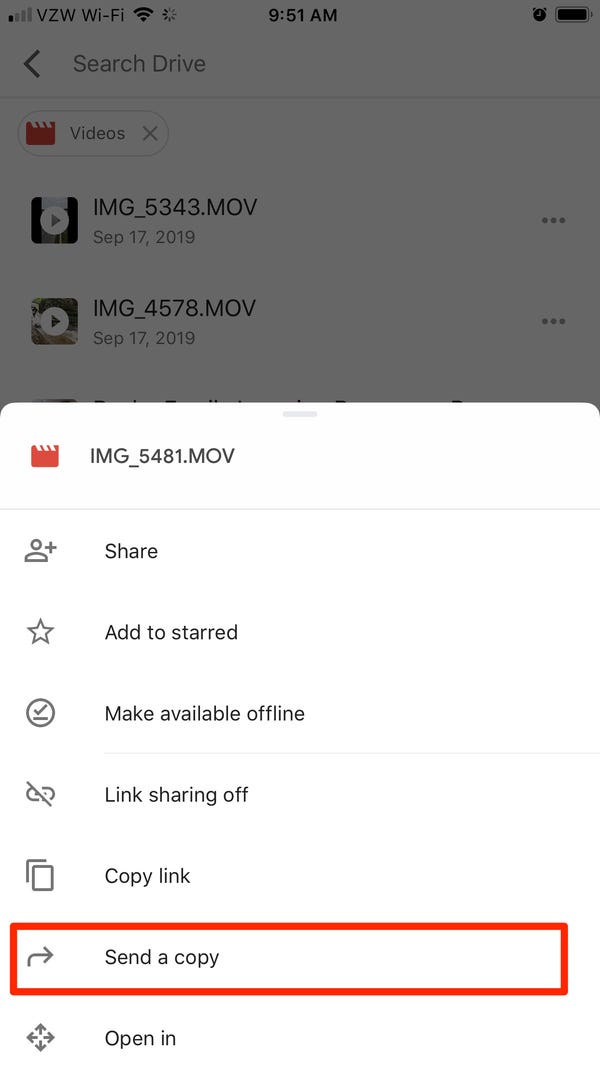
How can I get a large video off my iPhone? If your video files are larger than 2GB, then instead of using Dropbox, you can use Google Drive. It provides a free storage space of 15GB, way larger than Dropbox. Google Drive can be used on iOS, Android, macOS, and Windows computers. It helps you transfer videos from iPhone to computer without losing quality.
Here’s how to use it to copy videos from iPhone to Mac:
- Download and install the Google Drive application on your iPhone. Log into your Google account or create a new one if you don’t have an existing one.
- Upload your video files from the iPhone to the Google Drive platform. You can also organize it into folders if you wish. Renaming the files is possible as well.
- Go to your Mac computer and then visit drive.google.com using your browser.
- Log into the same account you used earlier.
- Then, simply download the video files you have uploaded to your Mac computer.
Easy, peasy, right! Google Drive is a great option if you want fast upload and download speeds. Plus, it’s a great way to back up your files if you want. If you wish to use Google Drive for other important data, you can simply delete the video files you have uploaded to make room for other file types.
If you have more than 15GB worth of video files, then AirDrop may be a good choice. Or, if you want to get more storage space for Google Drive, you can purchase individual plans of 100GB, 200GB, and 2TB. These plans can be paid on a monthly or annual basis.
Method 06. How to Transfer Videos from iPhone to Mac Using iCloud
When iCloud Photo Library is turned on within your iPhone, all your images and videos (from the iPhone) will be synced to iCloud. Thus, you can access these media files from other Apple devices. This works well if you have a stable internet connection. Plus, it is necessary to use the same Apple ID on every device you have.
If you want to know how to transfer videos from your iPhone to your Mac device, one option would be to use iCloud Photo Library. However, you need to activate the said feature on the two devices. Here’s how to do it step by step:
- Open your Mac device and go to System Preferences.
- Go to iCloud. Check the box labeled iCloud Photo Library.
- Now, go to your iPhone and visit Settings.
- Go to your Profile and then go to iCloud.
- Visit Photos and turn the feature that says iCloud Photo Library.
Once you activate the iCloud Photo Library feature on iPhone and Mac, it will begin syncing images and videos. The process might take from a few minutes to a few hours depending on the amount of data being synced. The best thing about it is you can monitor the sync progress through iCloud’s interface. Now, you can access the videos on your Mac by using the new Photos App.
Method 07. How to Transfer Videos from iPhone to Mac Using SHAREit
SHAREit is a popular file transfer application among Android users because of its blazing, fast transfer speeds. The only downside to using this tool is it sends a lot of notifications and it has a lot of nasty ads. However, if you’re going for the process of transferring videos from iPhone to Mac, this can still be a great choice.
Here are the steps on how to use it between these two Apple devices:
- Use your iPhone and download the SHAREit app from the App Store. Download the SHAREit app on your Mac computer as well.
- Connect your Mac computer and your iPhone to the same Wi-Fi network. This is a must. Transfers won’t happen if they aren’t connected to the same Wi-Fi network.
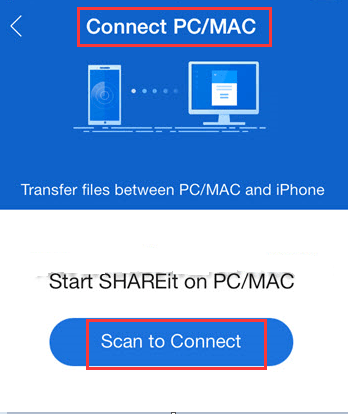
- Now, launch the SHAREit app on your macOS computer. A QR code will be shown within the main interface of the app.
- Now, use your iPhone and launch SHAREit on it. Press the “Menu” located at the upper left part of the interface. Select the option to “Connect To PC/ Mac”.
- Press the option “Scan To Connect”. And then, point the camera of the iPhone on the QR code shown on the computer.
- You can simply select the video files you wish to send to your macOS computer and then send them.
- The files will be instantly downloaded on the macOS computer at the end.
Method 08. How to Transfer Videos from iPhone to Mac Using iMessage
iMessage is an application created for iOS users allowing them to communicate with each other. It is not available on multiple platforms although it has some pretty cool capabilities. Aside from sending text messages from one Apple device (or iOS user) to another, it can be used to send videos as well. This feature is popular among many Apple fans out there.
Here’s a step-by-step guide on how to import videos from iPhone to Mac using iMessage:
- On your Mac device launch Messages.
- Visit Performances and then open Accounts.
- Enter the login details which are comprised of your Apple ID and the corresponding password.
- Once logged in, check the box labeled “Enable This Account”.
- Simply send a video using your iPhone to your Mac. You can send up to five videos using this method.
- Open your Mac device and then save the video you got in Messages.
Part 3. Recommendation: Convert Your Video Files
How do I make a video smaller to email on Mac? If you have really large video files, you can convert them to a video with a lower resolution so you can send them easily from your iPhone to your Mac. For this, you need to use iMyMac Video Converter.
It allows you to convert audio and video files from one format to the next such as MOV to MP4. And multiple file types are supported so you don’t have to worry about video or audio playback on other devices. This powerful tool has other functions as well including the ability to edit your personal videos and play them on your Mac computer.
It supports different resolutions for conversion including 4K UHD, 1080p FHD, 720p HD, and 480p SD. Plus, you can ensure that converted videos are supported by different devices including Android, iOS, macOS, and Windows gadgets.
Part 4. Conclusion
So, we’ve given you the top methods on how to transfer videos from iPhone to Mac. To be exact, six different methods were given with the steps on how to use these tools and platforms. So, you won’t have to worry about which tool to use.
If you’re worried about the size of your video files, you can use iMyMac Video Converter to convert these videos to lower resolutions. Or, you can convert them to higher resolutions, if you prefer. The tool converts audio and video files with no quality loss. Plus, if you’re using the video for a birthday celebration, for instance, you can use iMyMac Video Converter to edit the videos to your liking. The sky is the limit when it comes to this tool. It is truly a media powerhouse!
