


If you’re switching from Windows, you may be wondering what the Windows Explorer for Macs is. Is there an equivalent of Windows Explorer for that of macOS computers? Fortunately, there is an alternative to it and we call it the Finder on your macOS computer.
If you want to know how to use Finder, the Windows Explorer for Macs, then you are in the right place. We will talk about how to use the macOS utility on your computer. The different methods on manipulating the utility to achieve your goals will be given here.
Contents: Part 1. How to Launch and Close Finder on MacPart 2. Navigating Using Finder On MacPart 3. Manipulating Files On FinderPart 4. The Best Way To Optimize Mac Computers And Finder Windows
Part 1. How to Launch and Close Finder on Mac
Access Finder on Mac
To open the Finder within your macOS computer, you must click the extreme left section of the Dock. It’s typically, the first icon you will see within the Desktop on your dock. The position of its icon cannot be transferred to another location.
In order to make sure Finder is activated without having to press its icon, you should minimize every application that’s open. After that, left-click the mouse button on your computer’s Desktop.
If the option for Finder can be found within the top bar (system menu) beside the logo of Apple, this means that your Finder window is active at the moment. Once a Finder window is active, you can press SHIFT + CMD + O to launch the folder for Documents. On the other hand, you can press SHFT + CMD + H to launch the folder for Home.
Quit Finder with Terminal
Within the menu, there’s no choice for you to “Quit” Finder. That’s because Finder is managing the Desktop of your computer, that’s why at least one Finder is launched or running in the background. When you have multiple Finder windows launched, you can close these other instances of finder by pressing the RED-colored icon in the upper left part of the particular Finder window.
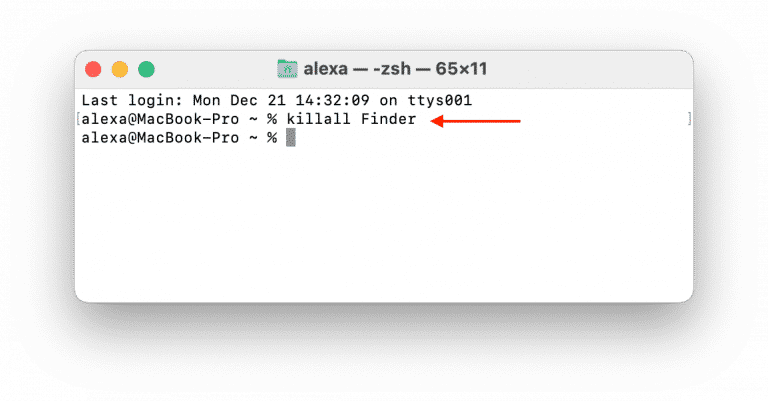
Restarting a Finder window by killing all instances of it in the Terminal is possible as well. To do that, follow the steps below:
1. Visit the Applications folder on your computer.
2. Then, click Utilities.
3. Click the Terminal to open it.
4. Within the Terminal window, type the command “killall Finder”.
5. After that, press the Return key. This will close all Finder instances on your computer and start a new refreshed one.
Part 2. Navigating Using Finder On Mac
Finder is made up of four different components, Sidebar, Toolbar, Main Window, Preview Pane. The last one, the Preview Pane is by default, hidden. But, you can activate it through the computer. We will talk about the different parts of the Finder here.
The Finder’s Sidebar
The sidebar consists of various elements such as Tags, Locations, iCloud, and Favorites. You can also customize the Sidebar of your Finder window, to do that, do the following steps below:
1. Click on Finder within the Dock to open it.
2. From the menu of Finder, click Preferences. After that, the window for Finder Preferences will show up.
3. Check or uncheck the boxes for elements you want to be seen (and not seen) within the Finder’s Sidebar. Save the preferences afterwards.
If you don’t want to view the Sidebar on your Finder window, you can also shot it or hide it using the View menu within your Finder window. An alternative will be to press the keys OPTION + CMD + S on your keyboard while Finder is open.
Finder’s Main Window
The main window of Finder can be used to navigate and move among folders. In addition, you can use it to perform a lot of tasks or activities on files or folders. The items can appear as icons and as columns, among others. You can change the look of the files or folders on your main windows through the toolbar. You can select the different ways it can be displayed: as icons, as columns, as a gallery view, and as a list.
Navigating Through Folders In Finder
You can open a particular folder within Mac by double-clicking on it using your mouse. You can also select the folder with a single click of a mouse and then press the CMD + DOWN ARROW buttons on your keyboard to open them.
If you want to go one level above the folder you’re currently in, press the keys CMD + UP ARROW on your keyboard.
It is always easy to go to a particular folder if you know its directory. To do to that, follow the steps below:
1. Open a Finder window within your computer.
2. After that, click Go menu and then choose Go To Folder. The Go To Folder window will appear.
3. Within its search box, type the directory of the folder you want to visit.
4. Then, click the Go button. The folder you have placed in the search box will now open in a new window.
Making New Folders Within Finder
The first thing you should do when you want to make a folder is to go to the parent folder you want to place the “new folder” on.
1. Once you are in the parent folder, right-click on a free space within it.
2. After that, choose the option for New Folder. Typically, this can be seen in the upper part of the menu that will pop up.
3. Now a new folder called “Untitled Folder” will show up. You can rename this folder if you want to.
Showing A Location’s Full Path Within Finder
Two different methods can be implemented to show the full location of a path or directory within Finder:
1. Press and hold your press on the CMD Key. After that, left-click OR right-click the Finder window’s Title Bar.
2. Within the View menu of Finder, click Show Path Bar. When this is activated, the directory’s full path will be shown in the lower portion of the interface.
Part 3. Manipulating Files On Finder
Select More Than One File Or Folder
You can also select more than one file on your computer. Here are the steps on how to do that:
1. Click the first file or folder you want to select.
2. After that, press the SHFT key and hold your press on this key.
3. Click, using the left-mouse button, the last file you wish to select within the range.
What if you want to select multiple files that are not near each other? Here are the steps you must follow:
1. Hold the command key within your keyboard.
2. Click each file or folder you want to select.
3. After that, release your press on the CMD key.
Copying And Pasting Files
Here are the steps to copy and paste the files on your computer:
1. First, select the files or folders you want to copy by clicking on them. Or, if you want to select multiple files or folders, hold the COMMAND key and then select all that you want. Then, release your press on the CMD key.
2. After that, press the COMMAND + C buttons on your keyboard.
3. Locate the destination folder where you want to paste the files or folders.
4. After that, press the keys COMMAND + V on your keyboard.
Moving Files Or Folders
Within your Finder window, there is no command that will allow you to “cut” files or folders like that in Windows (typically, the CTRL + X button on Windows). As such, you must implement the copy option we have stated in the earlier portions of this article.
Once that is done, you can delete the files or folders you have selected or copied to another folder. To do that, select the file or folder within Finder. After that, press the CMD + DELETE keys on your keyboard to move it towards the Trash. If you want to permanently delete the files or folders and bypass Trash, press the keys OPT + CMD + DEL.
Renaming Files
You can also rename files and folders within Finder. To do that, click the file to select it and press the key called Enter. Or, you can right-click the particular file and select the Rename option within the menu that will pop up. Type in a new name for the file or folder and then press the Enter key once again.
Showing Hidden Files Within Finder
In order to view the hidden files within your Finder window, press the keys CMD + SHFT + DOT. The dot refers to the actual “period” key [.], the one we place at the end of the sentences. In order to hide the hidden system files again, you can use an identical keyboard shortcut.
Opening Files Within Finder
There are three different ways to open a file within Finder. Check them out below:
1. Double-clicking the file will open it.
2. Selecting the file with a single click and then pressing CMD + DOWN ARROW keys will open it too.
3. You can also right-click a file and click the option that says “Open With” to launch it on an application that is not the default one.
Previewing Files Within Finder
You can preview your files within macOS computers. It’s a great feature, so you don’t have to open files just to check them out. To do that, simply select the file with a single left mouse click. After that, press the SPACEBAR button.
If it’s a document, it will show you the contents of the file. If it’s an image, it will bring up a preview of the image. If it’s a video, it will show a clip of the video file. Finally, if it’s an audio file, it will play up a preview of your sound clip.
Attaching Files To Your Email
In order to attach files to your email, you will have to press or select the files you want to attach. After that, click the icon that says “Share The Select Items”. This icon appears like a square with an arrow in the center of it. After that, choose the option for Mail. In this case, the Mail will open up and the file will be attached to it. Simply type your message and then send the email.
Part 4. The Best Way To Optimize Mac Computers And Finder Windows
If your macOS computer runs slowly, you should try this software. Using iMyMac PowerMyMac, users may examine the system state of their Macs. Furthermore, it helps them use different cleansing and optimization programs to ensure that the computer runs more swiftly and efficiently.
The following is a list of the iMyMac PowerMyMac modules and utilities that can help you optimize your computer and achieve the best performance:
- Junk Cleaner. This app cleaner for Mac allows you to search for any undesirable files on your computer. Examples of this kind of extraneous data that takes up a lot of space on your computer include caches, temporary files, logs, and other similar items. Once they are discovered, they may be readily removed.
- App Uninstaller. With the help of the tool, you may uninstall apps on Mac. It ensures that there won't be any lingering files or traces.
- Duplicate File Finder. The tool may be used to search the system for duplicate files. You may even preview the files to make sure they are exact duplicates of one another. If the duplicates are taking up too much space on your system, they can be eliminated.
- Optimization Utilities. Clearing your DNS cache is one of the optimization tools that iMyMac offers. Users can optimize using the many free small utilities available.
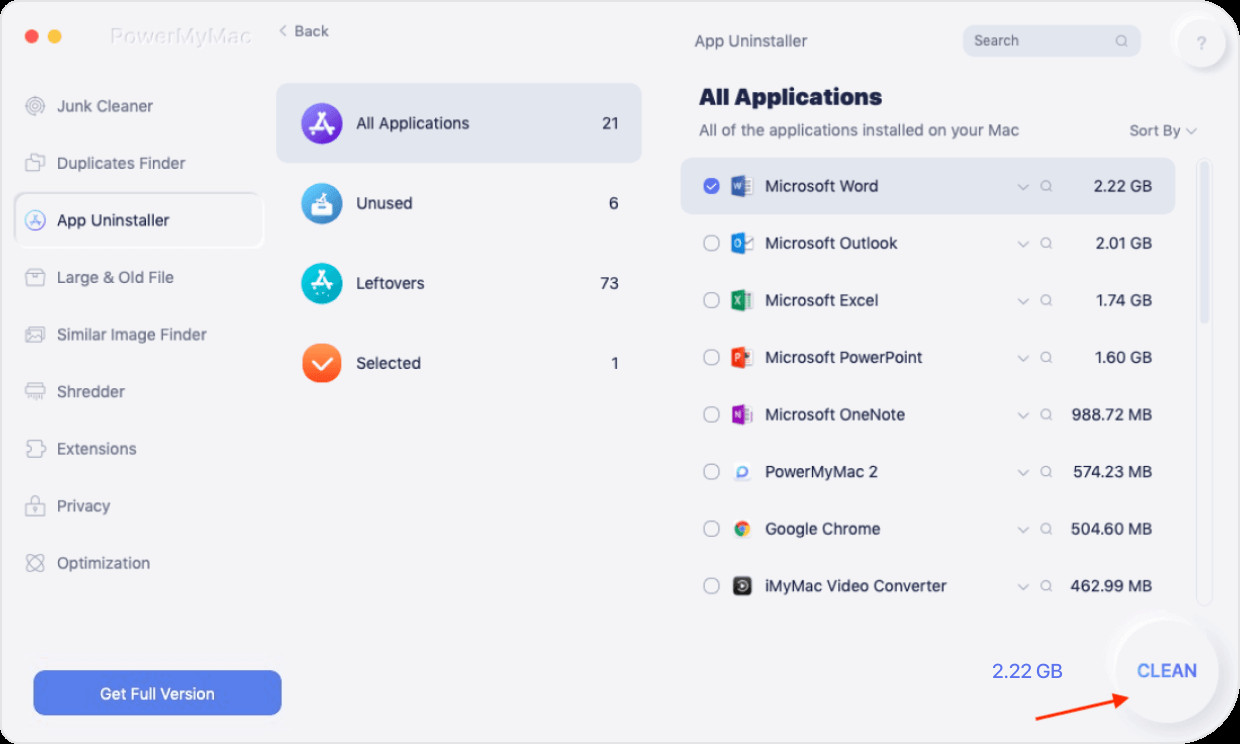
PowerMyMac can help you optimize and clean up your Mac. With just a few easy actions, your MacBook or iMac will operate quicker and free up storage on your Mac. Keep the performance of your Mac at its best. PowerMyMac is required as a result. PowerMyMac is a cleaning-oriented app that aims to help users get rid of pointless files and apps so that your Mac has more storage.
PowerMyMac from iMyMac. It's a fantastic piece of software for keeping your macOS machine tidy and operating at its best. Your equipment will keep running at its peak efficiency. To get the tool for a quicker and better macOS machine, go to iMyMac.com right immediately!

