


DiskMaker X is a popular utility used to create bootable macOS installation disks. While it serves its purpose well, there may come a time when you no longer need it or want to free up some storage space on your Mac.
Are you looking to uninstall DiskMaker X from Mac? In this guide, we will walk you through the process of uninstalling DiskMaker X from your Mac completely. By following the step-by-step instructions, you'll be able to remove both the application and its associated files, ensuring a thorough cleanup. Let's get started!
Contents: Part 1. Do I Need DiskMaker X on My Mac?Part 2. Manual Option to Uninstall DiskMaker X on MacPart 3. Effective Option to Uninstall DiskMaker X on MacPart 4. Conclusion
Part 1. Do I Need DiskMaker X on My Mac?
DiskMaker X is a utility software specifically designed for Mac users that allows them to create bootable installation disks for macOS. It simplifies the process of creating a bootable disk by providing an intuitive user interface and automated procedures.
The primary purpose of DiskMaker X is to create bootable disks that can be used to install or reinstall macOS on a Mac computer. This can be particularly useful in scenarios where you need to perform a clean installation of the operating system, troubleshoot system issues, or create a portable macOS installer for multiple devices.
DiskMaker X supports various versions of macOS, including the latest releases, and allows users to create bootable disks on different storage media such as USB drives, external hard drives, or even DVD discs. It gathers the necessary macOS installation files from the App Store or the macOS installer application on your Mac, and then prepares them on the chosen disk, making it ready for installation.
With DiskMaker X, users can save time and effort by having a reliable bootable installation disk readily available. This can be especially handy for IT professionals, system administrators, or individuals who frequently work with Mac systems and need to perform macOS installations or upgrades on multiple devices.
Reasons to Uninstall DiskMaker X on Mac
There are various reasons why you may choose to uninstall DiskMaker X from Mac. One of the common reasons is when you no longer need the application. Once you have created the bootable installation disk you required or if you no longer require the functionality provided by DiskMaker X, you might opt to uninstall it to free up storage space on your Mac.
Another reason to uninstall DiskMaker X from Mac is to optimize storage on your Mac. The application requires disk space to store macOS installation files and related data. By uninstalling DiskMaker X, you can reclaim valuable storage space, particularly if your Mac's available storage is running low.
Uninstalling DiskMaker X can also contribute to improving system performance. Unnecessary applications installed on your Mac can sometimes impact overall performance. Removing DiskMaker X, especially if you seldom use it, can help streamline your system and potentially enhance its performance.
Additionally, you may consider uninstalling DiskMaker X if there are newer and more efficient methods or tools available for creating bootable macOS installation disks. Apple may introduce new approaches over time, and if those methods are recommended, it might be beneficial to uninstall DiskMaker X and adopt the newer tools.
Finally, compatibility issues can arise as macOS evolves and new versions are released. In such cases, uninstalling DiskMaker X may be necessary to ensure the smooth functioning of your Mac and avoid any conflicts or errors that may arise due to compatibility issues.
It is important to note that before uninstalling DiskMaker X, you should have an alternative method or a backup of any important bootable disks you created using the software.
Common Problems of the App Removal Process
When uninstalling DiskMaker X from Mac, you may encounter some common problems. Here are a few issues that users sometimes face during the app removal process:
Incomplete uninstallation:
Occasionally, the uninstallation process may not remove all components of DiskMaker X from your Mac. Some files or folders associated with the application might remain on your system, leading to incomplete removal. It's important to ensure a thorough cleanup to avoid any potential conflicts or issues in the future.
Leftover files and preferences:
DiskMaker X may create additional files, preferences, or cache data that are not removed during the standard uninstallation process. These leftover files can take up unnecessary disk space and potentially cause conflicts with other applications. Manually locating and deleting these remnants may be required to achieve a complete uninstallation.
Uninstaller unavailability:
DiskMaker X might not provide a dedicated uninstaller, making the removal process slightly more challenging. In such cases, users need to manually locate and remove the application and its associated files, which can be time-consuming and require technical knowledge.
Impact on other applications:
Some users have reported instances where the removal of DiskMaker X inadvertently affects the functioning of other applications or system components. This can occur if DiskMaker X shares certain resources or dependencies with other software installed on your Mac.
Part 2. Manual Option to Uninstall DiskMaker X on Mac
How to uninstall DiskMaker X from Mac? It manually involves locating and deleting the application's files, caches, and preferences. Here are the steps to manually uninstall DiskMaker X:
Step 1. Quit DiskMaker X from Mac
Before you begin the uninstallation process, ensure that DiskMaker X is not running on your Mac. If it is open, quit the application.
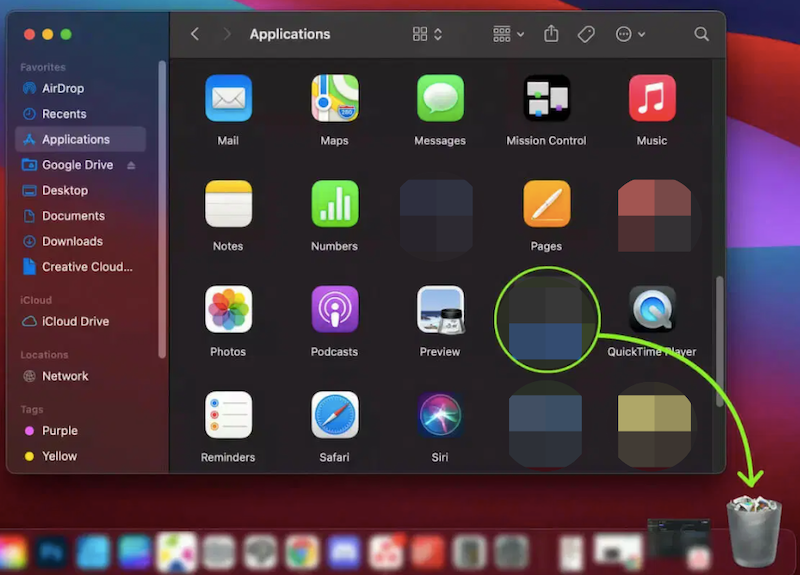
Step 2. Remove DiskMaker X from the Applications folder
Open the "Applications" folder on your Mac and locate the DiskMaker X application. Drag the DiskMaker X icon to the Trash or right-click on it and select "Move to Trash."
Step 3. Delete DiskMaker X-related files
Go to the Finder menu and select "Go." Click on "Go to Folder" and enter the following path: ~/Library/. In the Library folder, locate and delete the following DiskMaker X-related files and folders:
- Caches/DiskMaker X
- Preferences/com.diskmakerx.DiskMaker-X.plist
- Saved Application State/com.diskmakerx.DiskMaker-X.savedState
Step 4. Empty the Trash
Right-click on the Trash icon in the Dock and select "Empty Trash." Confirm the action when prompted.
Step 5. Restart your Mac
Restarting your Mac can help ensure that any remaining traces of DiskMaker X are completely removed from your system.
It's important to exercise caution when deleting files manually, as removing the wrong files can cause system issues. Always double-check before deleting any files, and if you're uncertain, it's recommended to seek additional guidance or consult official documentation.
Part 3. Effective Option to Uninstall DiskMaker X on Mac
If you're looking for an effective option to uninstall DiskMaker X from Mac, you can consider using a reliable third-party uninstaller like iMyMac PowerMyMac. PowerMyMac is a comprehensive utility tool that offers a wide range of features, including an uninstaller module that can help you remove applications and their associated files completely.
Key Features of PowerMyMac
- Smart Cleaner: Quickly removes system junk, cache files, and temporary data to reclaim valuable disk space.
- App Uninstaller: Completely removes unwanted apps and their leftover files.
- Duplicate Finder: Locates and deletes duplicate files eating up your storage.
- File Shredder: Securely deletes sensitive files beyond recovery.
- Privacy Protection: Erases browsing history, cookies, and app traces to protect your data.
- Performance Monitor: Keeps tabs on your CPU, memory, and storage usage in real time.
Here's how you can use PowerMyMac to uninstall DiskMaker X from Mac and remove files left after uninstalling automatically:
- Download and Install PowerMyMac: Visit the official website of iMyMac and download PowerMyMac. Follow the on-screen instructions to install it on your Mac.
- Launch PowerMyMac: After installation, open PowerMyMac on your Mac.
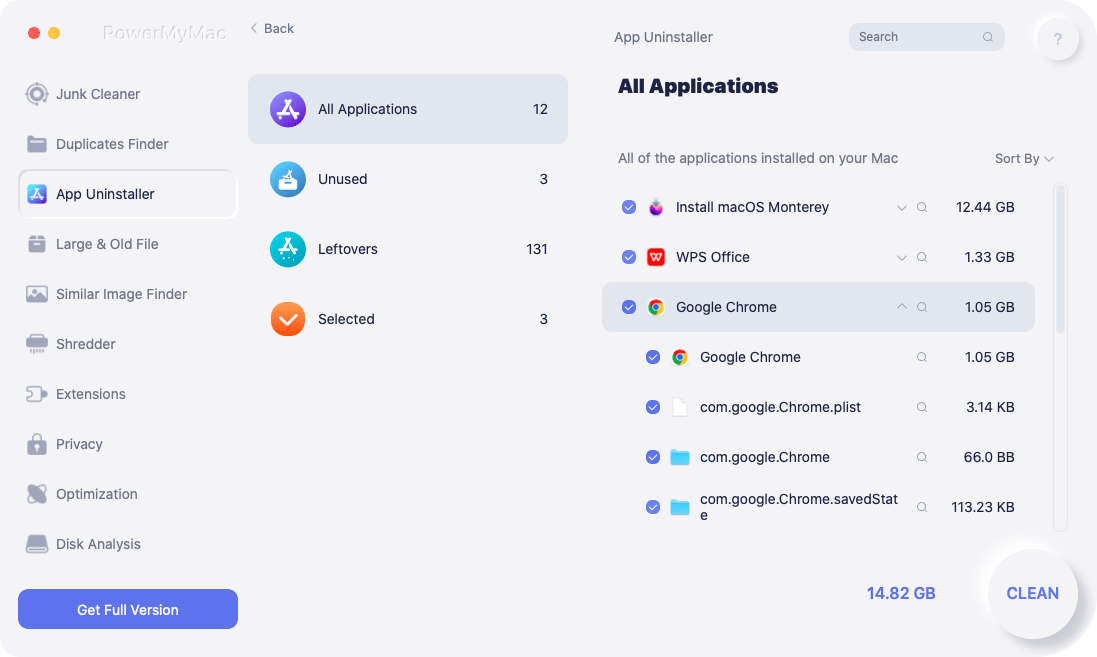
- Select “Uninstaller” Module: In the PowerMyMac main interface, select the “Uninstaller” module from the list of available tools.
- Scan for Applications: Once in the Uninstaller module, click on the “Scan” button to initiate a scan of all installed applications on your Mac.
- Locate DiskMaker X: After the scan is complete, you’ll see a list of applications displayed. Locate DiskMaker X in the list and select it.
- Review and Select Files: PowerMyMac will show you the associated files and folders related to DiskMaker X. Review the list and select the files you want to remove. Ensure that you select all the associated files and leftovers to ensure a thorough uninstallation.
- Click on “Clean”: Once you have selected the files, click on the “Clean” button to start the uninstallation process.
- Complete the Uninstallation: PowerMyMac will begin removing DiskMaker X and its associated files from your Mac. Wait for the process to complete.
By using PowerMyMac's uninstaller module, you can effectively remove DiskMaker X and its leftover files, ensuring a thorough cleanup. Remember to follow the on-screen instructions and exercise caution when selecting files for removal.
Part 4. Conclusion
In conclusion, if you're looking for a reliable and effective option to uninstall DiskMaker X from Mac, iMyMac PowerMyMac is a highly recommended solution. With its comprehensive set of features and specifically its uninstaller module, PowerMyMac provides a convenient and efficient way to remove applications and their associated files completely.
By using PowerMyMac, you can easily uninstall DiskMaker X and ensure that all related files, caches, and preferences are thoroughly cleaned from your Mac. The user-friendly interface and step-by-step process make it accessible to users of all levels of technical expertise.
Furthermore, PowerMyMac's uninstaller module allows you to scan and select the specific files and leftovers associated with DiskMaker X, ensuring a comprehensive cleanup without the risk of accidentally removing essential system files.

