


TunnelBear is a popular virtual private network (VPN) service known for its user-friendly interface and secure browsing capabilities. However, there may come a time when you decide to switch VPN providers or simply no longer need the app on your Mac. In such cases, it's essential to uninstall TunnelBear from Mac properly to avoid any residual files or conflicts that might linger on your system.
This article aims to guide Mac users through the process of uninstalling TunnelBear, providing a step-by-step approach that ensures a seamless removal. By following these instructions, you'll be able to fully uninstall apps like TunnelBear from your Mac, freeing up system resources and allowing you to explore alternative VPN options without any interference. Let's get started with the uninstallation process and bid farewell to TunnelBear on your Mac once and for all.
Contents: Part 1. What Usually Makes People Uninstall TunnelBear? Part 2. How Do I Uninstall TunnelBear from My Mac?Part 3. How to Perfectly Remove TunnelBear? Part 4. Conclusion
Part 1. What Usually Makes People Uninstall TunnelBear?
TunnelBear is a widely-used VPN service, but there are various reasons why users may choose to uninstall it from their Mac. Understanding these reasons can shed light on common user experiences and help determine whether TunnelBear is the right VPN solution for your needs. Here are some main factors that often lead users to uninstall TunnelBear from Mac:
- Performance Issues: VPN services can sometimes impact internet speed and overall system performance. While TunnelBear generally maintains a good balance between security and performance, some users may experience slowdowns or latency issues that affect their browsing experience.
- Limited Features: While TunnelBear offers a user-friendly interface and basic VPN functionalities, it may not provide the extensive features that some users require.
- Compatibility Issues: Operating system compatibility can be a concern for VPN users, especially when new OS updates are released. TunnelBear strives to maintain compatibility with major operating systems, including Mac, but occasional compatibility issues may arise.
- Changing VPN Preferences: VPN preferences can vary based on individual needs and preferences. Users may initially choose TunnelBear but later decide that a different VPN service better aligns with their requirements.
- Unwanted Storage Usage: TunnelBear and its associated files can take up unnecessary space, and users who don’t need it anymore may want to remove it to free up disk space and make room on Mac.
- Account or Subscription Management: In some cases, users may uninstall TunnelBear to manage their VPN accounts or subscriptions.
During the uninstallation process of TunnelBear, users may encounter certain problems or complications. Here are some possible problems that can arise during the uninstallation of TunnelBear:
- Incomplete Uninstallation
- Error Messages
- Uninstaller Malfunction
- Impact on Other VPN Configurations
- System Instability
Part 2. How Do I Uninstall TunnelBear from My Mac?
To manually uninstall TunnelBear from Mac, you can follow these steps:
- Close TunnelBear: Make sure the TunnelBear application is closed before proceeding with the uninstallation process. You can check for the TunnelBear icon in the menu bar at the top of your screen and choose “Quit TunnelBear” to ensure it is not running in the background.
- Move TunnelBear to Trash: Locate the TunnelBear application in the “Applications” folder on your Mac. Click and drag the TunnelBear icon to the Trash bin in your Dock. You may also right-click on the TunnelBear icon and select the option that says “Move to Trash” from the context menu.
- Remove TunnelBear Preferences: In the Finder menu, click on “Go” and select “Go to Folder.” Type “~/Library/” and click “Go” to open the Library folder. Within the Library folder, locate and open the “Preferences” folder. Look for any files that start with “com.tunnelbear” or “tunnelbear” and move them to the Trash.
- Delete TunnelBear Support Files: While still in the Library folder, navigate to the “Application Support” folder. Look for any folders or files related to TunnelBear, such as “TunnelBear” or “com.tunnelbear.tbeardaemon,” and delete them.
- Empty Trash: Once you have moved all the TunnelBear-related items to the Trash, right-click on the Trash icon in your Dock and select “Empty Trash.” Confirm the action when prompted. Please note that emptying the Trash is permanent and cannot be undone, so double-check to ensure you have removed all TunnelBear-related files.
- Restart your Mac: Restarting your Mac can help ensure that any remaining background processes or cached files associated with TunnelBear are fully cleared from the system.
By following these steps, you should be able to manually uninstall TunnelBear from Mac and remove any associated files. Remember to exercise caution when deleting files and be thorough in checking different library folders to ensure a complete removal.
Part 3. How to Perfectly Remove TunnelBear?
While the manual uninstallation process can effectively remove TunnelBear from your Mac, some users prefer a more comprehensive and efficient approach. One such solution is using third-party uninstaller software like iMyMac PowerMyMac, which offers advanced features to ensure a thorough removal of applications and their associated files. Here's how you can use iMyMac PowerMyMac to perfectly uninstall TunnelBear from Mac:
- Download and Install iMyMac PowerMyMac: Visit the official iMyMac website and download the PowerMyMac application. Follow the on-screen instructions to install it on your Mac.
- Launch iMyMac PowerMyMac: After the installation is complete, launch the PowerMyMac application on your Mac.
- Select Uninstaller Module: In the PowerMyMac interface, you will find various modules. Choose the “Uninstaller” module to initiate the application removal process.
- Scan for Installed Applications: PowerMyMac will scan your Mac for all installed applications, including TunnelBear. Click on the “Scan” button to start the scanning process.
- Locate and Select TunnelBear: Once the scan is complete, you will see a list of installed applications. Locate “TunnelBear” in the list and select it for uninstallation. Click on the “Clean” button to proceed with the uninstallation process.
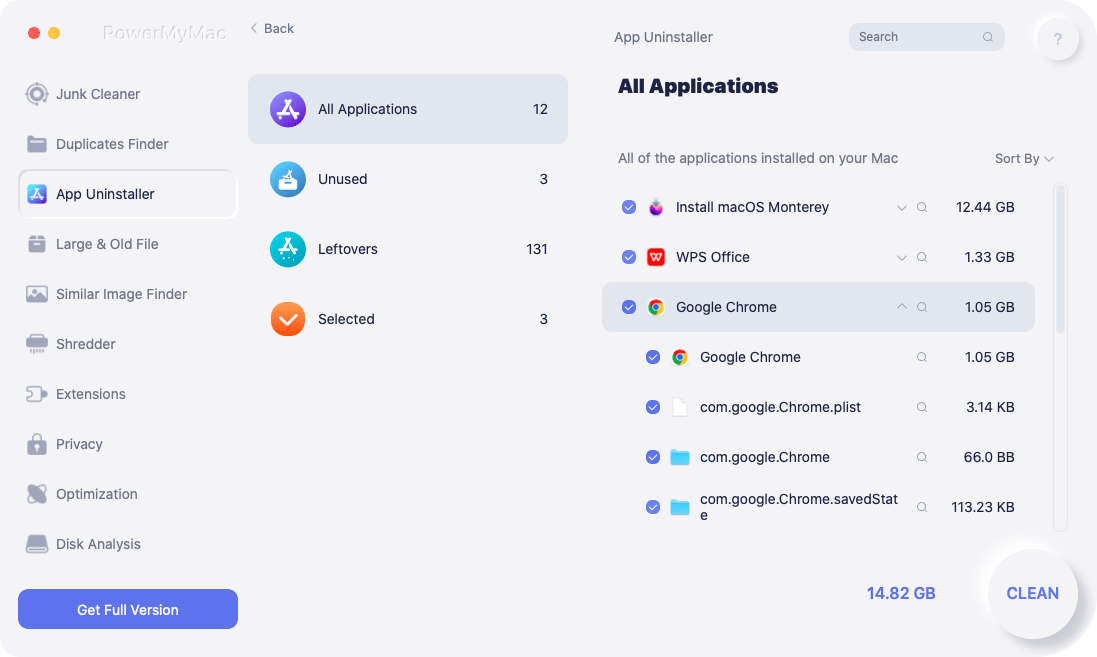
By utilizing iMyMac PowerMyMac's uninstaller module, you can achieve a more thorough and hassle-free removal of TunnelBear and its associated files. This method eliminates the need for manual file searches, as PowerMyMac scans and removes all related files with just a few clicks. It provides a convenient and effective solution for users seeking a comprehensive uninstallation process.
Part 4. Conclusion
In conclusion, removing TunnelBear from your Mac can be accomplished through manual uninstallation or by utilizing third-party uninstaller software. While the manual method can effectively remove the application, some users may prefer a more comprehensive and efficient approach.
iMyMac PowerMyMac is a recommended third-party uninstaller software that offers advanced features for a thorough removal of applications and their associated files. With PowerMyMac, you can simplify the uninstallation process and ensure a clean state on your Mac.
By using the PowerMyMac's uninstaller module, you can easily scan for installed applications, locate TunnelBear, and remove it along with all related files and folders. This eliminates the need for manual file searches and reduces the risk of leaving behind any remnants of the application.

