


DVDs still exist. Physical media is still alive. So, don’t be ashamed if you’re still holding on to your old DVDs that contain your favorite movies. Now if you want to start storing all your DVD movies onto your Mac, then this article is for you. There are a lot of reasons as why you should convert DVD to MP4 on Mac or Windows.
For starters, it’s a good way to backup your DVDs. Just in case anything happens to your DVDs, you wouldn’t have to cry over them since you already have them duplicated on your Mac. Second of all, you wouldn’t have to deal with the clutter that comes with collecting DVDs. When you convert cdr to MP4 on Mac, you will be able to free up purgeable storage space for a bunch of movies.
Contents: Part 1. Best DVD to MP4 Converter for Mac/WindowsPart 2. How to Convert DVD to MP4 Using VLC?Part 3. How to Convert DVD to MP4 on Mac Using HandBrake?Part 4. Can I Convert DVD to MP4 with Disk Utility on Mac?Part 5. Rip Your DVD to MP4 with a DVD Ripper on Mac
Part 1. Best DVD to MP4 Converter for Mac/Windows
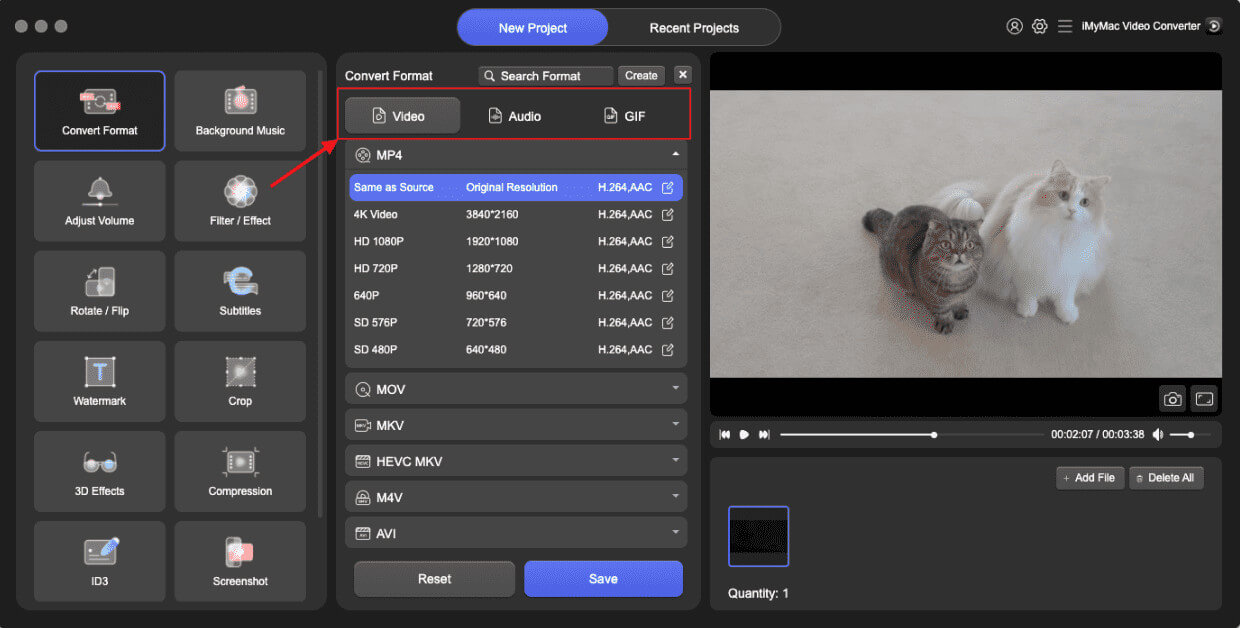
If you want an easy way to convert DVD to MP4 on Mac or Windows PC, then the iMyMac Video Converter is for you. This particular tool is a video converter supports a long list of formats and device. It’s also very easy to use.
Check out the steps below to see how simple it is to convert videos formats.
- Try out the iMyMac Video Converter by clicking on the Free Download button, then install and launch it.
- Download, install and launch the iMyMac Video Converter on Mac/PC.
- Look for the Add Files button. You will find this on the upper left-hand side of the program. Click on that to add your DVD file.
- Go to the "Convert Format" module. Choose MP4 from the drop-down list of "Video".
- Look for the button Export. Click on it to convert your DVD files to MP4 formats on Mac.
The iMyMac Video Converter can convert video and audio to any format you want with high speed and without any loss. It is a powerful tool with many functions and features, such as editing and playing videos.
As you can see, iMyMac Video converter only has a handful of steps to get the task done. Each step is pretty easy to follow since its interface is clean and free of ads. So, go right ahead and give the iMyMac a free try.
Part 2. How to Convert DVD to MP4 Using VLC?
VLC is a great CD ripping tool on Mac because it can help you convert DVD to MP4 on Mac. After the DVD is converted, it can be played on various devices and players without a DVD player.
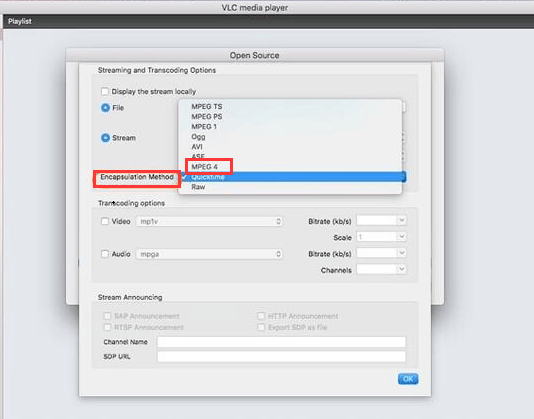
- First, insert the DVD into the Mac drive, and then launch VLC on the Mac. From the drop-down menu on the File tab, select the Open Disc option, and a window containing your disc information will pop up.
- Click the Disable DVD menu. In the lower-left corner, check the Stream output box.
- Click the setting button to access a new window. Click the File option to get the ripped disc on your Mac. Click Browse to select the location where you want to save the converted disc. This will pop up a new window, select the file name and location in the "Save As" and "Where" tabs respectively. Click the "Save" button to confirm.
- Then select MPEG 4 in the drop-down menu of Encapsulation Method. You can also set the Bitrate required video and audio and so on. Click OK to confirm all settings.
- Finally, click Open, and you can start to use VLC to transfer DVD to MP4 on Mac.
Part 3. How to Convert DVD to MP4 on Mac Using HandBrake?
HandBrake is a program you can look into. Just search for it and you will find it. Take a look at the steps below to see how you can use it to convert DVD to MP4.
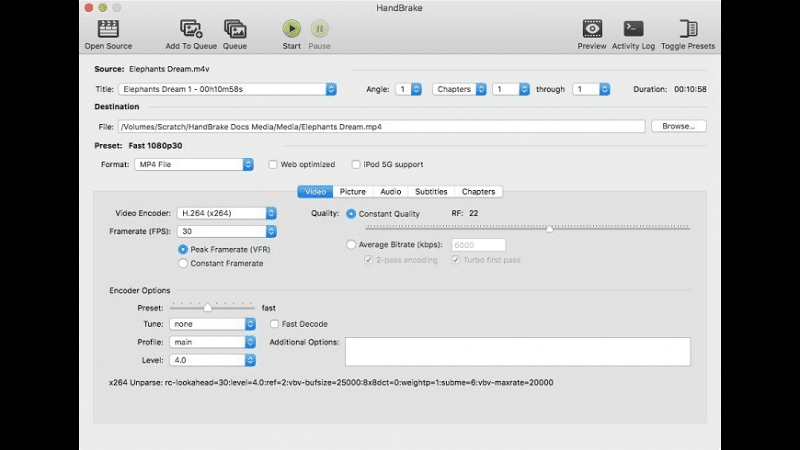
- Click on the macOS to start downloading the program. It will automatically install. After it has been installed, launch it on your screen.
- Make sure you have inserted the DVD. On HandBrake, click on Source to locate the DVD on your Mac. Once you have clicked on the DVD, HandBrake will scan it.
- Take your cursor to the Destination area and click on the Browse tab on the far right-hand of the screen. Choose a destination for your file.
- Take your cursor to the Output Settings and choose MP4 in the Format field. Then click on the Start tab you see on the top menu. This is the second tab from the left. It comes after the Source tab.
Part 4. Can I Convert DVD to MP4 with Disk Utility on Mac?
Did you know that there is software in your Mac that can help you convert DVD to MP4? The Disk Utility software can help you convert DVD to MP4 on Mac.
Since the Disk Utility software is included in your Mac, it’s free. There is no need for you to download or install new software. So, let’s start.
- Go to Finder. Click Go.
- Select Utilities from the drop-down list to get your Utilities folder to pop up.
- Click on Name on the top-right-hand side of the panel to organize the list by name.
- Go down the list and select Disk Utility. Double-click on it to launch it.
- Go to the left-hand side of the panel to see the CDs that you’ve already stored in your Mac. Select a CD.
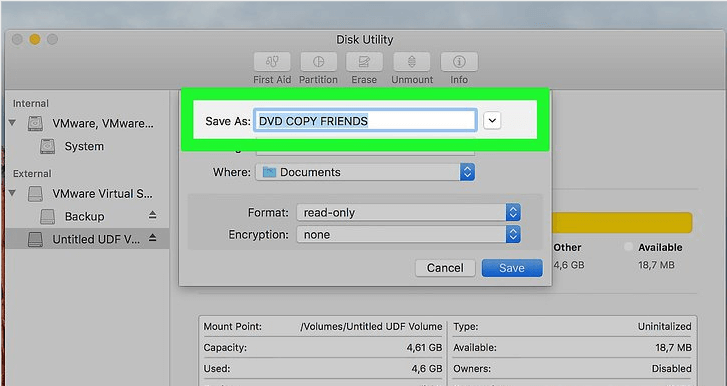
- Click on File. Select New from the drop-down list.
- Select Disk Image from. This is the last option on the list and it will show the name of the CD that you want to copy onto your Mac. The name of the DVD will be in quotations.
- Rename the file on the next Dialogue window, if you want to. Rename the image disk that will create.
- Create a new folder where you want to save your DVD.
- Select DVD/CD master under Image Format. You can also choose to encrypt if you want. You can do that by selecting Encryptoption on Encryption. If you don’t want to encrypt, you can choose none.
- Click on Save. The Disk Utility Progresswindow will pop up informing you that your Mac is creating an image. Your goal to convert DVD to MP4 on Mac is already taking place. You are creating a disk image of your DVD for you to be able to burn it.
- Wait for it to finish creating the DVD.
- Check on the new file in your Disk Utility folder. You’re going to notice a file has been added on the bottom part of the left-hand side of the panel. If you notice, your new file ends in .cdr.
- Make a copy of your new file by selecting it. Click on Burn from the top menu. This will open up your CD drive to open and prompt you to insert a disk. If you have more than one CD drive, select which one you want to use. If you only have one, then you can just proceed to the next step.
- Insert the DVD. Your Mac will check the DVD to make sure there is enough space for it. Click on Burn to convert DVD to MP4 on Mac.
- Repeat the process to make another copy.
Part 5. Rip Your DVD to MP4 with a DVD Ripper on Mac
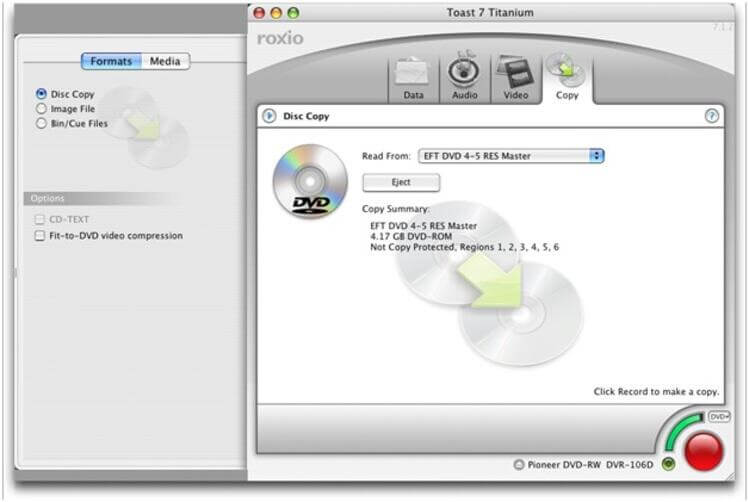
This option requires you to make use of another software called Toast Titanium. This is a paid software. It not only converts; it also provides unique functions, features, and effects to enhance your movies or videos.
You can convert DVD to MP4 on Mac using this DVD ripper, but actually, Toast 10 Titanium works on an array of devices, not just on your Mac.
Take a look at the steps below on how to use it to rip your DVDs to MP4 videos.
- Mount your DVD video on your Mac DVD drive.
- Select the Convert Category. You will find this on the upper left of the screen. It’s the last one on the menu bar.
- Click on the Video Files. This is on the fourth option under Convert.
- Click on the media browser on the upper right of the screen. From here, you can import videos from sources like iMovie, Movies folder, DVD, EyeTV, AVCHD, Web Video, or Live Screen Capture.
- Select DVD from the media browser. Drag and drop the file to the project on the left panel. You can also drag and drop the file from the Finder.
- Select the title you want to add. Keep in mind that the DVD movies will be added to Toast as thumbnails. These thumbnails will later be used as icons in iTunes in the Finder. If you like, you can also type in a new file name. That will not affect the source file.
- Take a look at the buttons on the right side of the movies you’ve added. You will see Edit and AU filter buttons. The Edit button lets you trim and cut clips. It also creates chapters. The AU filter button brings up a dialogue with a long list of pre-installed audio effects
- Look below the content areas to the estimated size of all the exported videos. Keep in mind that the size of the space indicator is determined by two things. One of which is the drop-down menu that calibrates the gauge to display a specific size. The second deciding factor is the selected export preset. When you click on it, you will get the player setup dialog where you can easily choose another device or format.
Note: This dialog is what you will be needing to convert DVD to MP4 on Mac. The presets will affect video format and quality. You will also be able to edit or create your custom preset and save it for your future use.
- Fill in the Player Setup window. Choose Mac from the list and choose a location where you want to save your movie.
- Use the preview video with the selected export settings. You can select a preview duration and a starting point. You can also choose to save the preview video to a folder. You will have an accurate preview of how your exported DVD will look. You can play the quality and format settings and preview a portion of your video rather than waiting for the video to finish converting.
- Copy or sync to your device soon as the file is converted.
Bonus Tip: Manage Mac Storage Space for Faster Video Conversion
Now that you know how to convert DVD to MP4 on Mac or Windows device, you’re going to need a lot of storage of space. You’re not just going to be filling up your Mac with the usual files, photos, and Videos. You will also be filling it up with movies.
Movies take up a lot of space on your Mac. You would need to manage storage space on your Mac. That’s not all because you’re also going to need to clean up your Mac to be able to manage its storage space. The fact that you would have to search for files, photos, programs, and videos that have to be deleted is a lot of work. It might be a menial task; still, it will take some time to get it done.
Let PowerMyMac do the menial task for you. It cleans up your Mac by finding those files that need to be deleted. You won’t have a hard time managing storage space on your Mac with the PowerMyMac. There is no way you can go wrong with the free download of the PowerMyMac.
You can use it to speed up and optimize your Mac for a fast & quick video conversion process. Or you can use this tool to find and delete the duplicate MP4 videos or DVD files on your Mac.
Which option are you most likely to try out? Are you considering PowerMyMac for space management on your Mac? We’d love to hear your thoughts. So, share them with us now.


Don2023-01-28 18:42:02
Thanks for the excellent article! I ended up using the VLC option since I already had that app on my iMac. It worked perfectly...I found out that you can take a 'snapshot' of video images which was really cool! :)