


It happens to the best. If you think that your Mac is never going to crash, well, you are wrong. Your Mac, just like any machine is prone to crash or encounter fatal errors.
When that happens, you’re going to experience kernel panic Mac. Don’t panic because this article will show you how you can resolve it.
Contents: Part 1. Defining Mac Kernel PanicPart 2. Resolving Kernel Panic on Mac with Software SolutionsPart 3. Resolving Kernel Panic on Mac with Hardware SolutionsPart 4. Conclusion
Part 1. Defining Mac Kernel Panic
When your operating system kernel encounters a fatal error, it takes on action to recover from it. That action is called a kernel panic. If Windows has the blue screen of death, the Mac has the kernel panic.
Yes, kernel panic Mac is real. As the term suggests, it does cause panic because your Mac is just going to be able to do anything. You will get a dark screen and a notification, enough to make you panic.
Why Kernel Panic Happens
The reason why kernel panic Mac happens is that your machine just can’t handle a lot of tasks all at once. Either you have to close some apps or uninstall them.
Part 2. Resolving Kernel Panic on Mac with Software Solutions
The good news is that there are ways to resolve the issue of kernel panic on Mac. You will find software solutions below.
Solution #1. Make Sure Your Mac Has Enough Space
If you don’t want to experience kernel panic on Mac, then you need to make sure that your Mac always has enough space. Space is precious on your Mac. It’s what your Mac needs to perform all tasks. If it runs out of space, you have more chances of experiencing kernel panic Mac.
To make sure that your Mac always has enough space, consider using the iMyMac PowerMyMac. This program not only checks on the space of your Mac, but it will also help you clean out unneeded files and apps. Check out the steps below to see how you can use it to avoid kernel panic Mac.
- Download the PowerMyMac
- Check System Status
- Click on Another Module
- Scan Module
- Click on the CLEAN Tab
The steps below are more detailed. They will show you a clearer picture as to how you can use the PowerMyMac to clean out your Mac. That way, you can avoid kernel panic Mac.
Step 1. Download the PowerMyMac
There is only one place where you can download the iMyMac PowerMyMac. You can easily get to that place by clicking on this link. Once you click on the link, you will be able to download it on your Mac.
Step 2. Check System Status
Launch the PowerMyMac and you will get to see how much space you have on your Mac. Then take your cursor to the left side of the screen where all the modules are listed down.

Step 3. Click on App Uninstaller
If you see that your Mac is running out of space, click on another module to clean out your Mac. if you want to uninstall some apps, click on the App Uninstaller.
Step 4. Scan Module
Once you have clicked on the App Uninstaller, a SCAN tab will show up on the main screen. Click on the SCAN tab to start scanning your Mac of apps that you want to cleanout.

Step 5. Click on the CLEAN Tab
After the scanning process, it will list down all the apps on the main screen. From there, you can choose which ones you want to cleanout. Just check on the apps that you want to clean.
After checking the apps, click on the CLEAN tab you see at the bottom part of the screen to clean out the apps.

Solution #2. Go to Disk Utility to Fix Errors
It could be possible that your external hard drive is malfunctioning and hence is the reason why you’re getting kernel panic, the steps below will show you how to fix it with Disk Utility.
Step 1. Launch Disk Utility
You can launch Disk Utility by clicking on Go on the menu on top. Select Utilities from the drop-down list. Look for Disk Utility inside the Utilities window and click on it.
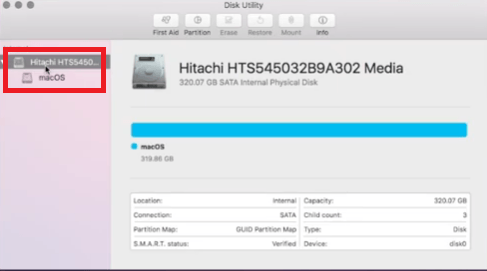
Step 2. Click on the First Hard Drive
Click on the first hard drive that shows up on the left-hand side of the screen. Then click on the partition below it.
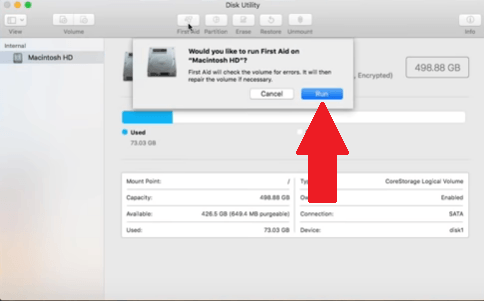
Step 3. Click on First Aid
Take your cursor to the menu of the Disk Utility folder. Click on the first tab, which is First Aid. A pop-up window will appear. It will ask you if you would like to run First Aid on macOS. Click on the Run tab to allow First Aid.
Solution #3. Disable Login Items
The login items could be causing kernel panic as well. if there are too many apps opening at the same time upon startup, then it could put some pressure on the processor. The steps below will show you how to disable login items to solve or even prevent kernel panic.
- You can open System Preferences by either clicking on it from the Dock or from the menu on top.
- Once the System Preferences folder is launched, look for Users & Groups. Once you see it, click on it.
- Now that you’re inside the Utilities & Groups folder, click on your profile under the Current user on the left-hand side of the screen. Then you will see Password and Login Items.
- Click on the Login Items.
- Click on the apps that you want to disable on startup.
- After clicking on the apps, take your cursor to the bottom part of the screen and click on the minus sign.
Solution #4. Make Sure to Comply with Updates
Kernel panic could happen if you haven’t been complying with the updates on your Mac. The steps below will show you how you can update apps on your Mac.
- Take your cursor to the Apple logo and click on it. A drop-down list will appear. Select the App Store from the drop-down list.
- Once you’re inside the App Store, click on the Updates You will see this tab on top of the screen.
- Once you click on the Updates tab, you will be taken to a new window where you can update all the apps.
Solution #5. Focus on the Problematic App
If a particular app is causing a problem for your Mac, then that app might be corrupted. Follow the steps below to see how you fix a problematic app that might be corrupted.
- Go to the Apple Store to see if there is an available update for the problematic app. If there is, update it and reboot your Mac.
- If there is no update available for the problematic app, uninstall it and reinstall it.
- You have already seen how you can use the iMyMac PowerMyMac to free up more space on your Mac. You can also use their Uninstaller to clean up the problematic app.
Solution #6. Fix Broken Disk Permissions
Broken disk permissions may be causing a kernel panic on your Mac. The steps below will show you can repair your disk permissions.
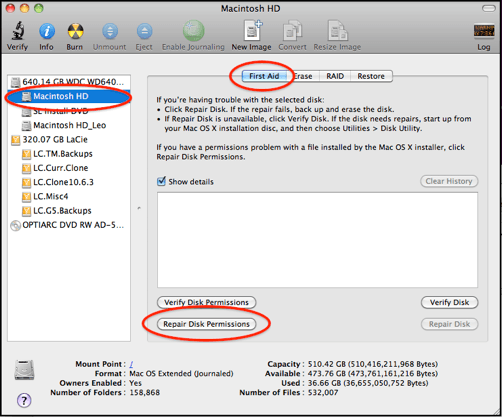
- Go to your Applications folder and select Utilities. Then click on Disk Utility. Wait for it to load.
- Select your main hard drive and click on Verify Disk Permissions on the bottom part of the screen. Wait for a couple of minutes to finish.
- Once you’re done verifying disk permissions, click on the tab that says Repair Disk Permissions.
- Wait for a couple of minutes for it to finish. Once it’s done, you have gotten all your permissions repaired.
Part 3. Resolving Kernel Panic on Mac with Hardware Solutions
There are also a couple of hardware solutions that can calm kernel panic. Continue reading to learn more about them.
Solution #1. Unplug Peripheral Devices
A certain device that’s hooked up with your Mac could be causing kernel panic. To find out which device is causing the problem, unplug each one from your Mac.
- Unplug each device from your Mac. Make sure your printers, network adapters, external video cards, and other devices are unplugged from your Mac.
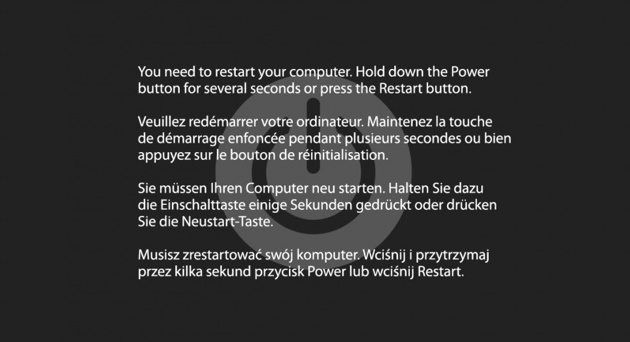
- Restart your Mac by pressing down on the power button. Once it has restarted, start connecting a device one at a time.
- If nothing happens at your first attempt, try again and add a new device. That way, you can isolate which device is causing the problem.
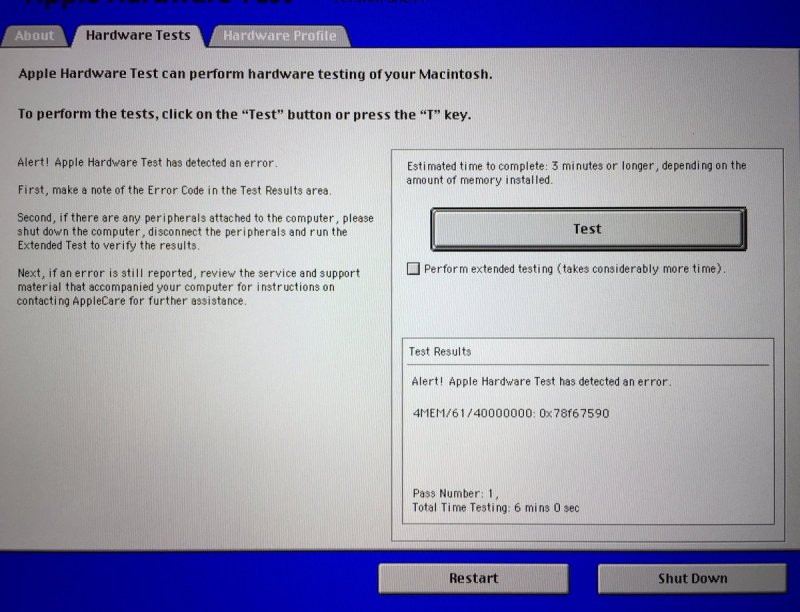
Solution #2. Run Apple Hardware Test
Your Mac has a built-in tool called Apple Hardware Test. The steps below will show you how you can use it.
Step 1. Shut Down Your Mac
To get started, shut down your Mac and disconnect all external devices, except your keyboard and mouse.
Step 2. Power on Your Mac
Power on your Mac and hold the D key. Some Macs will load directly into the hardware test, while some will need to connect to the internet first. If it needs to connect to the internet, just select a connection. Then enter your password and continue.
Step 3. Wait for the Initial Probe to Finish
The Apple Hardware Test screen will show up. The test will automatically do an initial probe of your Mac’s hardware. Wait for it to finish.
Step 4. Run the Test
There’s also an option to run a thorough by clicking on the Test tab. Keep in mind that it might take some time if you choose to click on the Test tab. Either way, just wait for the test to finish.
Once the test is complete, it will either list that there are No Problems Found or it will list Error Codes for any problems that it found. If you do get any errors, just search the codes online for what they mean.
The error code and the Mac model that you have will determine whether you can fix the issue or if you're going to need to send the Mac in for repair.
Solution #3. Reinstall OS
When all else fails, try reinstalling OS on your Mac. Keep in mind that this is your last option if you’re trying to solve kernel panic. The steps below will show you how to go about it.
Step 1. Start Internet Recovery
Make sure that your Mac is connected to the internet. Then do a start-up and hold down on your keyboard CTRL +R.
Step 2. Select Reinstall Mac OS X
When the Mac OS X Utilities window shows up, take a look at the options listed. Choose the second option, Reinstall Mac OS X and click on it. Then click on the Continue tab below.
Step 3. Agree to Terms
You will be taken to another window where you would have to click on Continue. On the next page, click on Agree. Then click on the Mac version you see on the screen and then click on the Install tab on the bottom. Wait until it finishes and you’re done.
Part 4. Conclusion
So, when you experience kernel panic on Mac, don’t panic. There are ways to solve the issue. If you want to avoid it, consider using the iMyMac PowerMyMac.
Have you ever experienced kernel panic on Mac? If yes, what did you do to solve it? Our readers would love to hear from you.

