


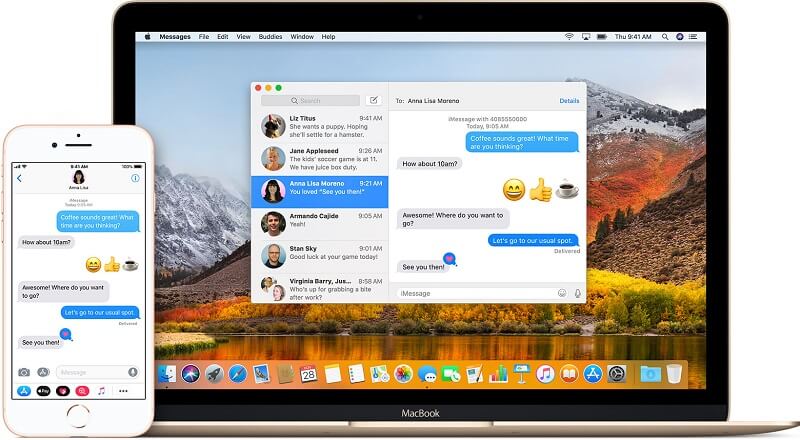
Messages within Mac’s operating system enable you to contact family, friends, and colleagues across various platforms. These include those of Apple’s iMessage, SMS, and AOL, Yahoo!, and Google services. But if you have never use iMessage on Mac and you’re new to the concept, you might want to learn how to start with and use the said app.
In this article, we’ll give you a comprehensive guide on how to set up and use iMessage on Mac. Simply follow our guide below and you’ll be up and running with iMessage on Mac in no time. Hop in!
Article GuideA Guide On Setting Up Messages On Your MacA Guide On Setting Up Messages Within iCloud On High SierraSetting Up Messages Within iCloud On iOS Version 11.4Send Any Type Of File To Your iOS Device Using iMessage On Mac OS X
People Also Read:Quick Fix: iMessage On Mac Not WorkingHow to Turn off iMessage on Mac?
A Guide On Setting Up Messages On Your Mac
Here’s how to set up Messages within your Mac computer:
Step 01: Open the Messages application. You can do this on your desktop, Applications folder, or through the Dock.
Step 02: Input your Apple ID address and the corresponding password. If you have activated two-step verification or two-factor authentication, input the corresponding verification code sent to you.
Step 03: Press Messages within the menu bar. Choose Preferences.
Step 04: Select the tab labeled Accounts.
Step 05: Choose the phone number and also email addresses which you wish to be reached by others.
Step 06: Choose the specific email address or phone number other people will be able to see when you have a conversation with them.
A Guide On Setting Up Messages Within iCloud On High Sierra
Messages within iCloud help to make sure that your messages are in sync among your Mac computer and other iOS devices. It also allows you to download messages in the said application especially when you have a new Apple device. Here’s how to set up your Messages within iCloud on the High Sierra Mac operating system.
Step 01: Launch Messages within your device.
Step 02: Press Messages within the menu bar.
Step 03: Press Preferences.
Step 04: Click the tab labeled Accounts.
Step 05: Press the correct iMessage account.
Step 06: Check the box labeled Enable Messages On iCloud.
Step 07: Press the Sync Now button. This will immediately sync iMessages within your device.
Now, that’s how you simply activate iMessage on iCloud. For it to sync across all devices, you have to set it up within your iPad or iPhone as well. Make sure it runs on iOS version 11. We’ll teach you how in the next section.
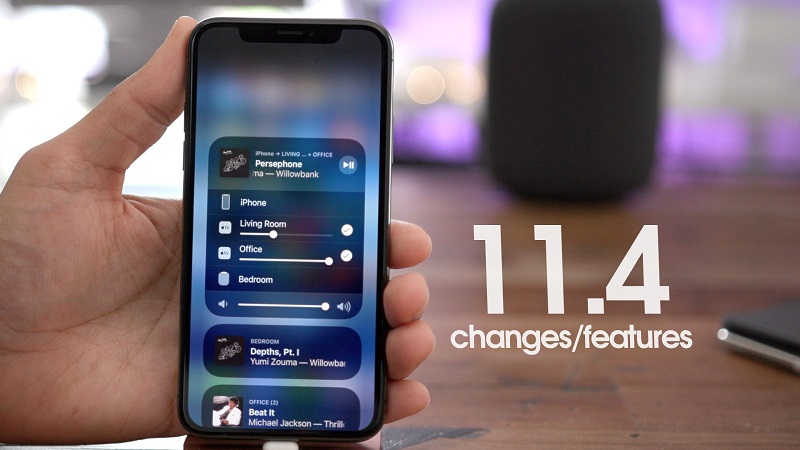
Setting Up Messages Within iCloud On iOS Version 11.4
You have to ensure that Messages within ICloud is activated on iOS version 11. In this way, messages are synced across all your devices including Mac computers, iPhones, and iPads. Here’s how to do it step by step:
Step 01: Launch Settings within your iOS device.
Step 02: Press the banner for your Apple ID.
Step 03: Press iCloud. Ensure that the toggle located next to that of Messages is on. This means it is colored green.
Step 04: Press Apple ID and then press Settings.
Step 05: Press Messages. After this, press Sync Now. In this way, your messages will sync with iCloud and with your iOS device.
Send Any Type Of File To Your iOS Device Using iMessage On Mac OS X
One not-so-obvious capability of iMessage is it enables you to send files to other iMessage users. You can even send files to yourself. Of course, the reverse (receiving files) is also true. Thus, iMessage can even work as a fully functional app for transferring files. This is possible for both iOS and Mac OS X users. You can simply transfer files such as RTF documents, PDF files pictures, videos, and other file formats.
In order to take advantage of this capability, you have to ensure that iMessage is already set up within your iOS device. Messages should also be used within your Mac computer as well. When you have both, it enables you to send files to yourself and even other Apple users. Once you have configured the apps necessary by following the steps above, you can start sending files with iMessage.
How To Send Files From Mac OS X To iOS Using iMessage
Sending files through your Mac computer is as simple as dragging and dropping files. Then, you just open the file on your iOS device. Here’s how to do it:
Step 01: Launch Messages app and open a conversation you wish to send files to.
Step 02: Drag your file towards the window for the Messages conversation.
Step 03: Press Send.
Step 04: Now, the iOS device will receive the file with iMessages. Usually, this is in a similar way to that of file transfers with iChat. Simply open the received file on your iOS device.
How To Send Files From iOS To Your Mac OSX Using Messages
Here’s how to do it step by step:
Step 01: Tap the file and hold this tap in order to see the Copy feature.
Step 02: Launch the Messages app. Open the conversation with the user you want to send the copied file to.
Step 03: Press and hold and select Paste.
Using iMessage For Unsupported File Formats And Using It As An Alternative For SFTP
Another not-so-obvious feature of iMessage is it has the ability to transfer any type of file between two operating systems. You can use the same technique stated above. This is possible even with not-so-famous file formats.
Thus, iMessage can be utilized as a very simple way of transferring files towards iOS devices without the need to use SSH and SFTP. However, the destination folder of the transferred files makes some form of limitations. The files received by your iOS devices go to the following folders: /var/mobile/Library/SMS.
This is the point when the flaw comes in. When you want to access the said directory, you need to have a jailbroken iOS device. Plus, you also need an application (e.g., iFile) in order to go your way around these hidden file system of iOS.
Moving and transferring files within the hidden file system of iOS necessitates an SSH client (e.g., Prompt) PLUS you also need some form of knowledge about the command line. For expert users, this can be a great feature especially if they are comfortable with jailbreaking. However, if you’re a beginner and don’t know your way around, it’s better to send common file types (e.g. documents).
In Conclusion
iMessage is a great way to communicate with other users such as your friends and family members. In addition, it’s a great way to share and transfer files among devices. You can send and receive messages and different file formats with the application. This guide has given you the steps so you can get started with using iMessage on your Mac. We hope it helped you out.

