


Adobe Acrobat Reader DC is a known PDF reader that allows you to view, print, sign, and comment on PDF files. However, some people who have downloaded this app may have problems using it, prompting them to seek ways on how to uninstall Adobe Acrobat Reader on Mac. Uninstalling an unneeded application on Mac may be easy, but how about deleting the whole program components from your system?
This guide will show you in detail how to thoroughly uninstall Adobe Acrobat Reader from your Mac along with the app components that it has.
Contents: Part 1. How Do I Remove Adobe Reader as My Default on Mac?Part 2. How Do I Fully Uninstall Adobe Acrobat Reader on Mac?Part 3. How to Completely Uninstall Adobe Acrobat Reader on Mac?Part 4. Conclusion
Part 1. How Do I Remove Adobe Reader as My Default on Mac?
To remove Adobe Reader as the default PDF reader on your Mac, follow these steps:
- Locate any PDF file on your Mac.
- Right-click (or Control-click) on the PDF file and select Get Info from the context menu.
- In the Get Info window, find the Open with section. Click the dropdown menu and select your preferred application (such as Preview).
- Below the dropdown menu, click the Change All button. A prompt will appear asking if you want to change the default application for all files of this type. Confirm by clicking Continue.
How Do I Shut Down Acrobat Reader?
You must make sure to quit the app before starting to learn how to uninstall Adobe Acrobat Reader on Mac. Because if you proceed with uninstalling while it is running, the process may fail and cause an error. There are many options to quit the Adobe reader:
- The app icon can be seen in the Dock; you can then right-click and select Quit.
- In the Menu Bar, click the app and select Quit [app name].
- Open the Activity Monitor, search the target app's name, pick any process related to the app, click the X button seen on the upper left corner, and choose the Quit button.
- Use the
Option – Command – Esckeystroke to open the Quit Applications window, choose the app from the list and click the Force Quit.
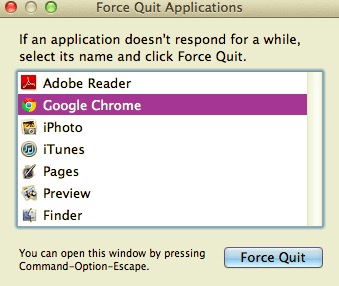
However, there are times where you still cannot shut down applications by any of these options. The only option or choice you have now is to reboot the Mac into Safe Mode for you to kill the unwanted app.
Part 2. How Do I Fully Uninstall Adobe Acrobat Reader on Mac?
To thoroughly uninstall Adobe Acrobat Reader DC from Mac, you have to delete the executable files as well as all associated support files, including caches, logs, and preferences. Aside from showing the manual approaches on how to uninstall Adobe Acrobat Reader on Mac, this section will also explain how to look for the remaining files of Adobe Reader.

For those who installed Adobe Reader from Mac's App Store:
- From the Dock, click the Launchpad icon, then type Adobe Acrobat Reader DC into the Search box.
- Hover the cursor over the target app's icon when it appears, then press and hold until the icon jiggles. Then, in the app icon, click the Delete
- To finish the deletion of Adobe Acrobat Reader DC, click Delete on the pop-up window.
For those who installed Adobe Reader that is not through the App Store:
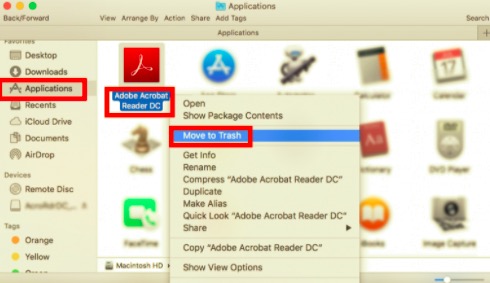
- Launch the Finder and select the Applications folder from the sidebar.
- Locate Adobe Acrobat Reader DC in the Applications folder, then drag and drop its icon to the Trash icon (at the end of the Dock).
- Right-click the Trash, select Empty Trash, and then click Empty Trash again.
Manually Removing Adobe Acrobat Reader DC's Components
To learn how to uninstall Adobe Acrobat Reader on Mac, the components is quite important. The components of Adobe Acrobat Reader DC include the software itself, preference files, bundled program, kernel extensions, and supporting plugins. To be able to detect the remaining files, you can find these on either or both of the two locations: /Library and ~Library.
Delete Components in /Library
- Go to the Menu Bar in the Finder and click Go > Go to Folder...
- Input the path of the top-level Library on your hard drive:
/Library, then Enter. - In the following folder locations, look for those whose names contain the keyword(s) of Adobe Acrobat Reader:
/Library,/Library/Caches,/Library/Preferences,/Library/Application Support,/Library/LaunchDaemons,/Library/LaunchAgents,/Library/PreferencePanes,/Library/StartupItems. - Locate the corresponding files and directories, and then delete all.
Delete Components in ~/Library
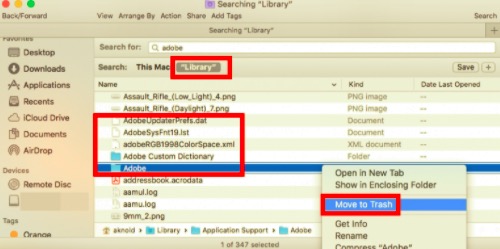
- Open the user library in your home folder by typing
/Libraryinto the address bar. - In the Search Bar, type the Adobe Acrobat Reader DC keywords, and then select "Library".
- Find matched items in the results, right-click them, and select Move to Trash from the menu.
- After you've deleted all of the Adobe Acrobat Reader DC leftovers, empty the Trash. If you see an error message stating that an item is "in use and cannot be erased", restart your Mac and try emptying the Trash again.
Part 3. How to Completely Uninstall Adobe Acrobat Reader on Mac?
Deleting the app and its files may be a hassle when doing it manually. If you don't want to search the Adobe Acrobat Reader DC files one by one, you may use a professional tool to do it for you.
PowerMyMac is a simple app that has a App Uninstaller feature. With this app, you can now easily remove the Adobe Reader along with its related files in just a few clicks without going through the folders in your drive. It can help you save valuable disk space and speed up your Mac. Here is how to uninstall Adobe Acrobat Reader on Mac using the PowerMyMac's App Uninstaller.
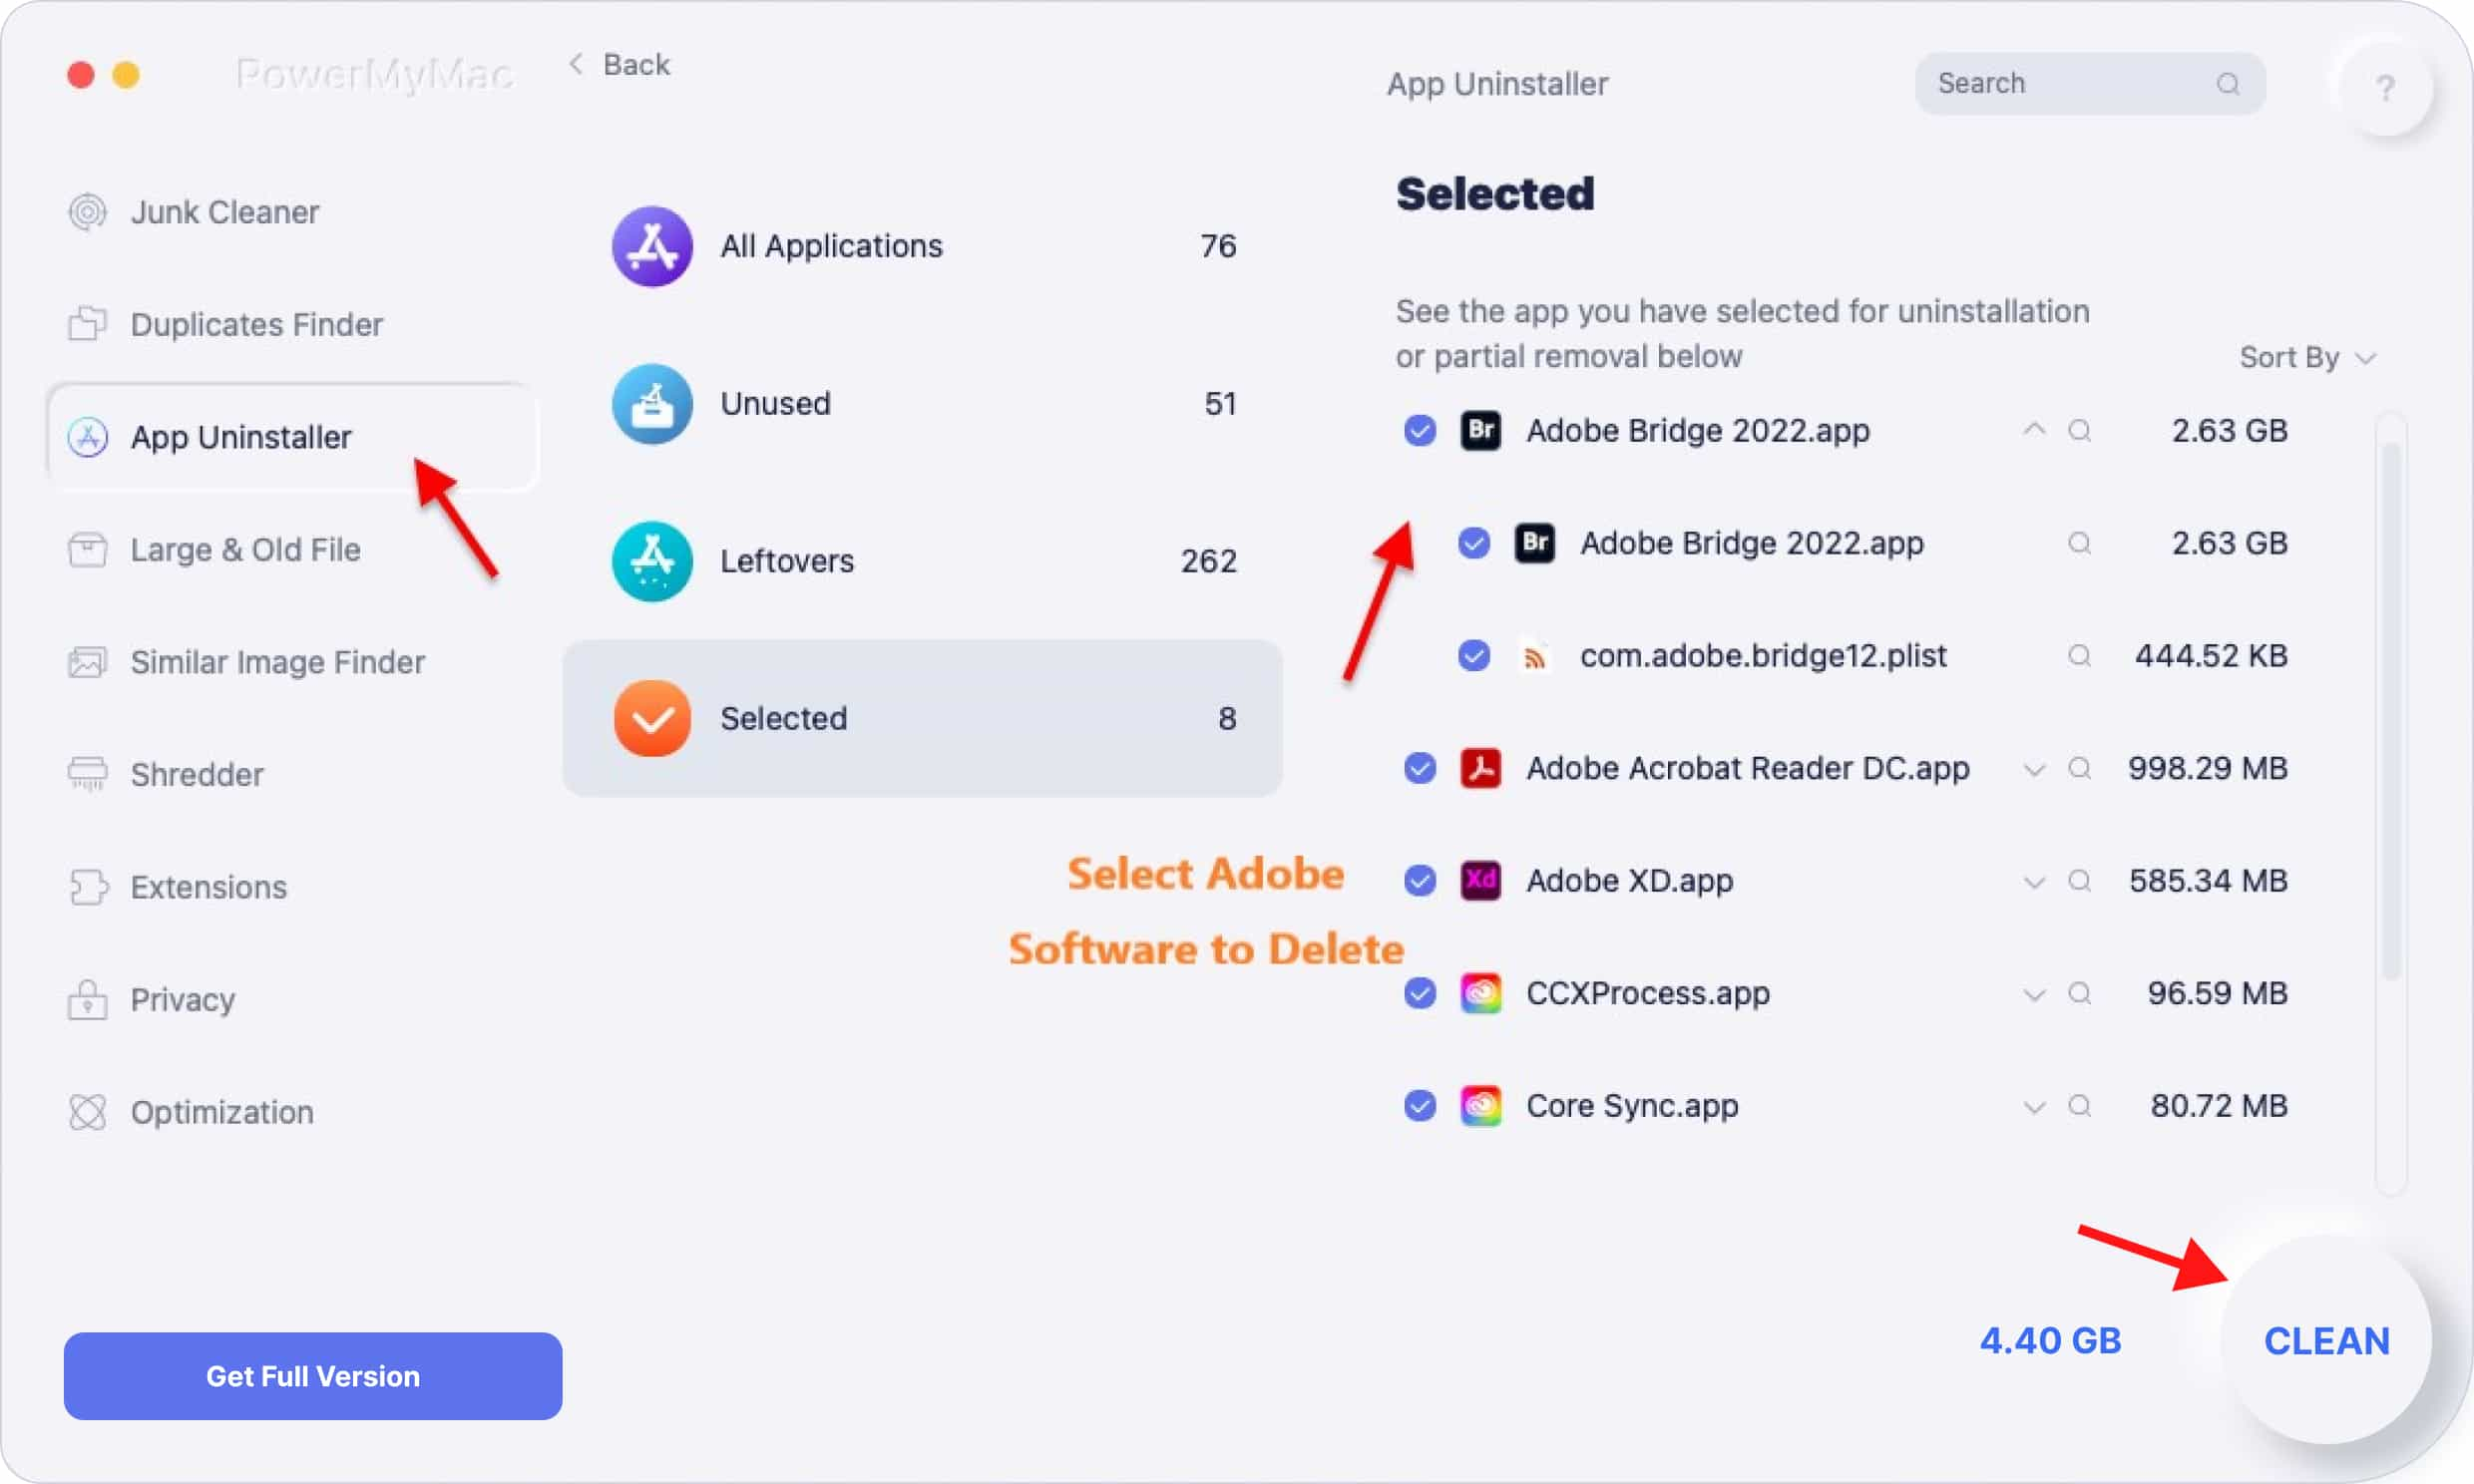
- Launch PowerMyMac and Select the App Uninstaller. Click SCAN to begin scanning all of the applications installed on your Mac.
- Once the scanning is complete, a list of apps will appear. Select the Adobe Acrobat Reader and the files associated with it.
- Click the CLEAN button; then the Adobe Reader and its associated data will be deleted. A pop-up window labeled "Cleanup Completed" will appear and show how many files were cleaned and how much space is now free on your hard drive.
Part 4. Conclusion
This article discussed how to uninstall Adobe Acrobat Reader on Mac manually and through using an app, but manually removing the Adobe Acrobat Reader DC could be time-consuming and very hassle for you.
Many users have difficulties locating the associated files of Adobe Reader. That is why it is more efficient to use a tool that can delete the app and the related files in just a few clicks. By using PowerMyMac, you can now feel more confident that all the unwanted files have been removed from your Mac.


Eva2022-09-28 08:57:58
Not working at all. How do I uninstall this?
Jen Temcio2022-04-27 18:09:32
This was immensely helpful and now my documents are working. Thank you SO SO much for your helpful content and easy to follow directions.