


 I’m a Mac user and I simply want to upgrade to macOS Sierra but it seems like stuck. My friend has been experiencing a lot of problem with his macOS Sierra after he has upgraded to it. How do we fix these problems? Please help us.
Don't worry, we will solve this problem for you below.
Contents: Part 1. What Issues Cause macOS Sierra Installation Stuck?Part 2. How to Fix macOS High Sierra Install Stuck?Part 3. How To Speed Up macOS Sierra?Part 4. Conclusion
People Also Read:How to Update MacHow to Speed Up Mac
Part 1. What Issues Cause macOS Sierra Installation Stuck?
Upgrading to the macOS Sierra can be very enjoyable. It comes with greater performance and a lot of features. However, some people don’t enjoy such benefits. They experience a lot of macOS Sierra issues of installation stuck that can be frustrating.
Fortunately, in this article, we will show you the different issues and how to fix them. Why macOS Sierra won't install? Let’s start with an outline of each of these issues of macOS Sierra installation stuck below:
1 - There is not enough disk space for macOS Sierra.
2 - Slow installation of macOS Sierra.
3 - Frozen installation of macOS Sierra.
4 - Mac device won’t launch after macOS Sierra was installed.
5 - Wi-Fi speeds are very slow after installing macOS Sierra.
6 - Troubles with regards to Bluetooth hardware on the macOS Sierra.
7 - Trouble with a variety of Safari plugins.
8 - Applications don’t launch or crashes.
9 - Reduced battery life on macOS Sierra.
10 - iTunes always crash on the macOS Sierra.
11 - Photoshop won’t launch on macOS Sierra.
12 - Slow macOS Sierra.
Part 2. How to Fix macOS High Sierra Install Stuck?
According to the issues of macOS Sierra installation stuck above, here are some of the corresponding solutions to fix "macOS Sierra won't install" issue as following:
- Get rid of unnecessary files in your system to get more disk space for the macOS Sierra installation.
- Restart your Mac and launch Safe Mode.
- Reset the NVRAM and SMC.
- Remove the outdated macOS Sierra Wi-Fi preferences.
- Use the latest Bluetooth hardware.
- Disable a variety of Safari plugins.
- Check if applications don’t launch or crashes have issues with Sierra compatibility.
Problem 1. There is not enough disk space for macOS Sierra
It can be frustrating to realize that you don’t have enough disk space to install macOS Sierra on your device. You need at least 8GB of disk space if you want to install macOS Sierra. If your device displays an error message stating that you do not have enough storage space, you must get rid of unnecessary files in your system. To do it quickly, you need powerful cleaning tools to help you do that, and here we recommend iMyMac PowerMyMac.
Problem 2. Slow installation of macOS Sierra
This is a common problem experienced by those who wish to upgrade to the macOS Sierra. And it is usually caused by a device that is cluttered. What are the fixes to this? Well, if you have started the installation process already, then you simply have to wait.
If you haven’t gone on with the process yet: Especially if your Mac device is slow and you have too few extra spaces on your drive you have to clean your Mac up. This is true too especially if the rainbow-colored wheel is showing up all the time on your device.
As stated previously, you can use PowerMyMac to uninstall the useless app that takes up much space. This will help you prepare your Mac device for the upcoming macOS Sierra installation.
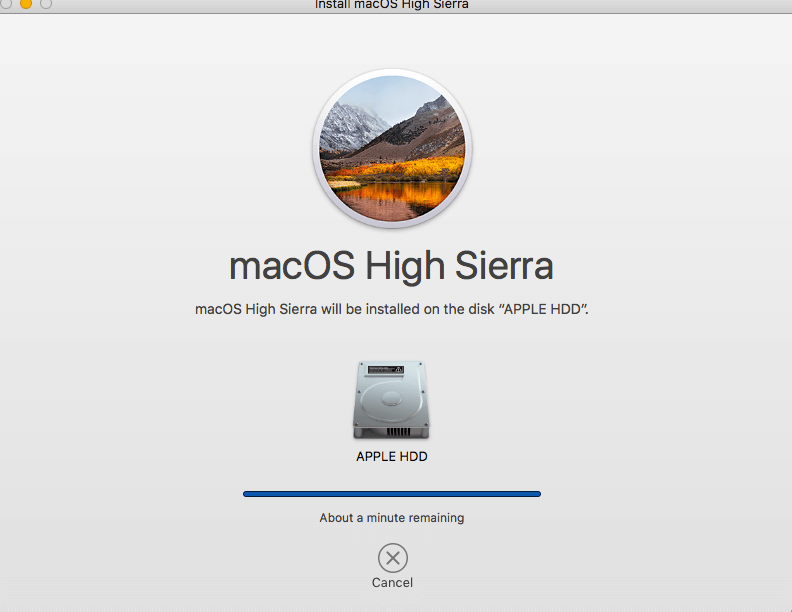
Problem 3. Frozen installation of macOS Sierra
There are times when the installation of your macOS Sierra seems stuck. This might be a good indication that the installation is frozen.
What should you do first? Well, just relax. After which press Command + L. This should give you more information on the log and it also shows you how long you actually have to wait until the installation is complete. Watch this to ensure that files are actually being installed on your device.
What if you pressed down Command + L and you’re sure that nothing is being installed (nothing is happening). What you can do is to shut down your device by holding the power button down. Then, restart your Mac device. Press Command + L again to check the log.
What if there’s still nothing going on? Well, you have to restart your Mac again. Once it opens, hold down the Shift button to launch Safe Mode. Launch the App Store and update your Mac while it is currently in Safe Mode.
Problem 4. Mac device won’t launch after macOS Sierra was installed
Finished the installation but see a grey monitor instead of your macOS Sierra? Well, this means your Mac won’t launch after macOS Sierra has been installed. What you can do is to utilize hardcore restoration methods. Here’s how to do it:
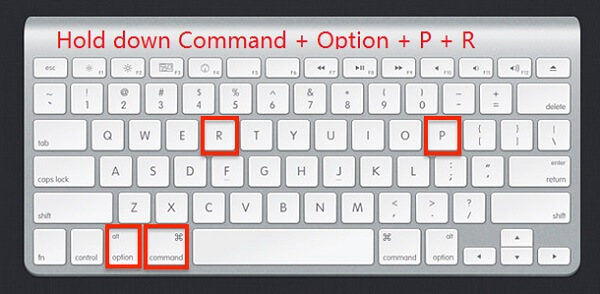
1 - Restart the Mac device while resetting the NVRAM. Do this by pressing Command + Option + R + P. Hold these keys down.
2 - Reset the System Management Controller (SMC). Do this by shutting down your Mac device and unplugging every cable. Wait for a couple of minutes.
After which, plug in the cables back again. Turn on your Mac device afterward.
3 - Boot up your Mac device in Safe Mode. Do this by shutting down your Mac device and restarting it again while you press the Shift Key (make sure you hold it down).
Plus, you have to ensure that your Mac device has a minimum of 9GB of free disk space.
4 - Remove every third-party Kext and third-party extensions available.
5 - Remove anti-virus applications.
6 - macOS Sierra does not support PPTP VPN Software. That’s why you have to remove all of these first.
Problem 5. Wi-Fi speeds are very slow after installing macOS Sierra
This problem might be caused by outdated macOS Sierra Wi-Fi preferences. You have to update it to fix this problem by removing the current preferences you have. Here’s how to do it:
Step 1 - Click out an empty spot located on your Desktop.
Step 2 - Press Command + G + Shift.
Step 3 - Type this particular directory: /Library/Preferences/SystemConfiguration/
Step 4 - Delete the files that appear in the folder that will launch. The files are shown below:
com.apple.network.identification.plistcom.apple.airport.preferences.plistcom.apple.wifi.message-tracer.plistpreferences.plistNetworkInterfaces.plist
Step 5 - After you have deleted all of these files, reboot the Mac device. Reboot the Wi-Fi router as well.
Problem 6. Troubles with regards to Bluetooth hardware on the macOS Sierra
If some of the hardware included in your device doesn’t work after you have updated to the macOS Sierra, it might be because it’s outdated. Apple is actually part of the Bluetooth Special Interest Group (Bluetooth SIG) that makes sure the development of the Bluetooth are within standards. Thus, Apple keeps up with it every single time.
macOS Sierra supports only the latest Bluetooth hardware. Thus, if yours is outdated and cannot be updated, you have to replace it with something new.
What the solution? You have to downgrade to El Capitan. Or, you have to upgrade your hardware.
Problem 7. Trouble with a variety of Safari plugins
This one is not actually a problem. It’s actually a feature of macOS Sierra. Apple usually wants to get rid of outdated stuff like Java, Flash, Quicktime, and Silverlight. When you give up these outdated plugins, you are given a faster and better browsing experience---enabling you to enjoy the new HTML5.
macOS Sierra Safari will ask you if you would like to turn on the plugin if you come upon a site that uses these outdated ones. What you can do is the state to Safari if you want to turn on the plugins once, every single time, or cancel it (and actually don’t ever return back to the website that utilizes Flash and other outdated plugins).
Problem 8. Applications don’t launch or crashes
There are times when applications don’t work in macOS Sierra. They simply won’t open or they crash altogether. The reason for this is actually simple. It is not compatible with the said operating system.
Why is this so? Well, maybe the developers haven’t updated the application to make it compatible with macOS Sierra. Or, you, yourself haven’t updated the app to its macOS Sierra-compatible version.
What’s the solution? Well, you have to check out if there are updates to these applications. You can visit the official website of the app to check if they have issues with Sierra compatibility. Finally, you can actually check out if there’s an alternative app you can use to replace these non-compatible applications. If you wish to uninstall these outdated apps, don’t simply put them into the trash. Use PowerMyMac’s App Uninstaller to completely wipe it off your system.
Problem 9. Reduced battery life on macOS Sierra
A lot of people experience reduced battery life on macOS Sierra. But the problem isn’t usually with the operating system itself. It might be because the battery is really old. Or sometimes, it might be because there are a lot of applications running in the background. Other reasons might be insufficient RAM and a disk drive that is filled with files and folders (not enough disk space).
If you think your macOS Sierra experiences reduced battery life, you can actually check out the problem on your Mac device.
Step 1 - Launch Activity Monitor and check out what actually runs on your device currently.
Step 2 - Check the Autorun. These include applications that automatically run when your Mac device starts up. Check out if there are autorun applications that are unnecessary.
Then, remove them from actually running when the Mac device starts up.
Step 3 - If nothing really helps you, you should downgrade to a lower operating system, El Capitan.
It’s better to have a long battery life while using the older operating system than having the new one but your device shuts down after only a few hours of using it.
Problem 10. iTunes always crash on the macOS Sierra
This can be a problem on some iTunes versions especially on the iTunes 12.5.3. There are a variety of reasons for this. However, there are some things you can implement to fix it. For one, you can downgrade to a more stable iTunes version. If there is a newer version, you can upgrade to it too.
*If you want to upgrade to the newer version you can do it by launching the App Store. Go to the Updates Tab. Then, check out iTunes.
*If you want to go back to previous versions, you can utilize the backup from Time Machine. Or, you can go to the Apple website to download it.
Problem 11. Photoshop won’t launch on macOS Sierra
This problem goes way back in 2016. What you can do is to reinstall Photoshop or you implement a macOS Sierra clean install. To reinstall Photoshop, you can first uninstall it with PowerMyMac’s App Uninstaller (as stated above). Make sure you keep your license key so you can use it again once you reinstall Photoshop.
Now, the last problem (#12) would be solved in the next part. It will show you different ways to speed up macOS Sierra.
Part 3. How To Speed Up macOS Sierra?
Is problem #12, a slow macOS Sierra your problem? We’ll show you how to speed it up. Let’s get on with the first method.
Method 1 - Clean Up Your Device’ Disk Drive
You might need to clean up your hard drive. How do you do this? Well, it’s either you manually clean it or use a tool (iMyMac PowerMyMac). If you prefer to take it easy, use the tool and follow the steps stated above.
Method 2 - Using Special Effects? Well, Tune Them Down
This could provide a small speed boost to your Mac device. Here’s how to do it:
- Visit Settings
- Go To Accessibility
- Go To Desktop
- Reduce special effects such as transparency and desktop motions
- Use F1 (on your keyboard) to minimize brightness
Method 3 - Activate Optimized Storage
You can use iCloud Storage to store unused files and even old ones. Do this by following the steps below:
- Go to Apple Menu
- Visit About This Mac
- Go to Storage
- Click Manage
- A window will launch. You have to click up Store in Cloud and Optimize
Take note that you are only given 5GB’s worth of storage on iCloud. If you need a whole lot more storage, you have to pay a monthly fee.
Method 4 - Clean The Desktop Up
If you have A LOT of icons situated within your desktop, you have to reorganize it. Group files into various folders and clean up files you don’t need. This will speed up your system.
Method 5 - Utilizing First Aid
You can utilize the disk permission repair tool, this is built into your Mac system and is used to fix a slow performing macOS. Here’s how to do it:
- Launch Disk Utility
- Select the main hard drive on your device
- Click First Aid
Method 6 - Reset Your SMC
When these options above do not work, you have to reset your System Management Controller (SMC). The reasons you have to do this is varied. For example, if your hardware is not behaving properly (lights, keyboards, and fans), you should do an SMC reset. If performance is slow, you should also implement this fix. Resetting your SMC is also the fix for problems related to the battery (wake, sleep, charging, etc.).
Before you actually reset the SMC, you have to close applications. Plus, you have to force quit all applications that are not responding by pressing Command + Escape + Option). You have to ensure the instructions to reset your Mac is noted down or is open in another device cause you need to shut your Mac down.
Here’s a guide for Mac notebook devices (on how to reset the SMC):
Step 1 - Shut the Mac down.
Step 2 - Plug in the power cord.
Step 3 - Press Shift + Option + Control and press the power button too. Press all of these simultaneously.
Step 4 - Release all of them.
Step 5 - Turn on your Mac device again.
Here’s a guide on resetting the SMC on Mac desktops:
Step 1 - Shut down Mac. After which, unplug it.
Step 2 - Wait for at least 5 seconds.
Step 3 - Plug it back again.
Step 4 - Wait for at least 5 seconds again.
Step 5 - Turn on the Mac desktop.
Method 7 - Resetting Your PRAM/ NVRAM
Non-volatile random-access memory, that’s what NVRAM stands for. Parameter random-access memory refers to PRAM (used in older versions of Mac devices). Usually, when you reset your NVRAM, it’s because of these issues:
*Screen resolution problems
*Mac opens up with the wrong disk
*Kernel process actually panics
Here’s how to do it step-by-step:
Step 1 - Shut the Mac device down.
Step 2 - Find the keys Command + Option + R + P
Step 3 - Turn up the Mac and wait until the startup sound rings up
Step 4 - When the startup sound rings up, press all the keys stated before. Hold them up.
Step 5 - Hold these keys until the Mac device restarts again and the startup sound rings up.
Step 6 - Once the startup sound rings up, let the keys go.
Method 8 - Upgrading Your Hardware
This is the last option you should do. It’s up to you if you want to get more RAM (memory) or if you want to use faster drives such as solid-state drives (SSDs). Of course, you would need money to do this but it’s actually worth it if you don’t want to experience issues with macOS Sierra.
Part 4. Conclusion
Having problems with macOS Sierra installation getting stuck? Not a problem, we’ve got you covered. Experiencing other issues? Again, there’s nothing to worry about. We have all the fixes to the most common problems faced with macOS Sierra. Simply follow our guide above and use the tools we recommend (e.g. PowerMyMac) to help you solve your problems.
macOS Sierra typically runs smoothly and it is faster compared to older operating systems. There might be a multitude of reasons why it’s having problems on your Mac device. If a particular problem is of interest to you, you can check out this guide for more information. Finally, you can use PowerMyMac to clean your Mac of unnecessary files and speed up its performance. You can also use its Uninstaller (from the same company) to get rid of unwanted applications completely and cleanly.


Rks2021-11-21 03:12:23
High sierra stuck at a stage of selection disk ! What to do Disk space 155 gb left (1tb) I am trying Online recovery Mcbook is intel early 2011 13.3 with dvd option
Mohamed2020-09-28 17:50:05
Bonsoir j'ai une question a posé je veux revenir a Sierra mais toujours un pbs j'ai changé la date en mai 2015 ds le terminal bien demarré l'installation mais a 20 seconde de la fin je reçois ce massage : les données utiles du programme n'ont pas réussi la verification de la signature. Que faire et merci