


Knowing how to encrypt a folder on your computer adds an extra layer of security to private contents. This comes in handy in scenarios where you want to shut off prying eyes. The option for password protection will not pop up with a click on a folder; you must generate a protected folder. macOS omits native capability to incorporate password protection into folders.
So how to put password on folder mac? Creating a rudimentary password entails an encrypted disk image via the operating system’s Disk Utility tool. Once generated, you can access the folder in the form of a mounted virtual disk to modify, delete or add content after typing a designated password.
Contents: Part 1. How to Encrypt A Folder with Disk UtilityPart 2. Encrypt Files with Terminal via OpenSSL or CompressionPart 3. Third-Party Software to Protect Folders
People Also Read:How to Reset Mac Password?How to Securely Password Protect Zip File on Mac
Part 1. How to Encrypt A Folder with Disk Utility
Any changes you introduce with the disk mounted will be automatically encrypted and password-secured upon yanking the disk to the Trash. To encrypt a folder, follow these steps:
Step 1: Open Disk Utility
Head for the macOS Disk Utility in the Applications folder or invoke the app via Spotlight. Once spotted, open the program.
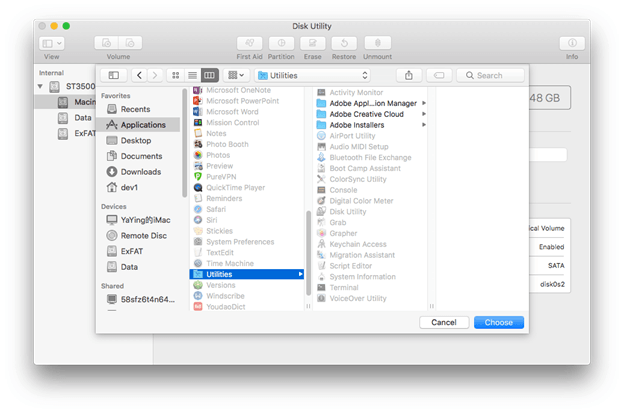
Step 2: Identify the Folder You Want to Password Protect
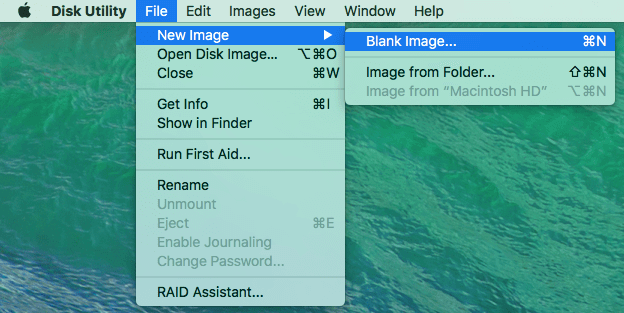
Click on File in the Disk Utility toolbar, choose New from the sequential drop-down menu, and then Disk Image from Folder. Afterward, identify the folder you want to password protect in the resultant folder, selecting it, and hitting the Image button on the bottom-right edge of the window.
Alternatively, hunt down the folder with the search bar in the top-right corner and hit the Image button in the lower right corner of the screen.
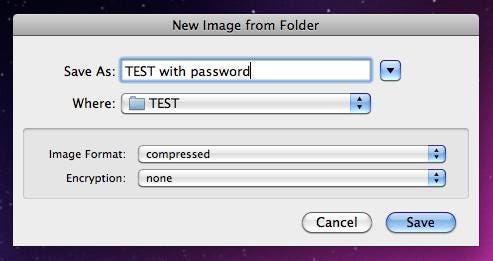
Step 3: Select 128-bit AES Encryption
After you tag and name the resultant files, choose read/write in the drop-down menu explicitly right of the ‘Image Format’ prompt. Next, select 128-bit AES encryption unraveled by the drop-down menu on the right of the encoding option. Now, select a preferred save destination and hit the Save button from the bottom-right edge when finished.
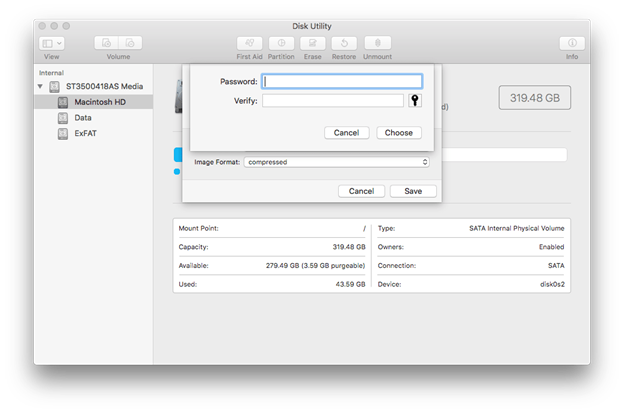
Step 4: Type and Re-enter Your Chosen Password
Once prompted, type and re-enter your chosen password in the spaces in the center of the pop-up window. Afterward, unselect the box on the left of Remember password in my keychain and hit the ‘OK’ key on the bottommost right of the window.
After creating the password-protected disk image, confirm it works like clockwork by attempting to access its components. Once you ascertain protection, erase the parent folder to make it inaccessible.
How to Use An Encrypted Folder
Your password-protected item will pop up in the Finder window in form of a .dmg file. Double-click to launch it. You’ll get a prompt to type your password after launching the file.
The disk image will throw up in the Locations on directly left of the Finder window after you launch it with the password.
Hit the folder’s name under the Locations set of options to view the contents in it. You may want to yank contents into the .dmg folder just like a regular one. You can also store new items into this directory.
Once you type the password, the disk image stays open in the Locations menu unless ejected. Right-click on the folder, select "Eject [folder name]" to exit the window. It will vanish from the Locations menu.
Part 2. Encrypt Files with Terminal via OpenSSL or Compression
Protect Items via Terminal, Using OpenSSL
Another built-in folder protective option is invoking Terminal and it entails some code. It’s a game-changer when you want to throw in files to an encrypted folder on Mac.
Step 1: Launch Terminal on Mac and type the following command.
Under this flight path:
openssl and aes-256-cbc portray the encryption type.
–in ~/Desktop/Photo.jpg depicts the file you wish to encrypt and its destination.
-out ~/Desktop/Encrypted.file shows the source where the encrypted file is stored.
Step 2: Enter the command and feed the encryption password when prompted. Confirm the password to proceed.
Step 3: Afterward, you’ll access the Encrypted.file document on Desktop. Based on your demands, you can tweak the directory or encryption methods.
Use this technique to encrypt and shield individual files.
Password Protect Files with Compression via Terminal
Compressing the folder with a password locks out all unauthorized snoops. However, it exists as a ZIP file making it transferable or shareable.
- Launch Terminal and place it where you’ve saved the file. For instance,
cd ~/Desktop. - Next, after the verification, you’ve to type the following command:
zip -e photo.zip photo.jpg. - This means the item
Photo.jpgconverts to a ZIP file labeledphoto.zip. Enter a strong password following the command. Repeat the password to confirm. - Immediately, you’ll spot the zipped file on its original location. No one will access the ZIP without the password to launch the folder on your Mac.
Part 3. Third-Party Software to Protect Folders
Third-party apps like MacPaw Hider offer state-of-the-art Mac solutions that allow you to encrypt, decrypt and save folders. It shields data with a single master password. The software also lets you set specific passwords for saved files. It employs 256-bit encryption for bullet-proof protection. They also include an option to conceal items. Most are paid software but you can give a whack at a free trial.
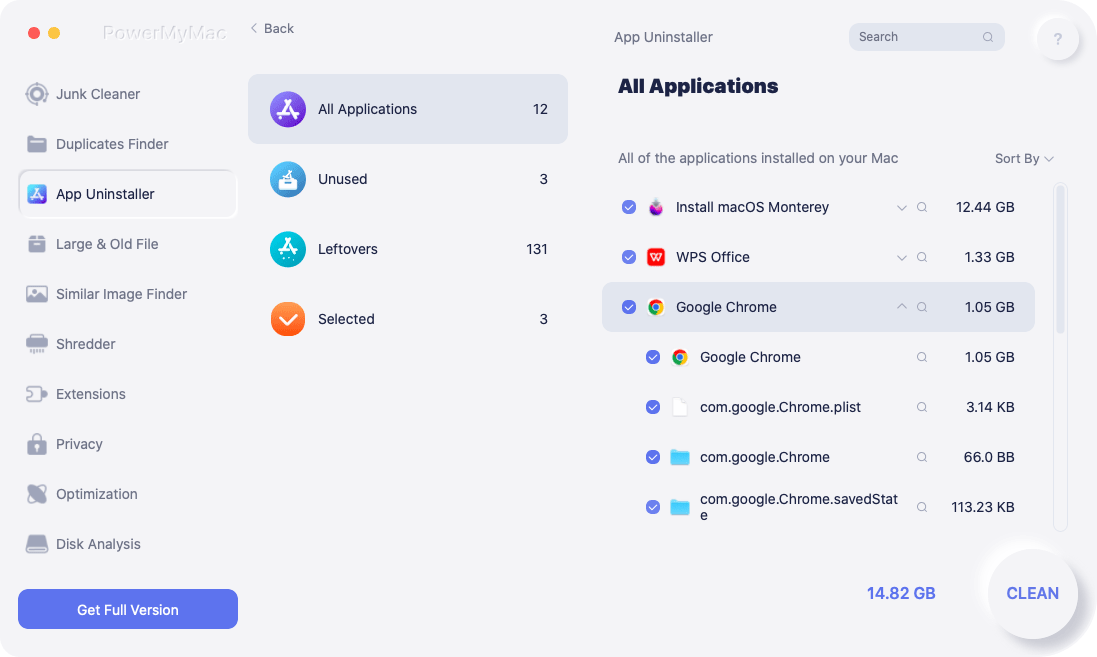
Bonus Tip: Mac First Aid- PowerMyMac
iMyMac PowerMyMac offers an advanced all-in-one cleanup, optimization, and system maintenance multi-tool. It boasts a clever mix of nifty features to simplify errands such as app uninstallation. PowerMyMac farms out junk from hard-hit spots like iPhoto and iTunes.
A cluttered Mac runs out of steam due to hogged memory. Therefore, I invite you to install it to keep your Mac in tiptop shape by freeing gigabytes of space. PowerMyMac adds years to your Mac’s life and boosts performance. It performs up to several serviceability functions.
Final Thoughts
In the end, Mac OS X folders restrict direct encryption forcing you to resort to password-fortified containers. This will ultimately secure your folder and the contents with a password. You can protect folders with a password with built-in Disk Utility or Terminal.
Moreover, you can also encrypt data or files by following similar steps. You only need to convert any item into a disk image to hem in the contents behind a password.
Was this tutorial helpful? We would love to hear from you- just weigh in on the topic in comments.


Chris R2023-01-11 21:15:54
What happens if you forget the password for the encrypted folder?