


As technology advances, the importance of cybersecurity becomes increasingly evident. Malicious software, or malware, can pose a significant threat to the security of our devices and personal information. To combat these risks, many users turn to reliable antivirus programs such as Malwarebytes.
While Malwarebytes is a powerful tool for detecting and removing malware, it also relies on a cache system to enhance its performance. However, over time, it can accumulate unnecessary data, potentially affecting the program's efficiency so it’s important to clear Malwarebytes cache. In this article, we will explore the process of clearing the app's cache, guiding you through the steps to optimize the software's performance and bolster your computer's security.
Contents: Part 1. What Is Malwarebytes?Part 2. How to Clear Malwarebytes Cache?Part 3. Reliable Option to Clear the Malwarebytes CachePart 4. Final Thoughts
Part 1. What Is Malwarebytes?
Malwarebytes is a popular antivirus and anti-malware software designed to protect computers from various forms of malicious software. It offers robust scanning and detection capabilities, helping users identify and remove malware threats effectively.
Malwarebytes utilizes advanced algorithms and heuristics to detect both known and emerging malware, ensuring comprehensive protection against viruses, spyware, ransomware, and other cyber threats. With its user-friendly interface and frequent updates, Malwarebytes has gained a strong reputation in the cybersecurity industry. Whether you are an individual user or a business, Malwarebytes provides an essential layer of defense to keep your computer systems safe and secure.
Part 2. How to Clear Malwarebytes Cache?
To clear the cache in Malwarebytes and optimize its performance, follow these step-by-step instructions:
- Launch Malwarebytes. Open Malwarebytes on your computer by double-clicking the Malwarebytes icon on your desktop or accessing it from the Start menu.
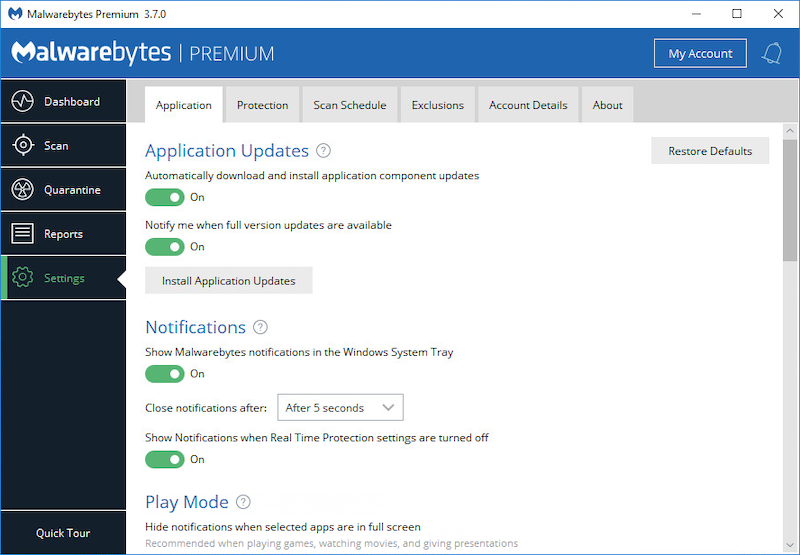
- Access the Settings. In the Malwarebytes interface, click on the “Settings” option located at the bottom left corner of the window. This will open the Settings menu.
- Navigate to the Application tab. Within the Settings menu, locate and click on the “Application” tab. This tab contains various settings related to the functioning of Malwarebytes.
- Scroll down to the “Cache” section. Scroll down the Application settings until you find the “Cache” section. Here, you will see the option to clear the cache.
- Clear the cache. Click on the “Clear” button next to the “Cache” option. A confirmation dialog box will appear asking if you want to clear Malwarebytes cache. Click “OK” to proceed.
- Restart Malwarebytes. After clearing the cache, it is recommended to restart Malwarebytes for the changes to take effect. Close the Settings menu and exit Malwarebytes completely. Then, relaunch the program by double-clicking the Malwarebytes icon.
- Verify cache clearance. Once Malwarebytes restarts, you can verify if the cache has been successfully cleared. Go back to the Settings menu, navigate to the “Application” tab, and scroll down to the “Cache” section. Check if the cache size displays as zero or a significantly reduced value, indicating successful clearance.
Congratulations! You have successfully cleared the cache in Malwarebytes. By removing unnecessary data from the cache, you can optimize the program's performance and enhance its efficiency in detecting and removing malware threats.
How to Clear the Malwarebytes Cache on Browser?
Clear Malwarebytes Cache on Google Chrome:
- Launch Google Chrome. Open your browser for Google Chrome within the computer by double-clicking the Chrome icon on your desktop or accessing it from the Start menu.
- Access the Chrome settings. Click on the three vertical dots located within the upper-right corner of the Chrome window to open the Chrome menu. From the dropdown menu, select “Settings”.
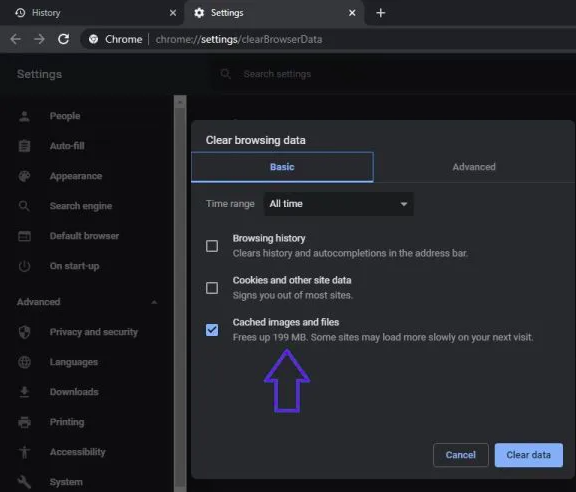
- Clear browsing data. In the Settings page, scroll down and click on the “Privacy and Security” section. Then, select “Clear browsing data”.
- Customize the time range and cache. In the Clear browsing data window, you can choose the time range for which you want to clear the cache. To clear the entire cache, select “All time”.Additionally, make sure the “Cached images and files” option is checked.
- Clear the cache. Click on the “Clear data” button to clear the cache. Chrome will remove the cached files, including the Malwarebytes cache, from your browser.
Clear Malwarebytes Cache on Safari:
- Launch Safari. Open Safari on your Mac by clicking on the Safari icon in the Dock or by accessing it from the Applications
- Access Safari preferences. Click on “Safari” in the menu bar at the top of the screen and select “Preferences” from the dropdown menu.
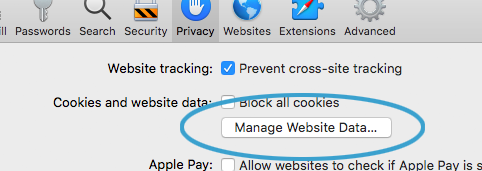
- Open the Privacy tab. In the Preferences window, click on the “Privacy” tab located at the top.
- Manage website data. Within the Privacy tab, click on the “Manage Website Data” button. This will open a new window displaying all the website data stored by Safari.
- Remove website data. In the Website Data window, you can search for “Malwarebytes” using the search bar. Once you find it, select it and click on the “Remove” button. Safari will delete the cached data associated with Malwarebytes.
Part 3. Reliable Option to Clear the Malwarebytes Cache
If you're looking for a reliable option to clear Malwarebytes cache and optimize your Mac's performance, iMyMac PowerMyMac is an excellent choice. PowerMyMac is a comprehensive utility software that offers a range of features to clean, optimize, and maintain your Mac.
One of the key modules in PowerMyMac is the "Junk Cleaner." This module is specifically designed to identify and remove unnecessary files and data, including app caches, system junk, user logs, and more. By utilizing the Junk Cleaner module, you can effectively clear the Malwarebytes cache and improve the overall performance of your Mac.
To clear Malwarebytes cache using PowerMyMac's Junk Cleaner module, follow these steps:
- Download and install PowerMyMac. Visit the official PowerMyMac website and download the software. Install it on your Mac following the on-screen instructions.
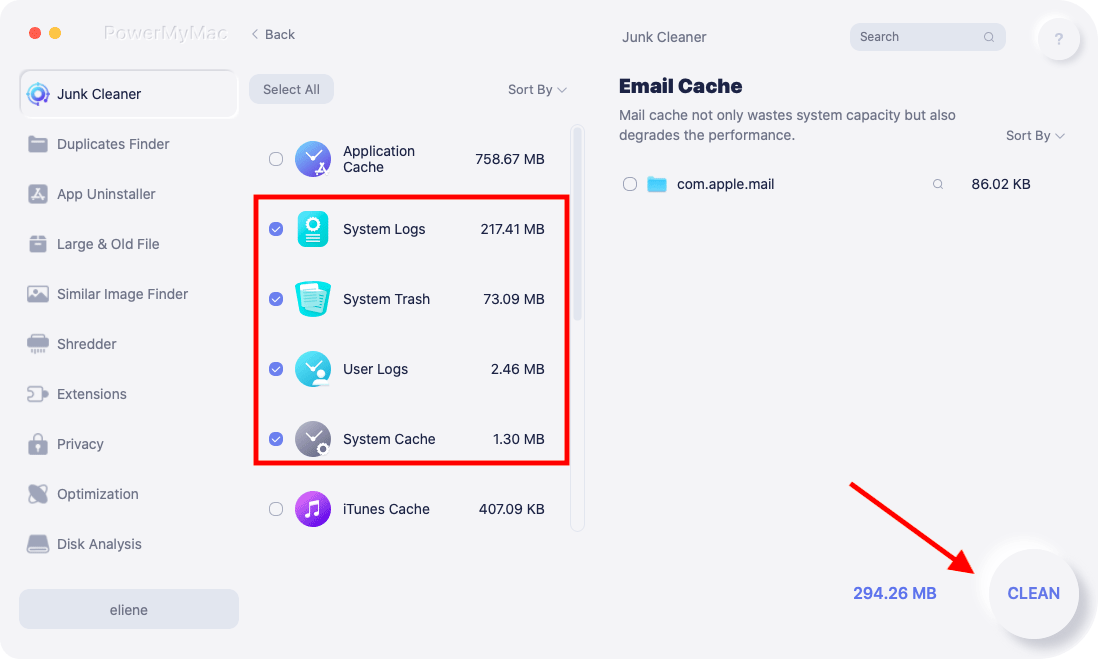
- Launch PowerMyMac and navigate to the “Junk Cleaner” module. Open PowerMyMac and click on the “Junk Cleaner” module located in the left sidebar of the main interface.
- Scan your Mac for junk files. Click on the “SCAN” button to initiate a scan of your Mac. PowerMyMac will analyze your system for various types of junk files, including app caches.
- Review and select the Malwarebytes cache files. Once the scan is complete, PowerMyMac will present you with a detailed list of junk files that can be safely removed. Look for the Malwarebytes cache files in the results.
- Clear the Malwarebytes cache. Check the box next to the Malwarebytes cache files and click on the “CLEAN” button. PowerMyMac will remove the selected files, including the Malwarebytes cache, from your Mac.
By using PowerMyMac's Junk Cleaner module, you can easily clear Malwarebytes cache and enjoy a cleaner, faster, and more efficient Mac. Additionally, PowerMyMac offers other useful features like app uninstallation, file management, and performance monitoring, making it a comprehensive solution for optimizing your Mac's performance.
Part 4. Final Thoughts
In conclusion, when it comes to clearing the Malwarebytes cache and optimizing your computer's performance, we recommend considering the use PowerMyMac. It is a reliable and comprehensive utility software that offers a range of features to clean, optimize, and maintain your Mac.
With its "Junk Cleaner" module, PowerMyMac enables you to efficiently clear Malwarebytes cache and other unnecessary files and data on your Mac. If you often download software on the App Store, you may need to erase the cache of App Store regularly. By removing junk files, you can free up valuable storage space, enhance system performance, and improve the overall efficiency of your computer.

