


Optimizing system performance is crucial in our fast-paced digital environment. Our computer systems gather temporary files and extraneous data over time, which may slow them down. An easy solution is provided by the well-known optimization program CCleaner, which enables users to clean their cache and improve system speed. In this tutorial, we'll look at the detailed instructions to clear CCleaner cache on Mac operating systems.
You may improve your system's responsiveness and performance by following these guidelines while also releasing critical storage space. This article will provide you with the information and resources you need to effectively clear the app's cache, regardless of whether you're a computer novice or a tech aficionado. Let's dig in and discover the keys to a computing experience that is quicker and more effective.
Contents: Part 1. Easy Steps to Remove CCleaner Cache on MacPart 2. Automatic Way to Clear CCleaner CachePart 3. Bonus Tips: Want to Uninstall CCleaner to Free up Storage?Part 4. Conclusion
Part 1. Easy Steps to Remove CCleaner Cache on Mac
1. How to Clear CCleaner Cache on Mac
Luckily, there are a couple of ways to delete the majority of your Mac's cache files. The best and simplest steps will be done last. Feel free to skip right to the conclusion if you can't wait to learn the answer. Let's look at how to manually remove your cache if you wish to.
By going to your web browser's settings, you may remove the browser's cache files. It may be a bit more difficult to clear user and system cache files. Here's how to carry out both.
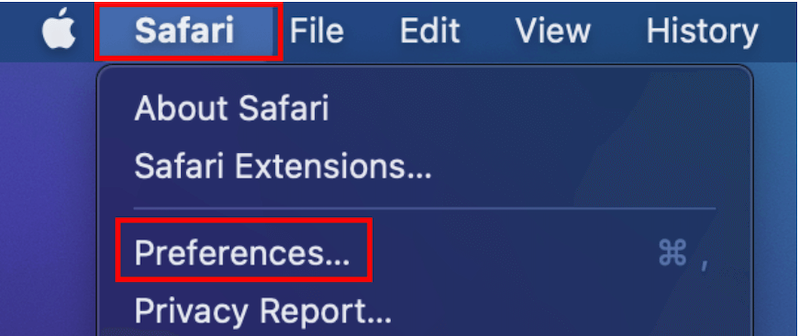
Clear CCleaner Cache on Safari
- Launch Safari and choose “Preferences” from the dropdown list after selecting “Safari” in the menu bar.
- Select the checkbox next to “Show Develop menu in menu bar” by clicking “Advanced” after which.
- The menu item “Develop” will show up in the top-left corner of the screen.
- Select "Develop" and then “Empty Caches”.
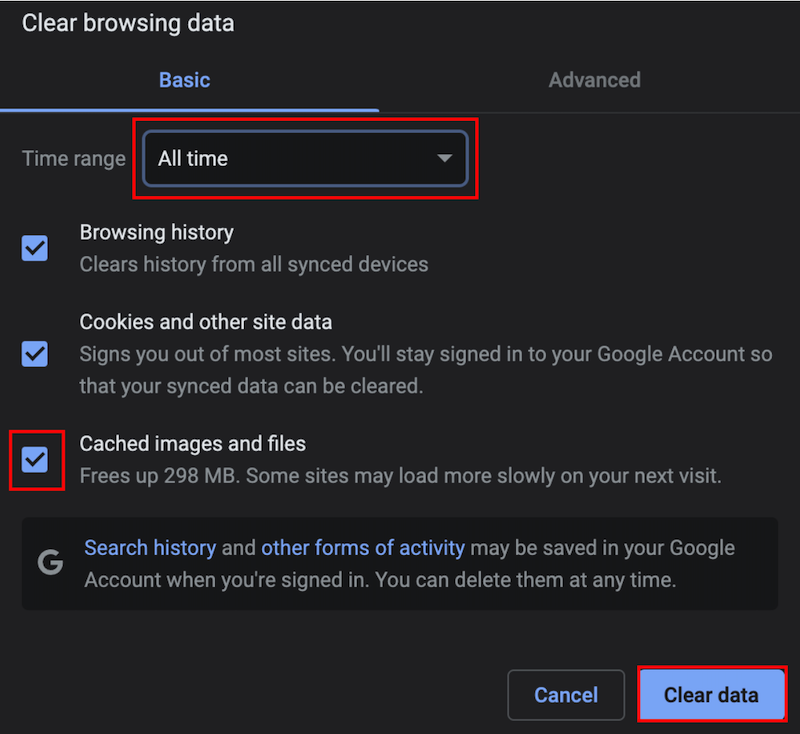
Clear CCleaner Cache on Chrome
- Launch Chrome, then choose “Settings” from the dropdown menu in the top-right corner.
- Click “Clear browsing data” under the “Security and privacy” heading on the left.
- Choose the period from the dropdown box (“All time” will delete it all for you).
- Check the box next to “Cached images and files” before clicking “Clear data”.
2. How to Delete System or User Cache with CCleaner
Before trying to clear system or user cache files, always make a backup of all system files. You cannot reverse-clearing the cache after it has been done, and thus, certain system processes may not work as intended.
To clear CCleaner cache, follow these steps:
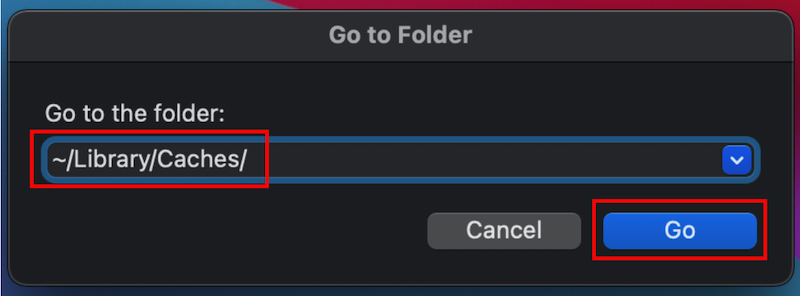
- Launch the Finder and choose “Go”, followed by “Go to Folder...”
- Enter “
/Library/Caches/”and press “Go”. - You may now choose the files or folders you wish to remove.
- Drag the cache files into your dock's “Trash”.
- Select “Empty Trash” using the right-click menu on the “Trash” symbol.
Part 2. Automatic Way to Clear CCleaner Cache
You may use third-party applications like iMyMac PowerMyMac to erase CCleaner cache if you want a more automatic method. You may completely clean and improve your Mac using the PowerMyMac program. It's possible that doing so will boost productivity, protect user privacy, and save up space on a Windows or Mac computer.
On your Mac or Windows computer, it can quickly locate and eliminate anything unnecessary, saving up a lot of storage space. PowerMyMac can assist you in removing any unneeded programs and files from your computer. PowerMyMac is a fantastic program for cleaning up Mac operating systems. Your computer's storage space can increase if you clear CCleaner cache using the Junk Cleaner option. On your Mac or Windows computer, it is suggested that you utilize PowerMyMac Junk Cleaner to clear the CCleaner cache.
- Launch the Junk Cleaner program, then press the SCAN button to begin looking through your computer for unnecessary files.
- You will have the opportunity to group all of the worthless documents on your computer when the scanning procedure is complete.
- Simply choose the document you want to delete and click "Select All".
- Selecting "CLEAN" will immediately delete the items you have selected from the list.
- Following the completion of the cleaning procedure, a pop-up screen with the title "Cleared Completed" will show.

Part 3. Bonus Tips: Want to Uninstall CCleaner to Free up Storage?
You may remove CCleaner to make up more storage space if you decide you no longer need it or want to investigate other optimization solutions (Choosing to clear CCleaner cache is not the only solution). Take the following actions to remove CCleaner on your computer:
- Windows: On a machine running Windows, use the Start menu to access the "Control Panel." Find the "Programs" or "Programs and Features" button in the Control Panel. Right-click on CCleaner in your list of installed apps and choose "Uninstall".
- Mac: On a Mac, look in the Applications directory for the CCleaner program. "Move to Trash" may be chosen by performing a right-click over the CCleaner icon. Then, to fully uninstall CCleaner from your Mac, empty the Trash.
In addition to the above steps, you can use PowerMyMac's App Uninstaller function for a faster and easier uninstallation process of CCleaner. To select the optimization tool that best meets your objectives, keep in mind to take into account other solutions and investigate their capabilities.
Part 4. Conclusion
One of the most essential steps in keeping a computer system organized and effective is clearing the CCleaner cache. Both Windows and Mac users may successfully clear CCleaner cache files by following the simple instructions provided in this article, which will enhance system speed and free up storage space.
Furthermore, using programs like PowerMyMac offers an automatic way to clear CCleaner cache files, significantly streamlining the procedure. To make sure your computer continues to function quickly and effectively for years to come, remember to routinely clear the cache and investigate other optimization solutions.

