


Bytefence Anti-Malware suffers from distribution problems, difficulties during removal, and intrusive adjustments to browser settings. All of this is connected to the actions taken by programs that can be considered undesirable. So we will introduce how to simply remove Bytefence Anti-Malware with a detailed virus removal guide.
Contents: Part 1. What Is ByteFence Anti-malware?Part 2. How to Manually Remove ByteFence from Mac? Part 3. Automatically & Easily Remove ByteFence from Mac
Part 1. What Is ByteFence Anti-malware?
Byte Technologies has developed a security application known as the authentic Bytefence Anti-Malware. Its primary function, similar to that of other anti-malware software, is to guard computers against viruses, trojan horses, malware, spyware, and other forms of online danger.
Bundling Bytefence Anti-Malware with some other software is a dubious software distribution strategy that is used rather aggressively by the makers of Bytefence Anti-Malware. Using this form of strategy, the apps are installed on a computer without the permission of the user.
Users have claimed that after the included version of Bytefence Anti-Malware is installed on a system, it alters the settings of the system, particularly setting search.bytefence.com as the primary search engine for the browser. User queries are sent to external search engines when they are submitted on this page.

Because of its potentially malicious method of dissemination, it has been given the label Bytefence Anti-Malware virus and people would want to remove Bytefence because of this. However, does ByteFence operate like a virus? Even so, this is not the case.
It's a real anti-malware program that was created by Byte Technologies, but it gained a bad reputation because it was bundled with other applications and distributed that way. Not only did ByteFence download itself secretly on customers' computers, but it also altered their browser settings without obtaining their permission.
ByteFence has been labeled as a possibly unwanted application by cybersecurity experts due to the fraudulent behavior of the company and the deceptive promotional practices that it has employed.
Part 2. How to Manually Remove ByteFence from Mac?
Delete ByteFence requires the completion of a number of individual actions. Since it is not malware, you are free to attempt to remove it from your computer by yourself.
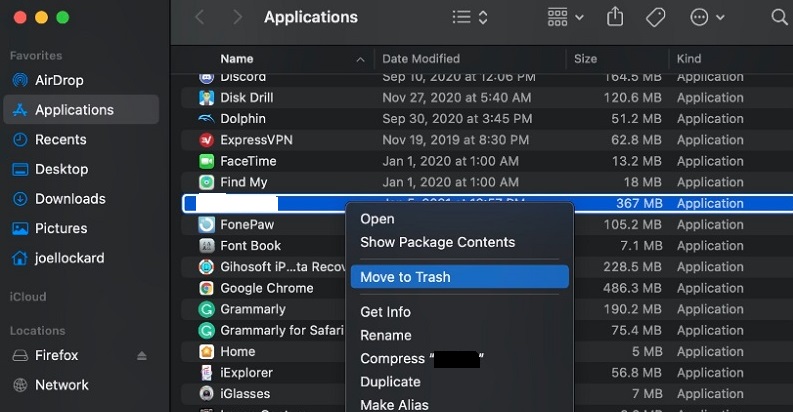
Utilizing the Trash icon, which can be found at the far right-hand side of the Dock, is the most typical method for initiating the manual uninstallation of ByteFence on a Mac.
- You can access the Applications folder by clicking the Finder logo within the Dock and navigating to that location.
- When you have located the potentially malicious application related to ByteFence, simply drag it directly from the directory toward the trash bin to get rid of it.
- Clear out the Trash.
It is important to take note that with the release of macOS Catalina, Apple changed the name of the Trash folder into Bin in certain other countries.
When you attempt to accomplish this task by yourself, there are situations when ByteFence will not uninstall in its entirety. There is still a possibility that some components of the sneaky application are concealed in one or more directories.
The question now is, what could be done to permanently get rid of it? The most efficient method is to make use of a dependable program in order to delete all of the files which are associated with the ByteFence, which is something that will be covered in further detail in the following section.
Part 3. Automatically & Easily Remove ByteFence from Mac
You aren't going to bother carrying through the typical procedures, are you? If this is the case, your best option would be to make use of iMyMac PowerMyMac, which is in charge of all the essential tasks for you and allows you to delete ByteFence Anti-Malware in a secure and comprehensive manner.
Because it is as easy as hacking a path through the thorns and brambles, there is no need to be concerned about any difficulties that may arise in the midst of the removal process. Not only can this tool remove ByteFence, but also it can delete iLivid anti-virus program quickly.
We are going to walk you through each step in using the App Uninstaller feature to ensure that the next time you wish to uninstall software by using it, you will be able to do it much more quickly.
- Launching PowerMyMac, heading to the app's home page, and selecting App Uninstaller from the menu that displays will begin the removal process.
- Your computer will be completely checked for any software that is currently installed when you click the SCAN
- You can select which apps to delete from a list of all the ones that are currently installed. By entering its name into the search bar, the app can be found.
- Choose "CLEAN" to delete all Bytefence-related files from your computer.
- A notice with the words "Cleaned Completed" will show up on the screen after it is finished.

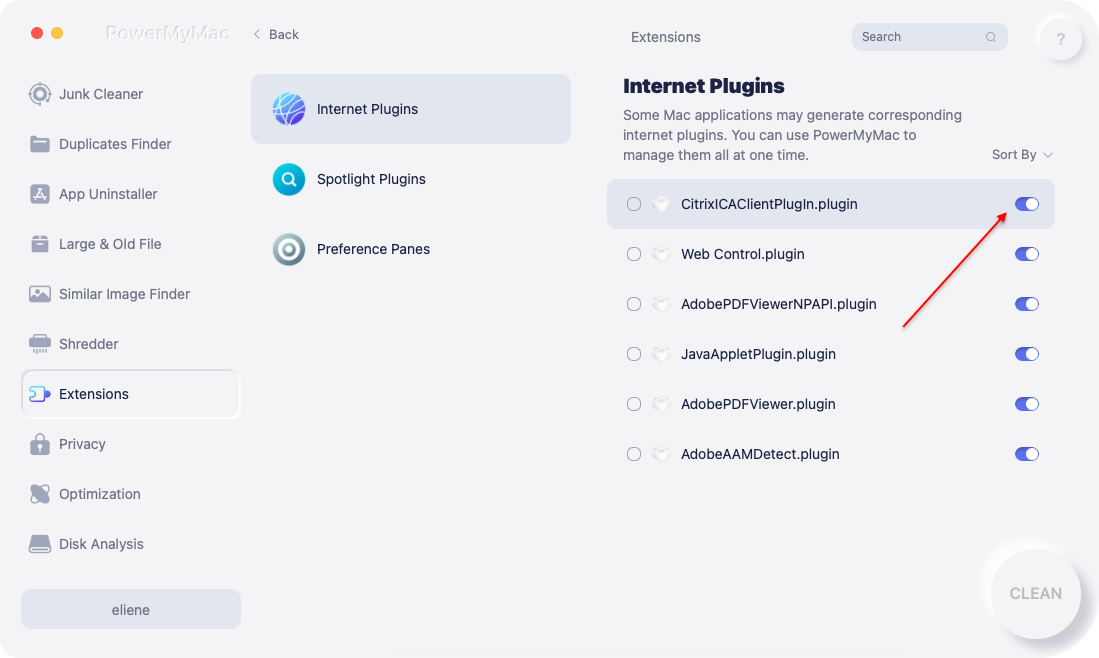
For the time being, the following are the steps for the Extension feature that you can follow to successfully remove Bytefence from your browsers.
- Select Extension after launching PowerMyMac.
- Select SCAN from the menu to do a search that detects and shows all Mac plugins, including Bytefence. The three types of extensions are Preference Panes, Internet Plugins, and Spotlight Plugins, as you can see.
- By clicking the button next to the plugin, you may turn them on or off.
Conclusion
With this detailed guide on how to remove ByteFence, you can easily remove any virus or malware software from your Mac. Compared with the manual way, we recommend you use PowerMyMac to remove the ByteFence and its extensions automatically. Try this tool today!

