


When cleaning up files and caches on Mac to save more space, many users pay less attention to DNS cache on their Mac devices. But when your browser starts running slowly, you can consider flushing your DNS cache on Mac. That’s the daily thing most network administrators or web developers do so as to speed up the website searching when the Mac’s stuck.
Since different versions of Mac have different manual clearing manners, it is hard for those users to find and distinct one by one. This passage, therefore, is going to share corresponding methods on how to flush DNS cache on different Mac operating systems.
TIPS:
- How to remove purgeable space on Mac to save more storage
- How to Clear System Storage on Mac Effectively
Contents: Round One: Get A Closer Look at DNS CacheRound Two: The Easiest and Fastest Way to Clear DNS Cache on MacRound Three: Put Your Hands On - To Clear DNS Cache Manually Round Four: Conclusion
Round One: Get A Closer Look at DNS Cache
DNS cache stores the IP addresses of web servers which contain web pages that you have recently skimmed. If the IP address of the web server changes and you haven’t updated it that you can no longer access the site via the DNS cache that this web server left before. So it is necessary to clear the unused DNS cache especially after a number of HTML 404 error codes came out. After that, your computer can re-save the new DNS information produced by those changed web servers, which help you to quickly enter those sites next time.
Round Two: The Easiest and Fastest Way to Clear DNS Cache on Mac
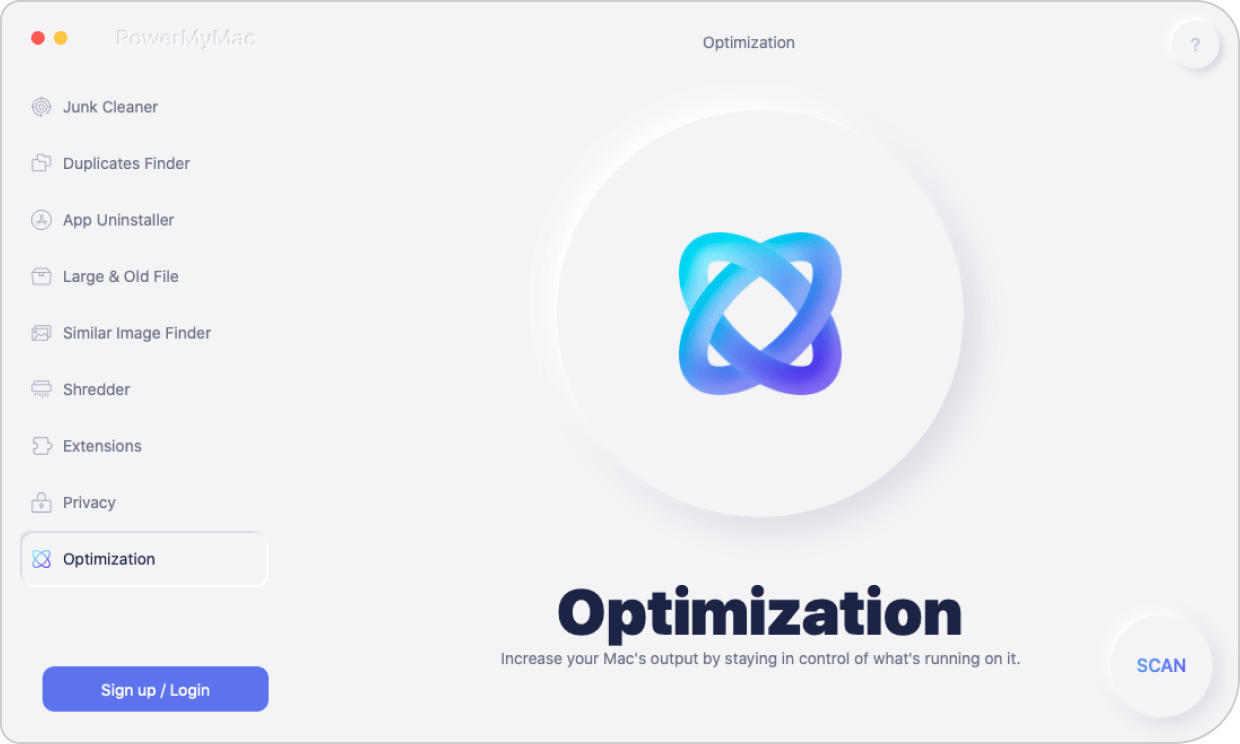
No matter what version your Mac is, the easiest and fastest way is to clean your Mac by a powerful cleaning tool. Here recommends an efficient all-in-one tool - iMyMac PowerMyMac to you. It is a utility application designed to clean, optimize and maintain your Mac. To flush the DNS cache on your Mac, you just need to install and launch the app. Then, choose the Optimization function to do the task for you.
Step 1: Download and Launch PowerMyMac
First, you need to download and install PowerMyMac. After you enter the app, choose the Optimization module.
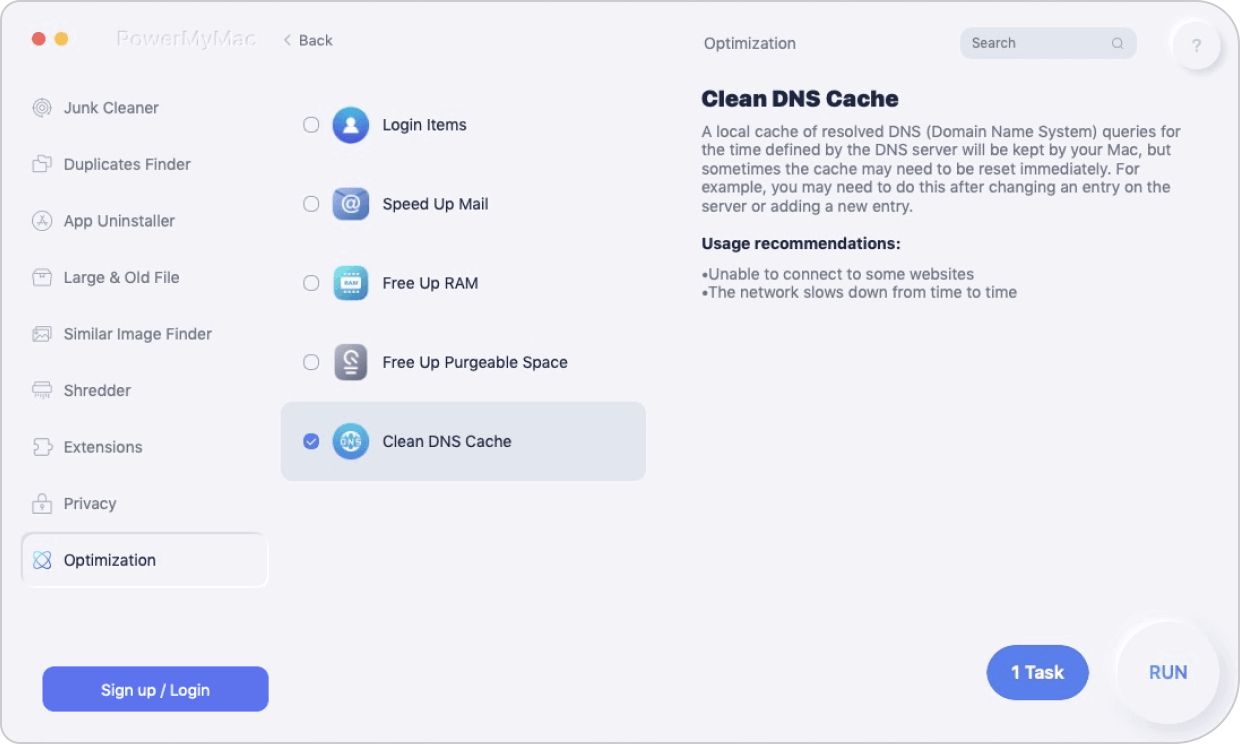
Step 2: Select Clean DNS Cache in Optimization
Under the Optimization menu, there are 5 specific functions to solve kinds of problems. Then, select Clean DNS Cache and hit the RUN button.
Now the cleaning process is done! Is it very simple and quick? If you don’t want to follow many tedious steps, download PowerMyMac and start your cleaning journey! Of course, if you would like to clear the cache manually, go through the passage below, you will find it useful!
Round Three: Put Your Hands On - To Clear DNS Cache Manually
If you’ve been using Mac for a long time, you should know that each version of Mac has it own way to reset and clean DNS cache. This may due to the mDNSResponder replacement. But that’s all right. You can look for the version of your Mac and then follow the steps in the following.
- If your computer is in the version of MacOS10.4 or above, then you should:
- Open the Finder, then go to Applications.
- Click Utilities and next Terminal to open the Terminal window.
- Type in the following syntax:
sudo killall -HUP mDNSResponder
Note: In this step, the system will ask for the administrator account password. Just enter your password and perform the step.
- Exit the Terminal after the DNS cache flushed. (When you hear “DNS Cache flushed” from an audio alert, it means you’ve successfully cleared the DNS cache.)

- If your computer is in the version of MacOS 10.1, 10.10.2 or 10.10.3, then you should:
- Open the Finder, then go to Applications.
- Click Utilities and next Terminal to open the Terminal window.
- Type in the following syntax:
sudo discoveryutil mdnsflushcache
Note: In this step, the system will ask for the administrator account password. Just enter your password and perform the step.
- Exit the Terminal after the DNS cache flushed. (When you hear “DNS Cache flushed” from an audio alert, it means you’ve successfully cleared the DNS cache.)
- If your computer is in the version of MacOS 10.7, 10.8 or 10.9, then you should:
- Open the Finder, then go to Applications.
- Click Utilities and next Terminal to open the Terminal window.
- Type in the following syntax:
sudo killall -HUP mDNSResponder
Note: In this step, the system will ask for the administrator account password. Just enter your password and perform the step.
- Exit the Terminal after the DNS cache flushed. (When you hear “DNS Cache flushed” from an audio alert, it means you’ve successfully cleared the DNS cache.)
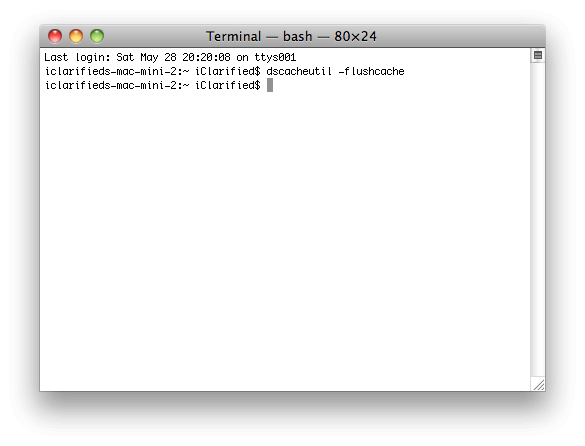
- If your computer is in the version of MacOS 10.5 or 10.6, then you should:
- Open the Finder, then go to Applications.
- Click Utilities and next Terminal to open the Terminal window.
- Type in the following syntax:
sudo dscacheutil -flushcache
Note: In this step, the system will ask for the administrator account password. Just enter your password and perform the step.
- Exit the Terminal after the DNS cache flushed. (When you hear “DNS Cache flushed” from an audio alert, it means you’ve successfully cleared the DNS cache.)
Round Four: Conclusion
See, to flush the DNS cache by a manual way is also an easy thing as long as you know how to do it through Terminal and type in the correct corresponding command. But if you still think cleaning DNS cache on your own is trouble and risky, then you can really download PowerMyMac and use it to Flash DNS, for it will clear your Mac safely and efficiently. Besides, the other functions in other modules will assist you to always optimize and clean up your Mac, keeping your Mac in good health so that you can have a nice experience on your Mac.

