


If you want to try one or more of the games, you can only do this via the Battle.net launcher. This no longer so small software manages and organizes the Blizzard games you have installed. At the same time, it works as a chat tool. However, if you're no longer interested in the games, you'll want to know how to delete Battle.net agent from Mac to save space, just like the reason why you delete other unneeded apps on your Mac. We'll walk you through how to completely remove the Battle.net Launcher from your macOS.
Contents: Part 1. Why Isn't Battle.net Uninstalling?Part 2. How to Uninstall Blizzard Games without Battle.net?Part 3. How to Uninstall Battle.net on Mac Manually?Conclusion
Part 1. Why Isn't Battle.net Uninstalling?
If Battle.net isn't uninstalling, there are other potential reasons and solutions:
- The uninstaller could be stuck or corrupted, preventing removal. (Download the latest Battle.net installer to install it over your current version, and then attempt to uninstall again.
- Your antivirus or firewall may be interfering with the uninstallation process. (Temporarily disable any third-party antivirus or firewall software and try uninstalling Battle.net again.
- Battle.net could be updating in the background, preventing uninstallation. (Stop any updates within the Battle.net client.)
- A prior failed attempt to uninstall Battle.net may leave broken files behind, preventing a new uninstallation attempt.
- On macOS, permissions or system security may prevent uninstallation. (Make sure you're logged in as an administrator.)
Part 2. How to Uninstall Blizzard Games without Battle.net?
There is hidden data everywhere that you should remove if you want to completely uninstall Battle.net on Mac.
If you don't want to look for all the hidden files one by one, you can use an uninstaller to run Battle.net uninstall Mac. This will save you a lot of work and you can also remove other unnecessary apps with the help of the uninstaller. We recommend the PowerMyMac software made by iMyMac.
PowerMyMac is a quick and easy way to uninstall apps on Mac. You can also use it to uninstall other Blizzard games like WOW without Battle.net. Follow the steps below on how to delete Battle.net from Mac:
- Download PowerMyMac for free. Install and launch it on your Mac.
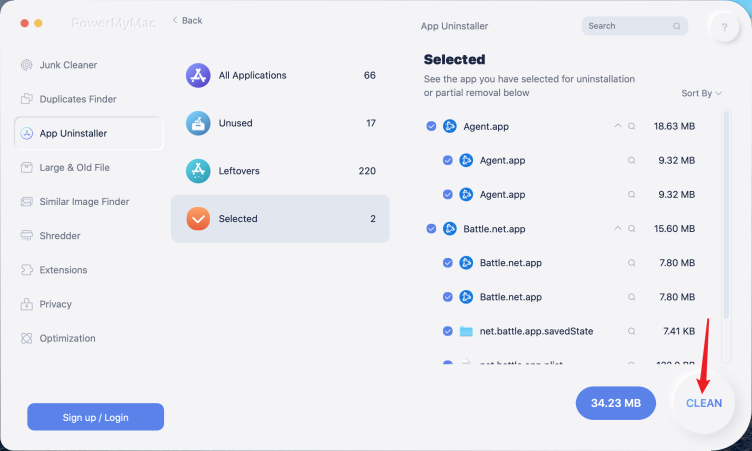
- Select App Uninstaller.
- Click SCAN to find the Battle.net Launcher or other app installed on your Mac.
- Select all the Battle.net apps and files you want to remove and click the CLEAN button. This will run the Battle.net removed from Mac with all of its associated files.
Part 3. How to Uninstall Battle.net on Mac Manually?
If you have a bit of time and nerves to spare, you can uninstall Battle.net completely without tools. Basically, all you have to do is click your way through a handful of folders and locate all of the files. We have already done this for you and listed where data can be hidden that you should remove to completely delete Battle.net Agent from Mac.
Follow all the steps in the list below to completely remove the Battle.net Launcher.
- Uninstall Battle.net on Mac
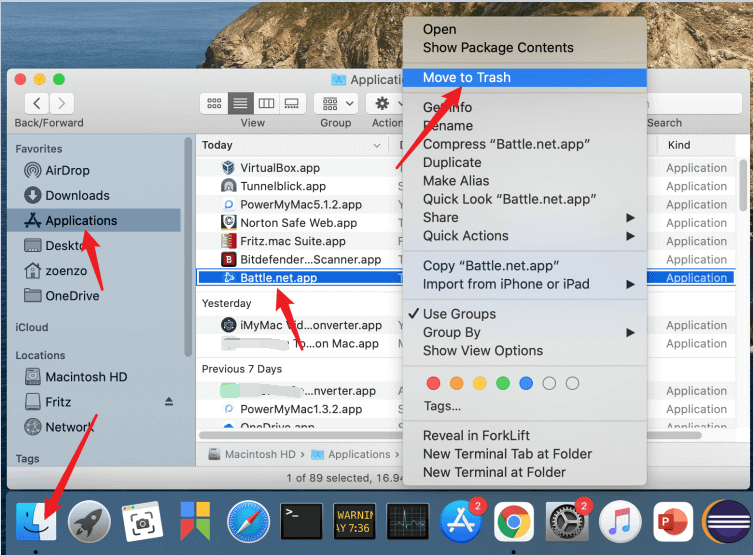
- Open the Finder and go to the "Applications" folder
- Look for net in your list of apps
- Right click on the app icon and select "Move to trash"
Removal of System Residues and Superfluous Data
- Open the Finder again
- At the top of your Mac menu bar, click Go
- Hold down the "Alt" key. "Library" will now appear between the menu item "User folder" and "Computer".
Then you can begin to delete the related folders:
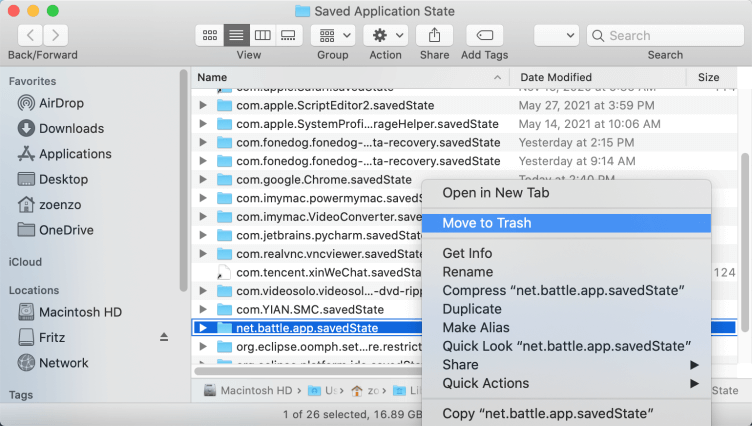
- Select Library and look for the folder "
Saved application state" - Open the folder and look for the folder “
battle.app.savedState”. - Delete the folder
If you want to use the “go to” function to uninstall Battle.net on Mac, use the following path: ~/Library/Saved Application State
The first data in the process of uninstalling Battle.net Mac is found and destroyed. A few more will follow. If you regularly remove programs to free up storage space, the variant with a utility program such as PowerMyMac is helpful to save a lot of time.
Now go back to the "Library" folder
- Here you look again for a folder with the name "Application Support"
- In this folder delete the folder named "net"
- The next dates are gone.
The last data in the Library folder is located in the Settings folder, these preset that Battle.net has stored there. Uninstall Battle.net Mac also involves removing this data.
- So go back to the "Library" folder
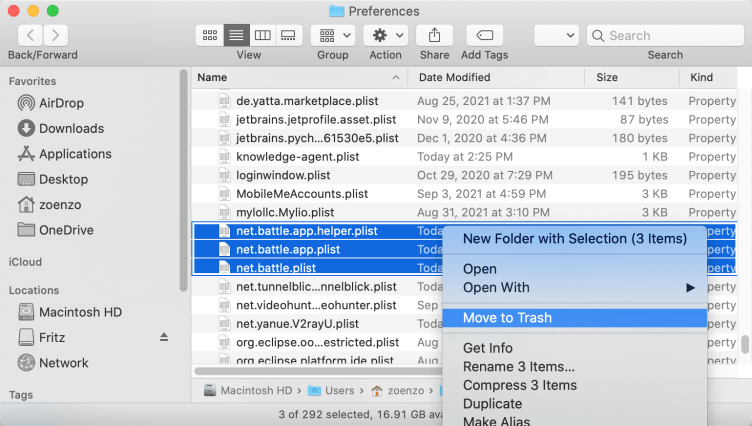
- Here you look again for a folder with the name "Preferences"
- In this folder, you delete the following files: "
Battle.app.helper.plist", "Net.battle.app.plist", "Net.battle.plist"
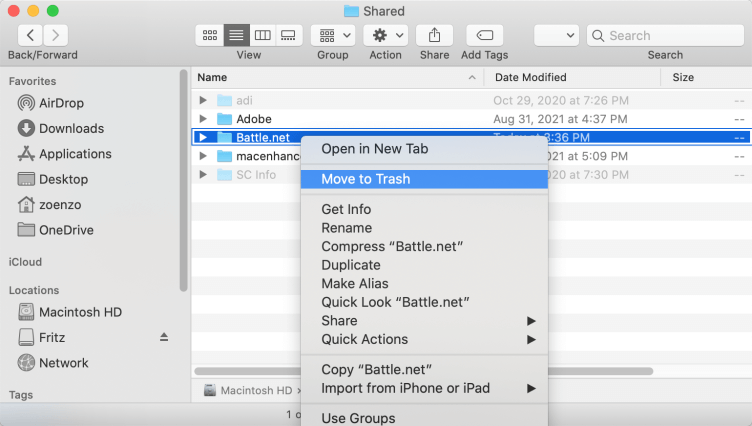
Finally, we need to go to the shared data folder. You can find it under ~/Shared with the "Go to" function or you can navigate there yourself with the Finder. When you locate these files, Battle.net Mac Uninstall should be complete and you will be back to most of your storage.
- Go from the “Library” folder to the “User” folder, both are in the same directory
- Here you will find the folder "Shared"
- In this folder, you simply delete the subfolder "Battle.net"
Important: Empty the recycle bin so that all data is removed and uninstall Battle.net really does come into effect.
Note: Please note that data from the individual games may still be hidden. To check, try again to enter the names of the games in the search bar. To do this, enter the full name of the game without spaces. E.g. “heroesofthestorm“.
Conclusion
In this article, you learned that uninstalling Battle.net Mac can be done very quickly and with just a few clicks. You should use a utility like PowerMyMac to do this. With the built-in uninstallation function, programs can be completely deleted with one click. This can save you a lot of time. The fact that the PowerMyMac from iMyMac can perform other useful functions such as cleaning up unnecessary data and duplicate images is also helpful in this decision.
If you want to uninstall Battle.net on Mac without a utility, we have listed the individual steps in this article. By removing all of this data, you ensure that you get the maximum storage space and that you can fix problems with battle.net completely.
We hope this article was useful and we look forward to your comments.

