


The CUDA Driver does not seem to be compatible with Macs running operating systems besides just macOS Mojave. Whenever you wish to uninstall CUDA Mac, keep in mind that removing components on even a Mac varies differently somewhat from uninstalling applications.
A full, as well as proper driver uninstallation, has always been required to avoid problems including failures caused by many other components under Mac. This article would show you how to completely and securely uninstall CUDA off your Mac.
Contents: Part 1. What Is CUDA on Mac?Part 2. Why Uninstall CUDA on Mac?Part 3. How Do I Uninstall CUDA from Mac Manually?Part 4. How Do I Uninstall CUDA Easily?Conclusion
Part 1. What Is CUDA on Mac?
Nvidia's CUDA has always been a simultaneous computer processing system as well as applications programming interfaces (API) architecture. Nvidia CUDA enables computer programmers as well as engineers to have used a CUDA Multicore processing graphical processor units (GPU) towards general-purpose computing.
Nvidia CUDA software was a powerful interface that provides easy accessibility to something like the GPU's virtualized central processing unit as well as parallel operational components, allowing high-performance computing kernels to really be executed.
Part 2. Why Uninstall CUDA on Mac?
Subscribers having NVIDIA visual processors with Macs have lately reported graphical multiple regression analysis as well as lack of performance upon switching somewhat from macOS 10.13 into Mojave. Mac had already finally acknowledged that NVIDIA CUDA is incompatible mostly with macOS 10.14 or perhaps even Mojave, therefore when you already had updated your macOS, and then it is recommended that you uninstall CUDA on Mac client again once it is completely acknowledged.

Nvidia also indicated that previous year this same newest version of further CUDA will also be the final to once again supporting the Mac. Often these Mac users just don't have CUDA installed, and yet sometimes when you already had an outdated Mac using nothing except that an Nvidia GPU or that have installed an Nvidia board in a Mac Pro, you might. But given with nor the Mac but neither Nvidia supporting it, it seems to be appropriate to uninstall CUDA on Mac this somehow.
Part 3. How Do I Uninstall CUDA from Mac Manually?
To thoroughly but also securely uninstall the CUDA component from Mac, you must do multiple stages. Firstly, you must uninstall the software. Then perhaps you should delete any leftover records on your Mac. Instructions for to uninstall CUDA on Mac manually was down below:
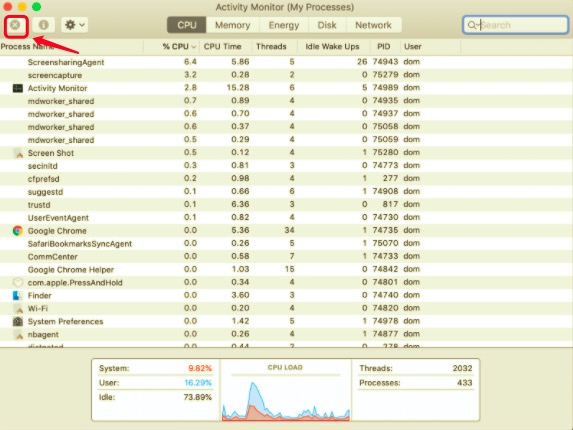
- You should need to go into your Dock, then right-click upon the Nvidia CUDA driver's signifier icon, and thereafter select the button "Quit". You might even utilize the Mac Activity Monitor; simply enter the Activity Monitor, next pick the processes within the label first from the menu that appears, subsequently hit the sign "X", and then select the button "Quit" within the popup box. If the Nvidia CUDA driver fails to halt, you should use the “Force Quit” button towards the Activity Monitor to impose that one to stop.
- Then after which, you must also make sure that all of the applications that run into your Mac must be close each.
- Next, you should do was launch on the System Preferences section, where you could access on the Launchpad right from the Application Directory or perhaps you may head over into the menu window of Apple, and from there choose on the System Preference.
- Right there into the System Preferences, look for the icon of CUDA. This would be then located at the bottom part of your screen. You just need now to click on that icon and after that, you should then select uninstall CUDA, right from the Preference panel.
Uninstall CUDA Using Finder
Here appear to somehow be various options accessible to assist you with the proper uninstalling of CUDA. Certain of this might be used by users to absolutely uninstall CUDA on Mac off their Mac. There must be one thing you should keep in mind while uninstalling software.
Whereas if the application you want to remove has now been running and continues to run during the uninstall operation, you should indeed stop any running processes before beginning with said uninstallation. Below is a step-by-step guide on doing it with the Finder:
- You should need to go into your Dock, then right-click upon the Nvidia CUDA driver's signifier icon, and thereafter select the button "Quit." You might even utilize the Mac Activity Monitor; simply enter the Activity Monitor, next pick the processes within the label first from the menu that appears, subsequently hit the sign "X," and then select the button "Quit" within the popup box. If the Nvidia CUDA driver fails to halt, you should use the “Force Quit” button towards the Activity Monitor to impose that one to stop.
- After doing so, once it has been eventually done, you may continue with the usual uninstallation.
- Afterward, you simply open the Finder, and thereafter, out from the sidebar, pick Applications that will also take you towards the folder.
- Then when you need to seek for that then hit upon that CUDA program, and through that, you need to drag the software's logo further onto Mac Trash, then finally, you will dump such a software's logo here already.
- Whenever you were needed to accept this activity, everything that you had to do was provide your account manager username and password.
- To finish the process, you should first press somewhat on Mac Trash then immediately empty that.
Keep in mind: Upon finishing the final step, pay close attention. Emptying the Trash might well remove all or most of the things you've put further towards Trash during an instant, and even this intervention would've been irrevocable. Try to examine unless you removed it elsewhere inadvertently; also prior to actually emptying the Trash, you could restore the item by right-clicking onto it and picking to Put Back option.
CUDA should be removed from your Mac using these steps. Except you find any problems yet are unclear whereas if the software was fully uninstalled from your Mac, using iMyMac's uninstaller would erase CUDA's associated folders while also completely uninstall CUDA on Mac.
Remove CUDA’s Related Files One by One
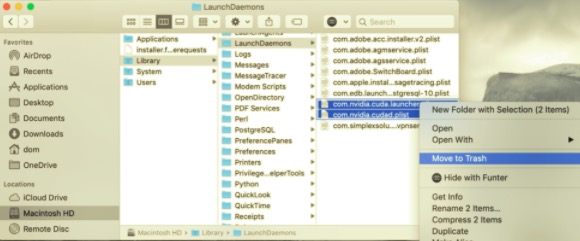
Afterward, you should locate just about all the CUDA driver's remnants (program files) onto your Mac's storage device. Such files were also typically kept and retained throughout the systems Library directory. To locate them, perform the following steps:
- To get started with the process of this you must do first was to launch the Finder, after that, you then click on the key
Command + Shift + G. Now, this would then open up the Go from the field of search the folder. - Upon that, you must now verify the subdirectories right from the Library for you to locate on CUDA’s linked files.
- After which, from each and every folder, you must find the folders and files that have the name CUDA or Nvidia.
- Whenever you do find almost all of the files, then you just drag and drop towards the Mac Trash.
- From there, press on the icon of Spotlight from the Menubar then enters “Cuda”.
- Now that you may perhaps find all the files which were attached to CUDA, you must then empty your Mac trash, then afterward you must now restart on the Mac system.
Part 4. How Do I Uninstall CUDA Easily?
If you do ever need to uninstall CUDA on Mac quickly, this tool that we will introduce to you will be described as shown was indeed your best decision. By making use of the PowerMyMac‘s App Uninstaller this would then scan out as some kind of competent and after which dependable uninstallation tool amongst the various apps that enable uninstalling apps your Mac system. You could also even save effort and time by looking at all of the app-related data for a longer period of time.
Learn how effective this program has already been towards uninstalling all of the unwanted files of your Mac. To uninstall and remove each and every undesirable, troublesome, obstinate, or perhaps even harmful apps with only a few mouse clicks. Looking into how to completely uninstall CUDA on Mac by following these steps-by-steps below:
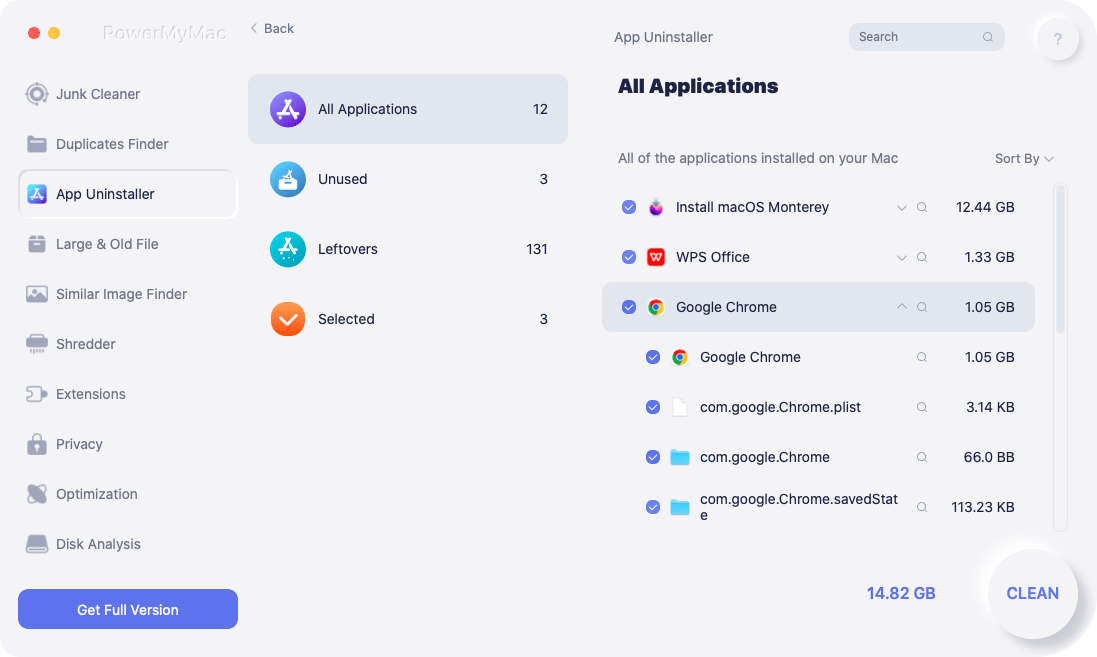
- You must therefore launch the PowerMyMac‘s App Uninstaller tool, then pick the apps you want to remove then finally press often upon the “SCAN” button.
- Whereupon, using the navigational window, start browsing for more CUDA.app or, conversely, utilize the search bar portion and input CUDA.
- Consequently, by selecting CUDA.app, the content of each application, and just about any related database queries, would have been immediately accessible. And after that, select cleaning once again to finish the task.
- Given that such software still contains the majority of CUDA components, there should barely be remnant data instantly after the application had been removed, but don't ever worry; easily put effortlessly farther inside the very specific search term, and now even the needed databases should be revealed. After totally removing CUDA, identify the data and then press the "CLEAN" option.
Conclusion
This article has tackled how to uninstall CUDA on Mac. As you have been reading above we did give a very short insight into what was CUDA all about and why some of the users come up with to really uninstall CUDA from Mac from their Mac system.
In addition to this information and guidelines, we also introduced to you PowerMyMac which was a great tool for uninstalling applications as well as on removing and eliminating such leftovers and even residues of the uninstalled app. We hope that this would then help you whenever your CUDA has been not functioning for you lately. Have a positive and pleasant week ahead.

