


Knowledge of the bunches of methods to screen record would help create video tutorials or presentations. Rather than explaining things through writing or by showing snapshots, displaying a recording would be more appealing. Thus, in this post, we will focus on sharing information relative to the process of how to screen record on Chromebook. If you have been using your Chromebook for some time already and are still wondering about screen recording but haven’t found a good guide to use yet, you’ll surely find what you’re looking for by reading the content of this article. Start by heading to the first section!
Contents: Part 1. Does Chromebook Have a Built-in Screen Recorder?Part 2. How to Screen Record on Chromebook with Keyboard?Part 3. How to Screen Record on Chromebook without Windows Key?FAQs
Part 1. Does Chromebook Have a Built-in Screen Recorder?
If you have read articles about built-in screen recorders on Windows PCs, you probably wonder if Chromebooks have the same. For your information, if yours is running under Chrome OS 89 or newer, yes, you can enjoy your device’s built-in recorder! So, how to screen record on Chromebook using it? Just follow the below!
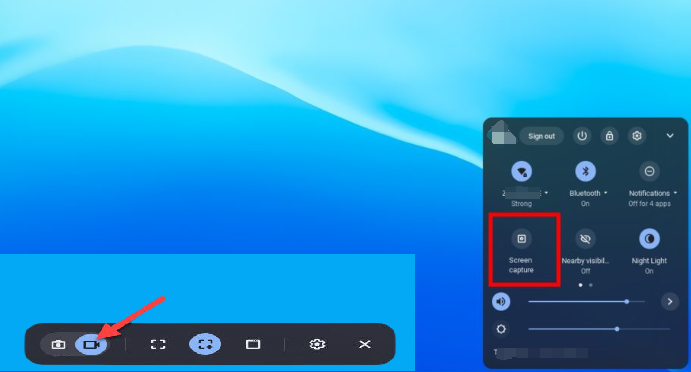
- Launch the “Quick Settings panel” on your Chromebook.
- Open the “Screen Capture toolbar” by selecting the “Screen Capture” button. Afterward, recording can immediately start.
- On the left side, buttons to take snapshots and record can be seen. Before you tap the “record” menu, specify the recording area – full, partial, or window.
- Double-check the audio settings via the “Settings” menu.
- When everything’s ready, hit the “Record” button. Once finished, press the “Stop” menu and save your video to your Chromebook.
It’s a good thing that Chromebooks also have a built-in screen recorder. If you don’t want to install any other third-party software programs, relying on the use of this would be good enough. However, if you’d like to experience more advanced features, then you have to check some other professional options.
Part 2. How to Screen Record on Chromebook with Keyboard?
You can begin capturing your Chromebook screen with just your keyboard – quick and easy. If you have been thinking about how to screen record on a Chromebook using some keyboard shortcuts, you’ll learn the details that you need by reading this part of the article.
- What you have to do to begin is to hold the “Shift”, “Ctrl”, and “Show Windows” keys at the same time. Alternatively, depending on the model of the Chromebook that’s in use, you can press the “Screenshot” key (the button with a small camera icon) that is just beside the “Show windows” button.
- In the screen recording options, choose the “Screen Record” menu. From the screen recording options (full, partial, or window), choose one. After selecting, the recording should start.
- Once finished, just press the “Stop recording” menu.
You should see the recorded file from the “Downloads” folder on your Chromebook. It is worth mentioning as well that by default, your Chromebook will save the recorded video files as WEBM files. You can have this modified and save them as MP4 files if you wish to so you can have them shared easily if you want.

Part 3. How to Screen Record on Chromebook without Windows Key?
It has been made so easy for users to screen record on Chromebooks knowing that they have a built-in recorder. But if you’d like to know how to screen record on Chromebook without the use of it, you, of course, have plenty of options.
How to Screen Record on Chromebook with Audio/Webcam
The most reliable and most recommended tool to screen record on Windows and Mac computers is the iMyMac Screen Recorder. It’s a powerful tool that can help one capture his screen and webcam with audio while ensuring that the resulting files are high quality. Additionally, it has features that every user can take advantage of – editing menus, real-time annotation tools, and more. Should one wish to take snapshots, pause, or restart recording, it can easily be done. Below is the tutorial on how to screen record on a Chromebook using this tool.
Get A Free Trial Now! Normal Mac M-Series Mac Get A Free Trial Now!
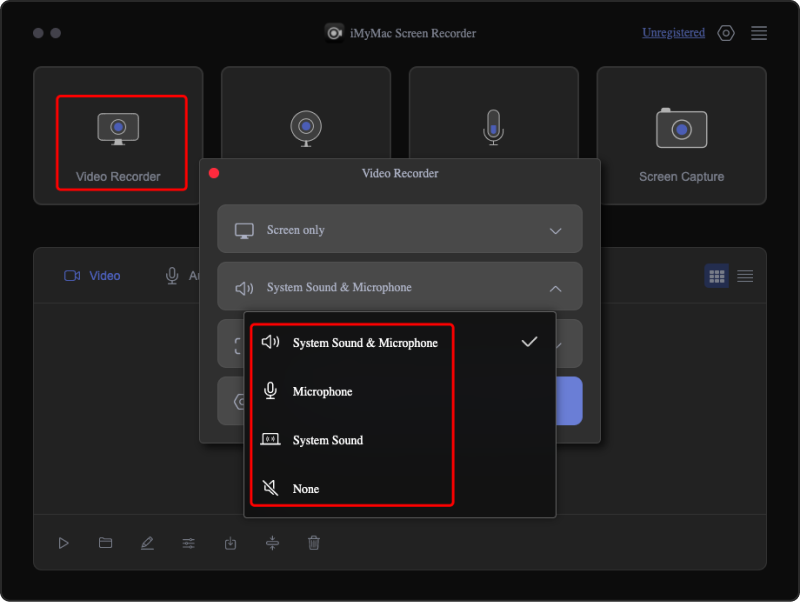
- Install the program on your Chromebook and launch it afterward. From the main interface, choose “Video Recorder”.
- Proceed to define whether to capture only the screen or with the webcam. Afterward, specify the recording area.
- Adjusting the audio settings is the next thing to accomplish. Decide on the type of audio to be captured.
- Once everything is set up, begin recording by pressing the “Start Recording” menu. Once finished, tap the red “stop” button.
The recorded files should be saved to your Chromebook shortly.
How to Screen Record on Chromebook with a Browser Extension
Apart from relying on the use of professional apps such as the iMyMac Screen Recorder, you might want to try using a browser extension as a method of how to screen record on Chromebook. Here, we’ll be tackling more about how you can use Loom. While using this option, you just have to ensure that your device is connected to a stable network to avoid any issues while the recording is ongoing.
- Head over to the Chrome web store and look for “Loom”. Once found, select the “Add to Chrome” option. Switching to the Chrome browser would be required here.
- Choose “Add Extension” next.
- Creating a Loom account would be needed in case you don’t have one yet. Press the “Extensions” too next.
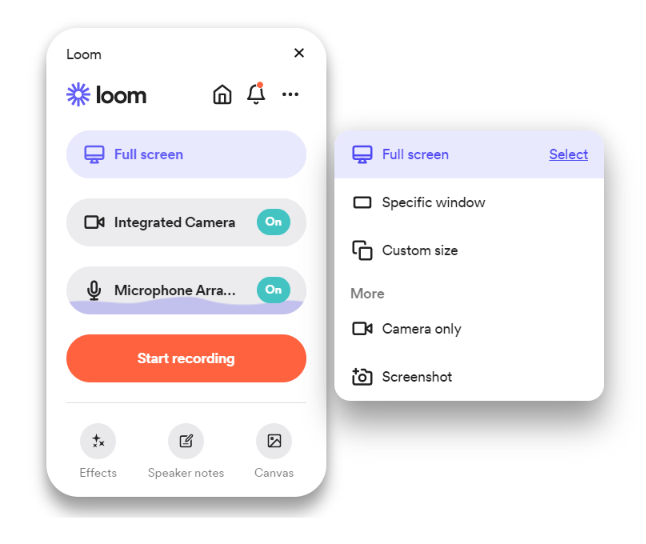
- The recording will begin once the “Loom” icon has been tapped. Make sure that you authorize it to your device’s microphone and camera so you can start recording. Decide on the part of the screen to be recorded.
- Click the “Start Recording” menu. Press “Stop” once finished.
FAQs
Here are some FAQs relative to the process of how to screen record on a Chromebook.
- How to Stop Screen Recording on Chromebook?
Screen recording on your Chromebook can simply and easily be done by pressing the “Stop” button that’s in the screen capture toolbar.
- How do I record my screen on my Chromebook without background noise?
If you are aiming to have the best results after screen recording on your Chromebook (no background noises or other nuisance), you may opt to use professional tools such as the iMyMac Screen Recorder.
