


Being aware of the screen recording process is an advantage given that it’s helpful in many cases especially when making presentations, tutorials, social media content, and more. However, being inclined to this would mean the need for a reliable screen recording tool. Fortunately, there are lots of options available. One of the most used, the OBS Screen Recorder, is what this post would be about.
In this article, you’ll be learning how to download the abovementioned program on different devices and eventually, how it can be used effectively. Let’s begin by hopping into the first section of this post.
Contents: Part 1. How to Download OBS Screen Recorder on Different Devices?Part 2. How to Use OBS to Record Screen on Mac/Windows/Linux?Part 3. How to Use OBS to Record Screen on iPhone/Android?Part 4. How to Record Audio in OBS?Part 5. How to Record a Webcam in OBS?
Part 1. How to Download OBS Screen Recorder on Different Devices?
In this section, you’re about to learn how to download and install the OBS Screen Recorder. The steps should be simple and easy so that beginners won’t find it hard to do.
- Head to OBS’ official website. From the blue buttons, choose your OS and proceed to download the installer file.
- Upon downloading, open the file.
- Simply follow the screen prompts. If plugins would be required, make sure to install only those needed to run OBS on your PC.
Best Alternative for OBS Screen Recorder
Being an open-source free app is what makes the OBS Screen Recorder loved by many. However, some might find limitations when using this. Thus, it’s good to have a great alternative. The most recommended in this case would be the iMyMac Screen Recorder. When it comes to powerful screens, webcams, and audio recordings, this is one of the best tools one can find and try. This tool is user-friendly, packed with several features and functions, easy to install, and compatible with Windows and Mac. When satisfying your screen recording needs, relying on professional programs like this would always be suggested.
Get A Free Trial Now! Normal Mac M-Series Mac Get A Free Trial Now!
Part 2. How to Use OBS to Record Screen on Mac/Windows/Linux?
Upon knowing how to download the OBS Screen Recorder, let’s proceed to see how you can finally use it to record your screen.
Use OBS on Mac
- Go to the “Sources” box and press the “+” icon. From “Options”, press “Display Capture” and tap “OK”.
- Press “Settings” then “Output”. Specify the desired destination folder.
- Click “Start Recording”.
Use OBS on Windows
- Launch the program upon installing it. The app should automatically add a “Scene”. If not, press the “+” icon.
- Find the “Sources” box and look for the “Display Capture” menu. Create a title before pressing “OK”.
- Choose a display and capture method that you like. Once done with this, press “OK”.
- Proceed to set up the output folder by heading to “Settings”, then “Output”, and “Recording Path”.
- Begin recording by clicking “Start Recording”.
Use OBS on Linux
Using the OBS Screen Recorder on Linux is the same when using it on Mac or Windows computers. You just have to make sure that these two requirements are met to avoid any issues while the program is in use.
- Your Linux PC must be running in Ubuntu 18.05 version or higher.
- You have already installed the FFmpeg video filter.
Here’s an overview of the steps.
- When specifying the recording settings, instead of choosing “Display Capture”, choose “Screen Capture” from the “Sources” box. Click “OK” afterward.
- Press the “Settings” menu then choose “Output”. On the “Recording Path”, type the preferred location or browse one.
- The recording will start once the “Start Recording” option is pressed.

As simply as following the mentioned tutorials, you should be able to use the OBS Screen Recorder on your PC without any issues at all.
Part 3. How to Use OBS to Record Screen on iPhone/Android?
There is no mobile app yet for OBS. Using screen recording alternatives would be recommended. But if you’ll push through with using it on your mobile gadget, we have workarounds to share here – using a cable as a connector.
On iPhones
- Connect your device to your PC using a cable.
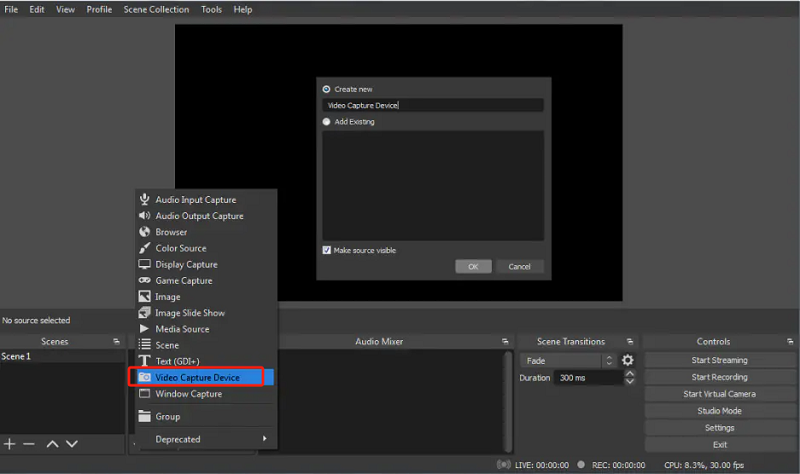
- On your PC, open OBS and find the “Sources” box.
- Press the “+” icon and select “Video Capture Device”.
- Tap “Create New” before clicking “OK”.
- When a new window appears, press the down arrow next to “Devices” and select your iPhone.
- When your iPhone screen has now been displayed, click the “Start Recording” to begin.
On Android Devices
When using the OBS Screen Recorder, there isn’t that huge difference compared to the steps to be done when using it on iPhones.
Again, it’s good to reiterate that this tool has no mobile app yet which could cause some issues along the way. It is still recommended that you use a reliable, good, and trusted third-party tool that’s supported by your device when screen recording for better results. If you really would like to resort to using OBS, there’s no harm at all. Just be prepared while dealing with some drawbacks.
Part 4. How to Record Audio in OBS?
In this section, our focus will now be the details on how to record audio in OBS Screen Recorder. Via this tool, you can capture internal audio as well as microphone sound. Find out more details as you read this part.
Recording System Sound
There could be cases when you need to record system sound, here’s how you can do it through OBS.
On Windows
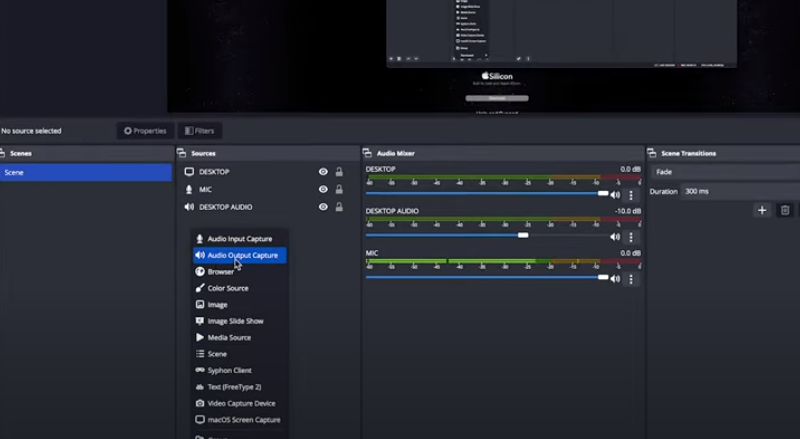
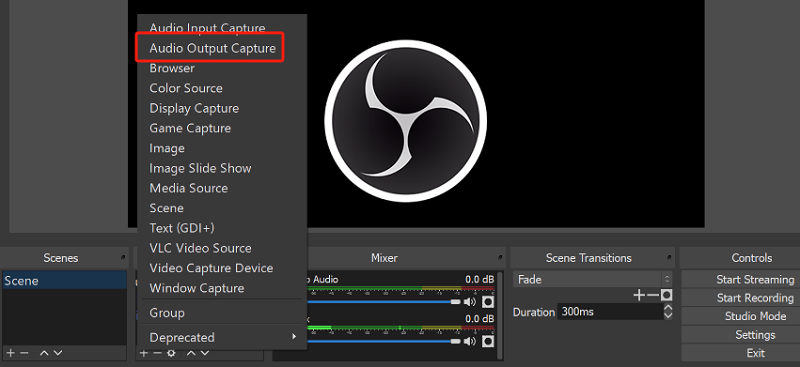
- Launch OBS. Look for the “Sources” tab and tap the “+” icon.
- From the menu, choose “Audio Output Capture”.
- A menu should pop up on the screen. Type a name before pressing “OK”.
- Tap the drop-down menu next to the “Default” option. You may now select the default audio output device that you are using on your PC. Tap “OK” afterward and you’ll be done!
On Mac
Recording system sound on Mac using the OBS Screen Recorder is a bit different compared to when doing it on a Windows PC. A program named “Blackhole” needs to be downloaded first. Upon downloading this, open the Audio MIDI Setup app on your Mac. Searching for it should work. Alternatively, it can be seen by going to “Applications”, “Utilities”, then “Audio / MIDI Setup”. Here, there is a need to create a new Multi-Output device. Once this has been completed, you now just have to follow the same steps mentioned initially for Windows users. It’s just that you would need to choose the “Multi-Output device” that you have created.
You can double-check if OBS is capturing the audio by checking the meter from the audio mixer. It would be good for the meter not to move into the red as it will signify that the output file will be distorted.
Recording Microphone Sound
As you have also previously read, the OBS Screen Recorder can record not only system sound but also microphone sound. This means that tutorial videos can easily be done through this tool.
If you’re wondering how you can finally record your microphone sound through this tool, you just have to ensure that the steps listed below are followed accordingly. The guide is a bit easier compared to when recording internal audio. You can follow the same steps regardless if you’re a Mac or a Windows PC user.
- Launch the OBS program on your computer. In the “Sources” box that is at the bottom of your screen, locate the “+” icon and press it.
- From the menu that would appear on your screen, select “Audio Input Capture”.
- A new pop-up menu shall be shown again. Input your preferred name or leave it as it is before tapping the “OK” button.
- Next to “Device”, there is a drop-down menu that you’ll see. You have to click this. Afterward, just simply choose the microphone you desire to capture from the menu.
From the “Audio Mixer” box, a new channel should be seen. Monitoring these meters can be done as you like when setting the recording levels.
Part 5. How to Record a Webcam in OBS?
Recording a webcam in OBS Screen Recorder is possible as well. We will be discussing more of that in this part.
- Firstly, you have to add your webcam as a source on OBS. Look for “Sources” from “Settings” upon launching OBS. Add a new video capture device by tapping the “+” icon. Press “Create New” and put a name that you’d like to use.
- From “Settings”, go to the “Output” menu to locate the “Recording Path”. This is where you can set up the destination folder. You can use the “Browse” button to find the folder desired.
- Finally, what’s now left to be done is to press the “Start Recording” menu that should be beneath the “Controls” option from the main interface.
