


Physical movie devices such as CDs and DVDs are becoming outdated. People are moving to digital media files that’s why they want to know how to copy DVD to computer. Even Apple has made a move away from physical data discs by removing its optical drives from its computers.
However, CDs, DVDs, and Blu-ray discs are not completely washed off. And sometimes, people like you have some of them scattered around your house. You may want to convert these discs to digital files to make sure you have a backup copy.
Or, you may want to edit your homemade videos on the computer using the software. In this case, you need to copy your DVD discs to your computer and make sure they are in formats that can be manipulated by video editing software.
In this guide, we’ll teach you how to transfer files from your DVD discs to your Mac computer. Start copying your data by reading our in-depth article below.

Article GuidePart 1. Is It Legal To Copy Or Rip DVDs?Part 2. How To Copy DVD To Computer On MacPart 3. How to Convert Video FilesPart 4. Conclusion
Part 1. Is It Legal To Copy Or Rip DVDs?
Before we delve into how to copy DVD to a computer on Mac devices, we’ll talk about the question, “Is it legal to copy or rip discs?”
It actually depends on your location or where you reside. Of course, in the United States and the United Kingdom, ripping your DVDs and Blu-ray discs is illegal. This is true even if you actually bought and paid for them. It may be possible for you to be prosecuted but there’s a slim chance of that happening. However, it’s still a risk you may or may not be willing to take.
For instance, in 2014, the UK government allowed consumers to copy their digital media files for personal use only. However, this was trumped over by another 2015 court ruling. This ruling states that copying digital files even for personal purposes only should not be allowed. This is because those whose copyright was actually infringed receive no compensation for such practices.
Things are a bit cloudy for US laws. A lot of legal professionals say that the key here is whether you’re circumventing a copyright and/or a Digital Rights Management (DRM) protection or not.
Important Note: We do not condone the copying of discs with copyright or DRM protection. We do not want our users to do illegal acts. Our article here is for homemade videos. If we do place information on how to transfer DVD discs to that of the computer, these are for informational purposes only and should NOT be enacted out unless you own the rights to the media itself.
Part 2. How To Copy DVD To Computer On Mac
Now, you may own some homemade videos placed inside DVD discs and wish to create digital formats of them. In this way, you can access and transfer them to your iPad, iPhone, Apple TV, or macOS computer.
If you aren’t using these copies for commercial purposes and if you don’t intend to share them to others, then ripping your DVD discs won’t get you penalized. And because DVD discs do have their own shelf-life, you may want to know how to copy DVD to computer.
There are things you need before you start ripping your DVD disc to your Mac computer. Below are some of them:
- A lot of free space within your Mac computer. Of course, you need storage space since DVD discs and even Blu-ray discs hold a lot of data.
- Another thing you may need is the optical drive that allows you to rewrite data. Usually, computers nowadays don’t have their own optical drives. You can purchase external optical drives from Apple as well –they sell the SuperDrive to consumers.
- Lastly, you will need the DVD disc you will rip to your computer.
How To Copy DVD To Computer On Mac Using Disk Utility
This method can be used on unprotected DVDs, for instance, your homemade DVD discs. Let’s assume that you have all the three requirements we have listed above. Below are the steps you should follow in order to know how to copy DVD to computer:
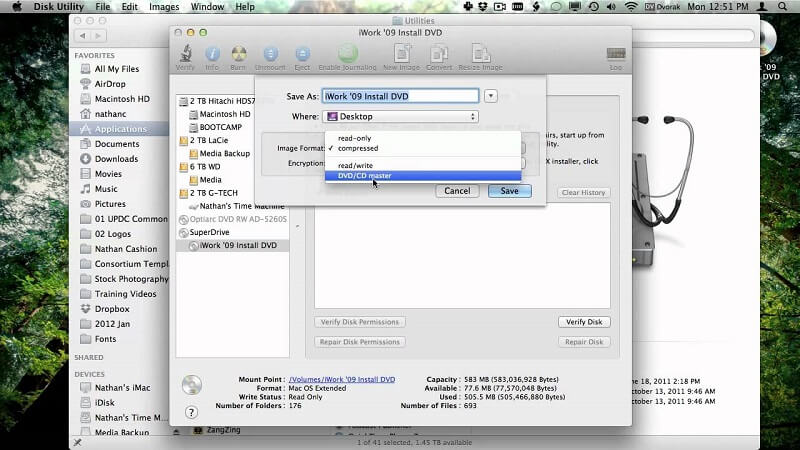
- Launch Disk Utility on Your Mac Computer
This can be found within Applications and then Utilities. Now, search for your DVD and click it. Multiple options will be presented to you. Select the one that says “New Image.” This can be found at the central portion at the upper part of the interface.
- Look for and Set the Image Format
Now, you should check out another option known as “Image Format.” You must set this option to “DVD/ CD Master.” Then edit the Encryption settings and place it as “None.”
- Start Ripping
Now, click “Save.” Your DVD disc will begin to copy to your selected destination folder. Once the process is finished, you can eject your DVD disc safely from the optical drive.
By now, you can simply enjoy your film on your Mac computer. Or, you can edit your videos to make sure they look amazing (more on this later). If you’re having trouble watching the video, you should check out the macOS version of the VLC Media Player. This media player can support a lot of video formats including those from ripped DVDs.
Rip Your DVDs To a Mac Computer Using HandBrake
As we have stated previously, ripping DVD discs with a copyright-protection is illegal. Even if you’re using it for personal purposes only, you can be penalized. The copyright protection of these discs is there for a reason. They don’t want you to copy these discs and distribute them for commercial purposes.
There is a third-party tool for Mac computers which you can use to rip DVDs to computers. This third-party tool is called HandBrake. We will also use “libdvdcss” to make things easier. Now, here are the steps on how to copy DVD to the computer using HandBrake:
- Download and Install Necessary Software
Download HandBrake from its official website and install it on your Mac computer. Now, download your libdvdcss from its website as well. You should install it on your macOS computer too. If you’re having trouble installing libdvdcss, then you should look at Google for tips on how to install apps created by unidentified developers on your Mac.
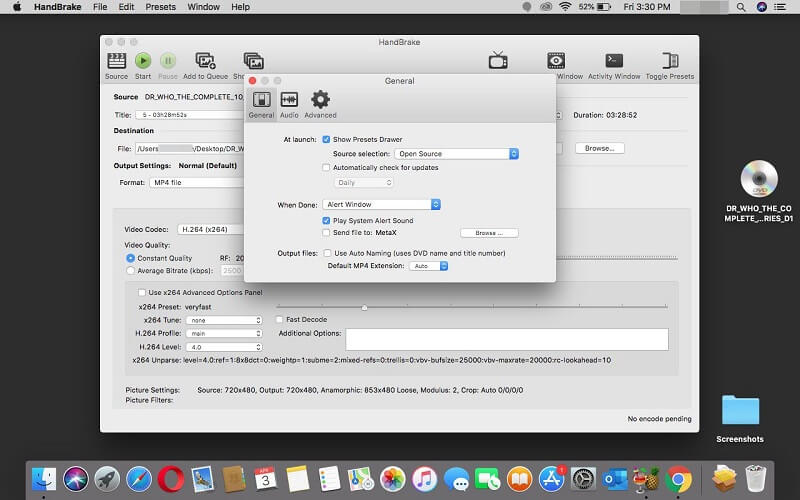
- Insert DVD and Use HandBrake
Now, insert your DVD disc on the optical drive. Make sure HandBrake is working within the background as well. The said software should detect your DVD disc automatically. If HandBrake doesn’t pick up your DVD disc, choose “Source” and then locate your disc on the window that pops up.
- Make Adjustments
Modify your output settings. It is best to use the output file format as MP4. This is because it is a popular format that can be used on both macOS and iOS devices. You should also set a target size that you wish.
- Press Start
Now, press “Start” and wait until the process on how to copy the DVD to the computer is complete. Once it is finished, you will be able to have digital copies of your DVD discs.
Part 3. How to Convert Video Files
After you have copied your DVD to the computer, then you can edit and convert your videos using iMyMac Video Converter. This is a great video editing and conversion tool that supports a lot of formats (both audio and video).
In addition, you can use it to edit your videos by cropping, trimming, rotating, and adding subtitles. You can use it to adjust saturation, hue, brightness, and volume, among others. This is a great tool for media enthusiasts out there.
One exceptional feature or iMyMac Video Converter is its ability to use hardware acceleration technology. Thus, conversion speeds are very fast. It supports NVIDIA CUDA, AMD, and Intel HD Graphics, among others. NVENC is supported as well.
iMyMac Video Converter supports a lot of resolutions including 480p (SD), 720p (HD), 1080p (FHD), and 4K (UHD). If you are converting your ripped DVDs, you can choose a resolution that you want. If you have a 4K television, then you can convert it to the said resolution. Finally, Supported devices are a lot. These include iPhone, iPod, iPad, Samsung, Google Nexus, Kindle Fire, Blackberry, and a whole lot more.
Apart from the device, you can freely access to the popular social media platforms such as Instagram, with the help of iMyMac Video Converter, you can make videos for Instagram to share them with your friends and family.
Part 4. Conclusion
Two different methods on how to copy DVD to a computer on a Mac were taught to you in this guide. The first method involves Disk Utility. On the other hand, the second method involves HandBrake and another useful tool libdvdcss.
Once you have ripped your DVDs to your macOS computer, you can simply convert them to output formats that you wish to use iMyMac Video Converter. This tool can be used to convert not only video but audio as well.
In addition, the tool can be used to edit your videos. Thus, if you have ripped homemade videos from your DVD, then you can edit it to make it more appealing and emotional for birthday celebrations, for instance.
If you wish to get iMyMac Video Converter, you can get it through the link here. Crop, edit and convert your ripped DVD discs and you’re on your way to enjoying precious past moments in your life.
