


Not like a Windows computer, hiding files and folders on your Mac is not as easy as it sounds. What can you do? Never worry because if you are wondering how to hide files on Mac, I will show you the steps to do this trick. This way, you will be sure that all those important files and folders on your Mac will surely be kept safe.
All the files on your Mac might contain important files for business purposes like business data, personal information, and other important things. Because of this, choosing to hide some files and folders on your Mac computer is one great way to have these files safe and private at all times. Now here you are, a detailed guide on how to hide files on Mac.
Contents: Part 1. Best App to Hide Files on MacPart 2. How to Hide Files on Mac via TerminalPart 3. How to View Your Files and Folder on MacPart 4. How to Unhide Files on Mac
Part 1. Best App to Hide Files on Mac
How do you hide files on a Mac? Now, We will go first for the easiest method. Use the best app -- PowerMyMac to hide your files on Mac.
Step 1. Open the software and select Toolkit. Then choose "Hide".
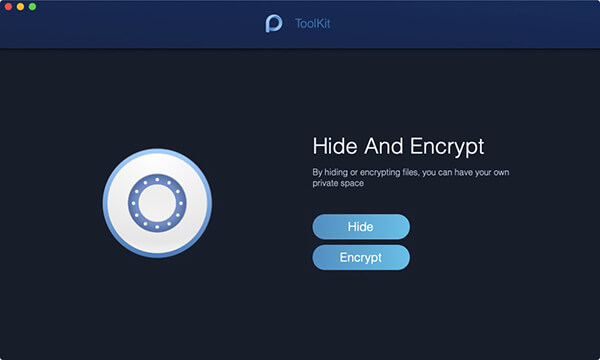
Tips: You need to Set and confirm your password the first time you use this feature.
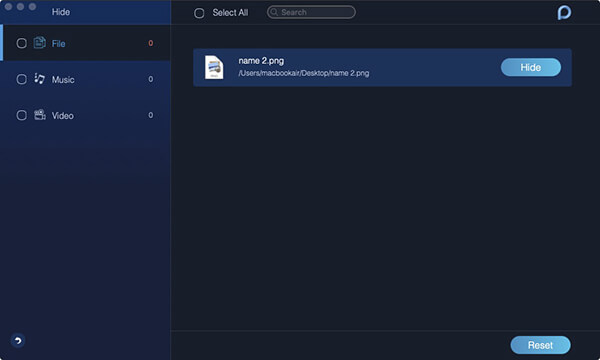
Step 2. Drag Your File and Hide It
Drag a file on the screen and hide it. Press the Hide button to finish this step.
Note: There is a switch button below. Turn the button off, the file you dragged in this step could be shown on your Mac again.
So easy, Right? PowerMyMac also allows you to encrypt your files. The steps are as easy as the Hide process.
Part 2. How to Hide Files on Mac via Terminal
How do you make a folder private on a Mac? Hiding files on Mac are a bit more complexed than doing so with a Windows or any other computer but it isn’t impossible.
Of course, you could also name the folder something absolutely boring such as “BBQ at the Stevenson's 2013” or “Homework” or whatever to avoid suspicion but that usually won’t complete the needed secrecy that you initially desired would it? So let’s just move on to hiding that folder altogether.
Use Your Terminal to Hide Files and Folders on Mac
To start this how to hide files on Mac guide, ideally, you gather all the items into a folder. The next step is to open the Terminal window. This can easily be done by pressing the Command button plus the space bar. You should see a small window pop up and you don’t need to be completely overwhelmed yet, don’t worry, it is there to help you hide that folder.
On the same terminal window, type in the following:Chflags hidden

From there on how to hide files on Mac using Terminal, simply click and drag the folder into the window. And at this point hit enter.
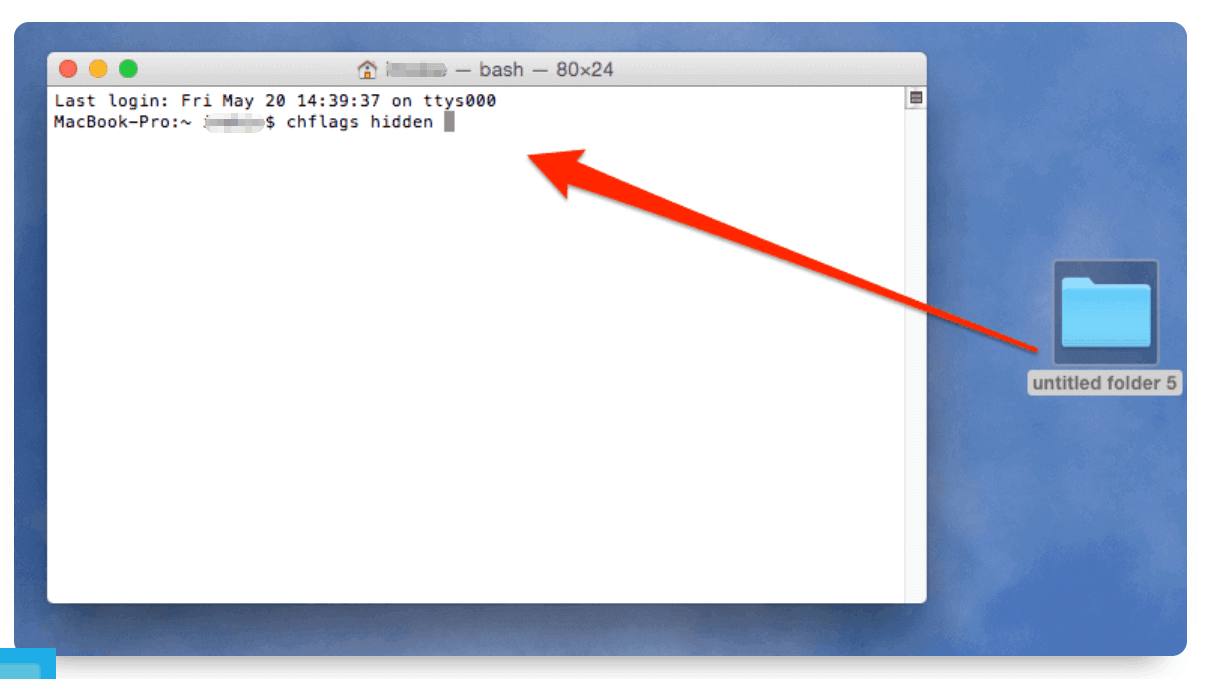
By now you have noticed that the folder that you wanted to be hidden has vanished from your desktop, assuming you did leave it on your desktop only and that’s pretty much what you wanted. Please note it’s actually still there and you can still drag it around if you wanted to. However, even if you searched for it using the Finder, it won’t simply show up like magic, in fact, it’s almost as if it has completely vanished altogether.
However, it’s actually still where you left it but it just can’t be seen or accessed using the finder. From here, a hidden folder is useless if even you can’t access it, isn’t it? Although the file is hidden, but can't find these hidden files? The next part of this how-to access hide files on Mac, which is what many of those panicking right now are probably wondering.
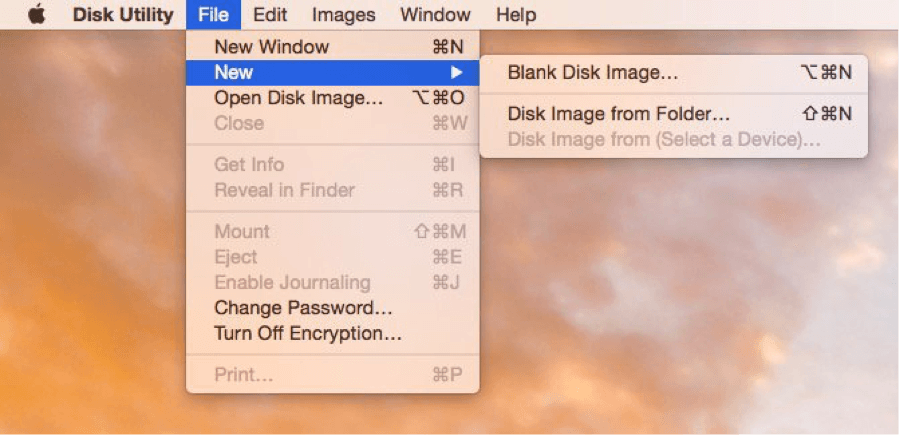
Using Disk Utility to Encrypt Your Folders
Having your files and folder encrypted is also a good way on how to hide files on Mac and keep them safe and private because you will only be the one who can access them.
How do you hide and lock files on a Mac? Here is how you can try to encrypt your files and folders using your Disk Utility:
- Launch Disk Utility. Just type in Disk Utility in your Spotlight Search and then press Enter.
- Go to the menu bar and choose File, then New, and then Disk Image from Folder.
- After that, choose the file or folder that you would want to encrypt and then click Image.
- Then name it and make sure that choose 256-bit AES Encryption found in the drop-down box next to Encryption.
- And then after that, click on the Save button and then enter using your password and then click on OK.
You can also password protect your important files without Disk Utility, click here to learn more.
Part 3. How to View Your Files and Folder on Mac
Access a Hidden Files or Folder
Let’s start off with the fastest method on how to hide files on Mac now.
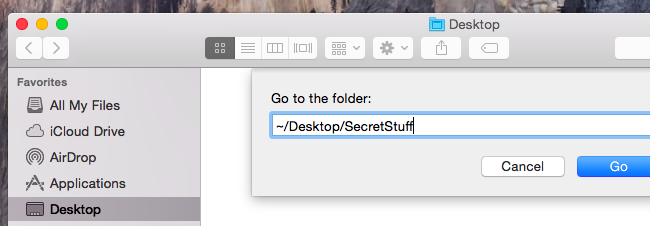
1. Go to the desktop and search for the “Go” button on the window.
2. Click it and find the “Go to folder” option in said drop down options. From there type in the location of the folder you hid by adding “~”. The “~” signifies a folder in use of the current username, so from there type in the location and the name of the folder.
This ideally works if you placed it in a place you can easily remember, like the desktop, documents, downloads and more. So it will look like this if it was in your documents:~/Documents/Title_of_Hidden_Folder
As another example, if you did place it in your downloads folder, you’ll want something like this:~/Downloads/Title_of_Hidden_Folder
There is actually another way to view hidden files. That is to show hidden files on Mac with shortcut. You can use the Open/Dialog button which can find the folder after doing a short and rather nifty trick. Start off by pressing these buttons together: Command + Shift + Period.
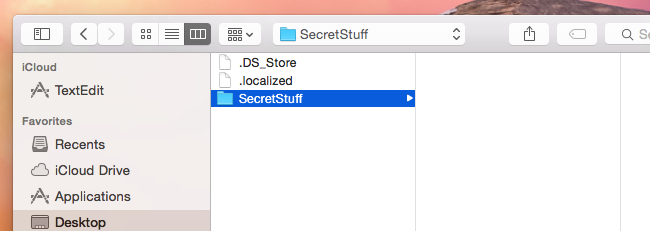
Now if you had saved the folder that you hid on your desktop, this trick won’t immediately show said file. That trick mentioned a little earlier, will help you find it quickly.
At the Open/Dialog window, after pressing the buttons you need to click on another folder within the Open/Dialog window and then simply go back to the Desktop folder. From there you hidden files should show up. Easy wasn’t it?
View Hidden Files in the Finder
The next option on how to hide files on Mac is to use the Finder to get find the hidden folder. This involves some work with the terminal again and from there you need to close all the Finders too which is more daunting than it sounds.
Start by opening a terminal. Type in these commands and make sure you hit the Enter button after each command:
defaults write com.apple.finder AppleShowAllFiles TRUEkillall Finder
This will forcibly restart all Finders that are open and will also show hidden files as commanded.
Want to prevent the Finder from displaying hidden files and folders? Run the following command to disable this option and restart the Finder. Open the terminal and type in this command:defaults write com.apple.finder AppleShowAllFiles FALSEkillall Finder
Part 4. How to Unhide Files on Mac
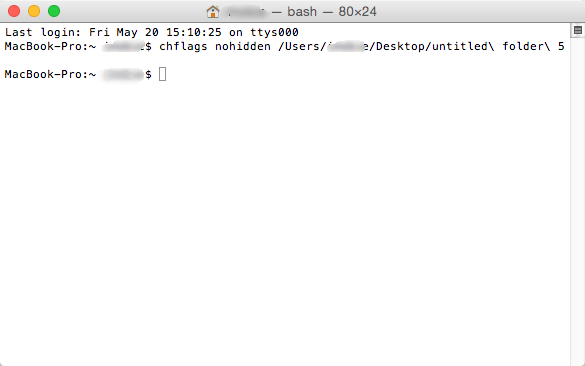
You have clear ideas on how to hide files on Mac, but on another note, if you ever want to unhide a folder for some reason or another, that isn’t an issue either. Again open the terminal and issue this command:Chflags nohidden
Ideally you still remember the path to your hidden folder, otherwise, if it is somewhere you remember exactly, simply drag it again into the window like earlier and it should once more poof back into existence. Again another nifty little trick.
Of course, if dealing with the terminal gives you anxiety or seems a little too complicated to you, you are always more than welcome to try third-party programs that can help you make your files and folders private on your Mac and there should be a pretty easy guide attached to said programs. Happy hiding!


christian2020-04-01 15:29:58
Bonjour, J'ai effectivement réussi à masquer un dossier par l'utilitaire de disque, cependant quand je fais une recherche sur un fichier qu'il contient, celui-ci apparaît dans la fenêtre de recherche. Existe-t-il une possibilité pour masquer l'ensemble des dossiers et des fichiers contenues dans le dossier masqué ? Plutôt que de le faire un à un ?merci