


Apple had released a new macOS for Mac desktops and notebooks. This was actually an impressive new refinement. Upgrading to the new macOS High Sierra is a very simple task that you can do on your own. It will not require you to put in more effort and time on doing this. In this article, we are going to show you why and how you can upgrade to the new macOS High Sierra.
Contents: Part 1. Why You Should Upgrade to macOS High Sierra?Part 2. How to Prepare Your Mac for macOS High Sierra Upgrade?Part 3. How to Backup Mac before the Upgrade?Part 4. A Guide to Upgrade Mac to Mac OS High SierraPart 5. Conclusion
People Also Read:How to Update Mac4 Options to Fix Mac White Screen. Here is Real Fix!
Part 1. Why You Should Upgrade to macOS High Sierra?
The reason why you should upgrade your Mac desktop or laptop is for you to have the new and improved AFPS file system, for you to have a faster experience in browsing, stellar graphics, VR support, and a better experience when it comes to your gaming life. This is what macOS 10.13 offers you.
If you also want to give a boost to your Mac, then upgrading to macOS High Sierra is the ideal thing to do. This is because the new upgrade can give you a compressed video up tip 40% more which will result in having more space and speed on your Mac. The macOS High Sierra also comes with a new and improved Photo app that will provide you with some professional tools that you can use.

Part 2. How to Prepare Your Mac for macOS High Sierra Upgrade?
Now that you are fully decided to upgrade your Mac to the macOS High Sierra, then its time to prepare for the upgrading process. However, please keep in mind that the beta version may not have all of the features. Because of this, if you are aim is to upgrade with some features, then you must make sure that those features are all included. Now, there are different ways with how to prepare for the upgrade.
1. Verify Mac compatibility
You have to make sure that the macOS High Sierra is compatible with the model of Mac that you have on hand. If your Mac is an edition ranges from the year 2009 up to the newer version, then there is a huge chance that you will run the macOS High Sierra without having any issues.
2. Clean Up Your Mac
This is very important because once that your Mac is clean, then it will continue running smoothly during the upgrade. Making a complete cleaning on your Mac actually includes many files to be removed on your Mac such as your duplicate documents, photos, cache, files, and other things that you no longer need on your Mac.
For you to completely clean up your Mac, then we highly recommend you to use the iMyMac PowerMyMac. It will surely help you to clean up your Mac completely because it has the capability of deleting all your junk files quickly and safely which will give you more storage space on your hard drive.
PowerMyMac can also find and then remove all of the email attachments that you no longer need. Your iTunes backup and your multi-language on your Mac that you do not need will also be located and deleted. It can also help you scan and then remove all of the large files that you no longer need. This is an all in one cleaner that you can count on in cleaning up your Mac before you make the upgrade.
Here is how you can clean up your Mac using PowerMyMac.
- Download PowerMyMac and install it on your Mac. Then launch it.
- On the left side of your screen, there is a list of modules. Choose “Junk Cleaner” from the list.
- Click that Scan button so that PowerMyMac will start scanning for all your junk files. Wait until the PowerMyMac is done scanning all your junk files.
- These junk files will be shown to you in categories such as Application Cache, System Logs, User Logs, Photo Cache, and more. Choose the desired folder that you want to clean up.
- After choosing, click on the CLEAN button.

3. Check for Any Mac Issues
After you are done with the cleaning process on your Mac, it is now time to check any issues before you proceed with the upgrade. Here is how you can check for the health of your Mac.
- Launch Disk Utility on your Mac.
- Choose the Startup Drive.
- After that, click on the First Aid tab.
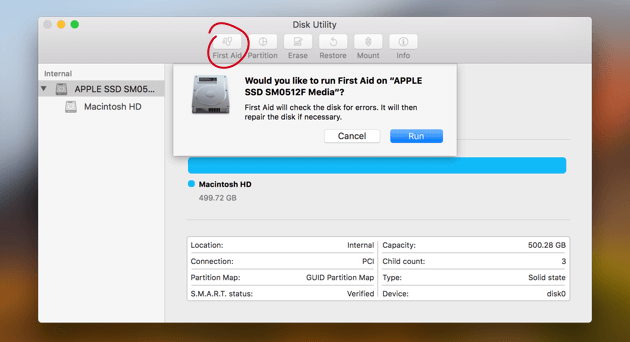
You will be lucky enough if you have not found any issues on your Mac. However, in the case that you found one, then you can start repairing those issues first. Restart and then hold the Command and R key for you to make some repairs using your Disk Utility.
Part 3. How to Backup Mac before the Upgrade?
To back up your Mac is one of the major things that you need to do. This is mandatory especially if you are going for the Beta version. This ensures that you will not lose any of your important data on your Mac. You can backup your data on your Mac by using one of Apple’s software which is the Time Machine. Time Machine can save copies of anything that is in y our mac. It can make a backup of your data on your Mac on an hourly, weekly, daily, or monthly basis.
Aside from the automatic backup that you can make using Time Machine, you can also customize the process. You can backup your precious documents and files manually by going through with System Preferences. Also, to use Time Machine, you would need to have an extra device for storage purposes. The bigger the storage capacity of your spare storage device, the better. You can choose from a USB, SDD, NAS drive, or Thunderbolt hard drive.
Part 4. A Guide to Upgrade Mac to Mac OS High Sierra
Of course, after you are done preparing your Mac for the upgrade, then it is time for you to go to the real deal. Here is a guide for you to upgrade your Mac in a more comprehensive, fast and safer way.
1. Select the Safest and Trusted Network to Make the Upgrade
You have to keep in mind that all of the major upgrades that will be done on your Mac needs a trusted network. This is for you to add speed and make a safe download of the upgrade and as well as installation. Because of this, the best option for you to have the upgrade is by doing this in the comfort of your home.
2. Log in to your iCloud
Because most of the Mac applications have an iCloud integrated part. So, if you are aiming to have a smooth operation in upgrading, then you have to log in your iCloud account for you to proceed.
3. Upgrade to the Latest Version of your OS
For you to avoid any problems that might occur, it is a mandatory action that you upgrade the current OS of your Mac to the latest one. Doing this will make sure that your Mac will become stable in upgrading it to the High Sierra. Also having your Mac OS update will fix any bug issues on your Mac as it will eliminate them all. You can check for any updates on your App store.
Also, it is very important to upgrade all of your third-party applications on your Mac to their latest version as well. In doing this, you can easily check the App Store for any updates on your application. While on the other hand, for the apps that you have bought externally, then you have to upgrade them manually first.
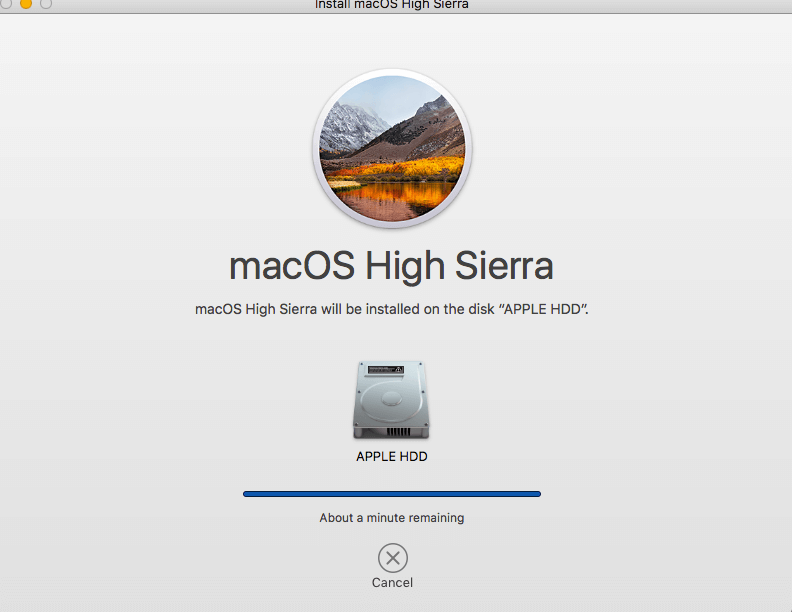
4. Download the Mac OS High Sierra
The Mac OS High Sierra is now available for any Mac users. You can have it downloaded from its website.
5. Have Your Mac Upgraded to Mac OS High Sierra
Once that you have downloaded the software from the website given, launch your installer from your Applications and then click on the Continue button. You will be guided by an on-screen instruction which will make it easier for you to upgrade to Mac OS High Sierra. All you have to do from here is for you to follow those instructions carefully for you to avoid any error. After that, ensure to have automatic updates from your System Preferences and from your App Store as well. This is for you to make sure that your Mac will have the best performance and for you to get the most out of it.
Part 5. Conclusion
Now, there you have it! It is really quite easy to upgrade your Mac to macOS High Sierra. All you need to have is an understanding of every step that you are going to make. Make sure that you follow every instruction properly and religiously.
Having PowerMyMac on your Mac together with the new upgrade that you have with macOS High Sierra, could turn out to be a great tandem. As the High Sierra also boosts the speed of your Mac, then PowerMyMac will give it help in boosting it more and giving you more space for storage. This is by removing any folder, files, photos, junks, and other things that you no longer need on your Mac.

