


Have you heard of HEIC? If not, then get to know what it’s about. The HEIC is the latest file extension. It’s a type of HEIF or High-Efficiency Image File format. It uses modern compression methods to retain a higher quality image on your iPhone.
So, when you take a photo with your iPhone, that particular photo is better compressed so that the file size is a lot smaller.
That being said, there will be a need to convert HEIC to jpg on Mac. The good news is that it’s not hard to convert HEIC to jpg on Mac. Before you get right into it, you should know more about the HEIC file name first.
Contents: Part 1. Can I Convert HEIC to JPG?Part 2. How Do I Convert HEIC to JPG on Mac for Free?Part 3. Conclusion
Part 1. Can I Convert HEIC to JPG?
HEIC is also known as High-Efficiency Image Coding. You’re probably already using this particular format and you don’t even know it.
HEIC is Apple’s file extension of the HEIF file format. This is a replacement for JPG, the file format for images. You very well know that JPG is a very old file format. The latest compression methods may not do so well with it.
HEIC files are only carried out by Apple phone users. Hence, it only supports iOS 11. Launched by the MPEG group, it is the newest and the latest file extension and format.
It’s important to note that a HEIC file is different from a JPG format. What that means is that older machines, using out of date software, won’t be able to open, read, or save in HEIC or HEIF format.
You might wonder why you have to convert HEIC to JPG on Mac. The fact is, there is no need for you to do it especially if you’re just keeping your photos on your Mac. However, you would have to convert HEIC to JPG if there’s a need for you to upload a photo online.
Another reason why you would have to convert HEIC to JPG is that you’re emailing the image and you want to be sure that the recipient can open it. To be sure about it, it’s best to convert HEIC to JPG on Mac.
It’s worth noting that in the Photos app on your Mac, it won’t matter if the file extension is JPG or HEIC. You can still edit the photo in either format as long as you’re doing it on your Mac.
The important thing about the HEIC file extension is that you get better compression that can help you save on space on your Mac.
Part 2. How Do I Convert HEIC to JPG on Mac for Free?
Avoid texting the photos because if you do so, the files will end up losing the quality. When you text a photo, it ends up getting compressed. Once it gets compressed, it then gets sent to a smaller file. That won’t happen if you Airdrop the photos from your iPhone to your Mac. You should keep that in mind at all times.
Now, you can finally start to convert HEIC to JPG on Mac. Check out the three options listed below.
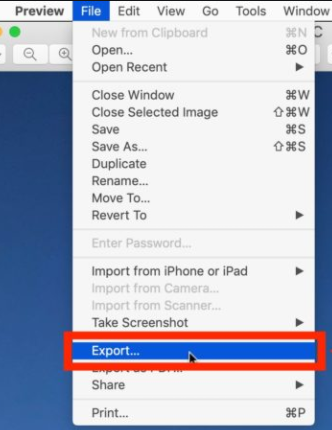
Option #1. Use Preview on You Mac
- Control-click on the photo.
- Open the photo by selecting Preview.
- Take your cursor to the menu and click on File.
- Select Export from the drop-down list. You will be taken to another page where you will again see a drop-down menu with a list of file formats you could choose from.
- Change the format to JPG. You could also change the quality if you like. Make use of the slider to do that. If you don’t care about the size, you can just opt to set the slider to Best on the right-hand side. You could also rename the file on the files next to Export As.
- Click on the Save button.
- Check on the photo from your desktop.
- Press
Command + Iif you can’t see the JPG file name on your desktop.
Option #2. Use a Web-Based Tool to Convert HEIC to JPG on Mac
- Open a web browser on your Mac.
- Go to https://www.apowersoft.com/heic-to-jpg.
- Drag and drop a photo on the web-based tool. That will easily convert HEIC to JPG on Mac.
- Download the file.
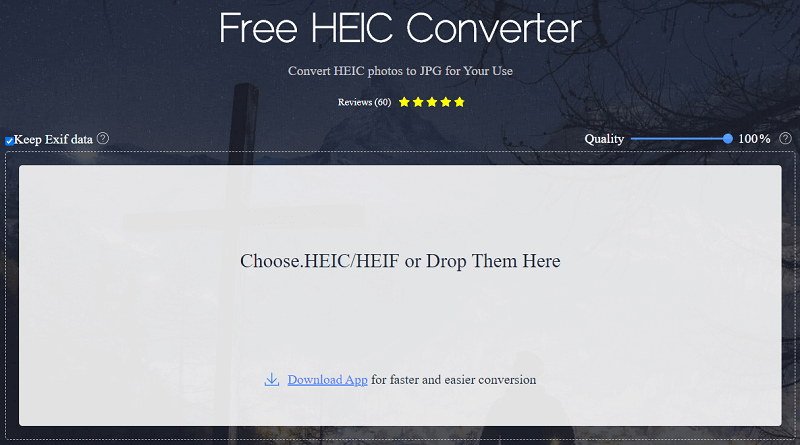
Take note that this particular web-based tool has a desktop version. If you want to save some space on your Mac, you can just settle for the web-based version.
While it’s very convenient to use a web-based tool to convert HEIC to jpg on Mac, you would have to be very careful. Aside from the fact that it’s free, you won’t have to download the tool on your Mac.
There is a downside though. The online technique that can help you convert HEIC to JPG on Mac can compromise your privacy. You see, each time you upload and convert your files on a web-based tool, you are sharing some crucial information with a website. The information you have on your file goes straight to the website’s server.
Even if the website has a well-laid out Privacy Policy, there is no guarantee that the information you have just uploaded and converted stays safe. The fact that you have already uploaded the file online means you’re agreeing to the Terms of Service of the website. If you don’t read their Terms of Service carefully, there is a possibility that the file that you ‘ve just uploaded and converted could be used by other people. That could be very dangerous for your privacy.
Option #3. Use Photoshop to Convert HEIC to JPG on Mac
- Open up Photoshop on your Mac.
- Click on the Create New button. You will see this on the left-hand side of your screen.
- Take your cursor to File on the menu above.
- Scroll down on the drop-down list and click on Scripts.
- Select the Image Processor.
- Select Folder on the Image Processor page.
- Click on Downloads and create a folder.
- Click on Save Location.
- Check Save as JPG on the File Type.
- Put in value in the Quality box. You can use the numbers 1 to 12, with 12 being maximum quality.
- Click on the Run button. You will see this button on the top, right-hand side of the Image Processor screen

That’s it. Photoshop is on its way to converting HEIC to JPG on Mac. There’s nothing else that you have to do since Photoshop is doing it all for you.
Bonus Tip: Remove Duplicate Files on Your Mac to Save Space
It’s not enough to just have your photos in the HEIF format. If you’re serious about saving space on your Mac, it’s not enough to keep photos in the HEIF format.
Besides, you’re most likely to end up with a lot of duplicate photos when you start to convert HEIC to JPG on Mac. Just think about it, once you start converting, you’re going to have two files with different file extensions. Those files are going to take up more space on your Mac.
What you need is the PowerMyMac to help you clean out those duplicate filesbecause it is designed to clean out your Mac so that you wouldn’t have to do it yourself.
It takes care of those files that have been duplicated through conversion or download. There is no need for you to find those files since the PowerMyMac has a Duplicate Finder can do the job for you.
If you want to avoid storing duplicate files on your Mac, you should learn more about the PowerMyMac by clicking.
Part 3. Conclusion
It’s not a problem to convert HEIC to JPG on Mac. As you can see, there are several ways to do it. You just have to choose which option suits you well.
Have you had to convert HEIC to JPG on Mac? How did you do it? Did you use any of the options mentioned above? If not, what method did you use? We would love to hear from you. Feel free to share with us your thoughts.

