


If you are using a Mac, the Photos app is responsible for managing all images inside the application such as photos transferred from your iPhone or memory card as well as those that were imported. For the curious ones, you might be wondering where are photos stored on Mac.
Remember that this is specific to the Photos app. In case you do not use the app to manage your photos on your Mac, the photos are not stored inside the applications package library but you can easily find them using Finder in the generic Pictures folder or somewhere else in the Mac system.
Here we will show you how to quickly locate and manage your photos on Mac.
Where are Photos Stored on Mac? Quick Guide
The photo files are stored in this location on Mac: ~/Pictures/Photos Library.photoslibrary/Masters/.
It is important to note that the ~ tilde indicates the users home directory, if you are going to utilize the “Go To Folder” command to move through that directory, do not skip the ~ prefix.
Contents: Part 1. Why Can't I See Photos in Finder on Mac?Part 2. Where Are the Photos Files Stored on Mac?Part 3. Bonus Tips: How to Use the Photos App to Import Photos to Mac Let's Wrap It up
Part 1. Why Can't I See Photos in Finder on Mac?
Before knowing where are photos stored on Mac, you may also want to know how to store your photos. Your photos can be stored on your Mac or on iCloud. Generally, photos can take up disk space, especially if you have a lot. Since photos have been synced to iCloud, the original photos are purgeable files and can be removed from Mac to save space.
If you can't see your photos in Finder on your Mac, several factors could be causing this issue. Here are some potential reasons and solutions:
-
Photos Are Stored in the Photos App:
- If you use the Photos app to manage your pictures, they are stored in the Photos library rather than as individual files in Finder. To access these photos, open the Photos app. If you need to access specific photos in Finder, you can export them from the Photos app by selecting the photos and choosing
File > Export.
- If you use the Photos app to manage your pictures, they are stored in the Photos library rather than as individual files in Finder. To access these photos, open the Photos app. If you need to access specific photos in Finder, you can export them from the Photos app by selecting the photos and choosing
-
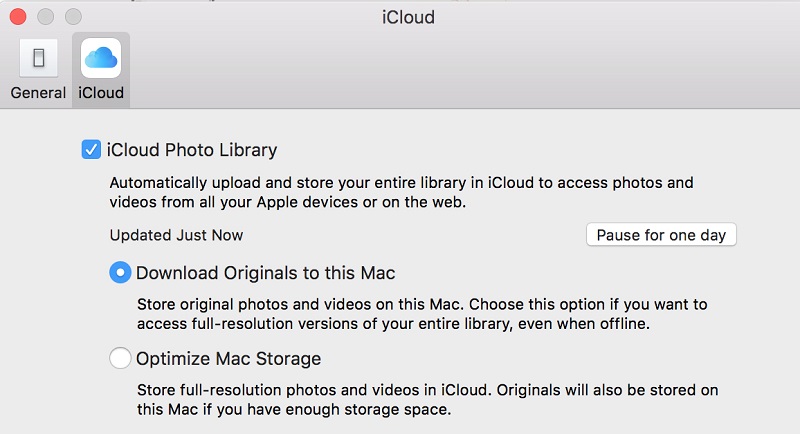
iCloud Photos:
- If you have iCloud Photos enabled, your photos might be stored in iCloud and not downloaded to your Mac. Ensure that you have enabled the "Download Originals to this Mac" option in
System Preferences > Apple ID > iCloud > Photos.
- If you have iCloud Photos enabled, your photos might be stored in iCloud and not downloaded to your Mac. Ensure that you have enabled the "Download Originals to this Mac" option in
-
Hidden Files:
- It's possible that some photo files are hidden. To check if hidden files are the issue, you can press
Command + Shift + .in Finder to show hidden files.
- It's possible that some photo files are hidden. To check if hidden files are the issue, you can press
-
Incorrect Finder View Settings:
- Ensure that your Finder view settings are set to show the type of files you are looking for. For example, if you are in a folder that should contain photos but have a filter applied that excludes image files, they won't appear.
-
Photos in Different Locations:
- Your photos might be stored in different folders or on external drives. Check your usual photo storage locations, such as
Picturesor other folders where you might have saved them.
- Your photos might be stored in different folders or on external drives. Check your usual photo storage locations, such as
-
Search Function:
- Use Finder's search function to locate your photos. Open Finder and type common photo file extensions like
.jpg,.png, or.heicinto the search bar.
- Use Finder's search function to locate your photos. Open Finder and type common photo file extensions like
-
Library Corruption:
- If there's an issue with the Photos library or other photo management software, your photos might not be accessible. You might need to repair the Photos library by opening the Photos app while holding down the
OptionandCommandkeys, then selecting "Repair".
- If there's an issue with the Photos library or other photo management software, your photos might not be accessible. You might need to repair the Photos library by opening the Photos app while holding down the
-
Permissions Issues:
- There might be a permissions issue preventing Finder from accessing certain folders. Check and adjust permissions in
System Preferences > Security & Privacy > Privacyand ensure Finder has the necessary access.
- There might be a permissions issue preventing Finder from accessing certain folders. Check and adjust permissions in
By checking these potential issues and solutions, you should be able to locate and view your photos in Finder on your Mac.
Part 2. Where Are the Photos Files Stored on Mac?
Can't find photos on Mac? Where are pictures stored on Mac? The photo files usually are stored in this location in the macOS:
~/Pictures/Photos Library.photoslibrary/resources/derivatives/masters
It is important to note that the ~ tilde indicates the users home directory, if you are going to utilize the “Go To Folder” command to move through that directory, do not skip the ~ prefix.
This essentially focuses on the local image files and not anything stored inside iCloud. For files on iCloud, you can access them through iCloud Photo Library or the Photos app.

How to Access the Location Where Photos Files are Stored?
How to view photos in a folder on Mac? In case you decide to manually navigate to the file location of Photos using the Finder to find where are photos stored on Mac, there are steps that you should follow:
- Open Finder and proceed to the home directory
- Open the “Pictures” folder
- Search for the file labeled as “Photos Library photoslibrary”
- Right-click or Control+Click on the “Photos Library photoslibrary” and tap on the “Show Package Contents” option
- Access the folder labeled “Masters” to find the image files included within the Photos app
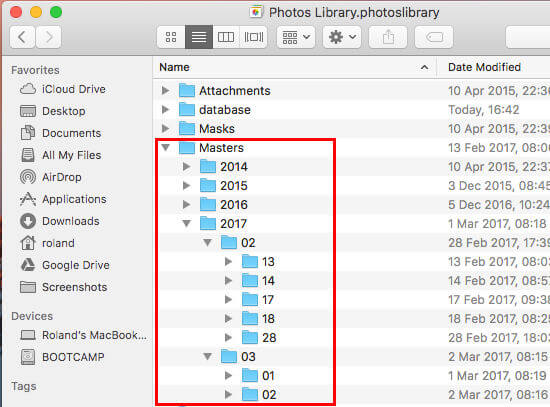
Generally, the “Masters” folder includes directories of photos that are categorized based on the date in day, month or year subfolders. In every folder, you will find the image files from each specific date.
Remember that if you delete a photo from the “Masters” directory, you can no longer access it in the Photos app. It is recommended to copy a file from the directory if you want to edit one. Furthermore, this package folder is not aimed to be easily accessed which is the reason why it is concealed. However, you can browse directly through your files if you want.
Another option if you want to find the original file from Photos apps is to utilize the “Show Referenced” option. This will access a Finder window that holds a file that was selected from Photos. Some Mac users will notice that the images in the Photos app are designated in the same package style containment as with other common Mac apps and in the same parent directory where you will find the iPhoto images and the Photo Booth files.
In case you only require the “Master” files to copy a few photos, simply move them out of Photos directly to the desktop. This action will create duplicates of your photos and will not move or delete the original files.
What to Do When Pictures Folder on Mac Missing?
If you have updated your Mac version to El Capitan or higher, the picture folder will disappear, then it's hard for you to find your photos.
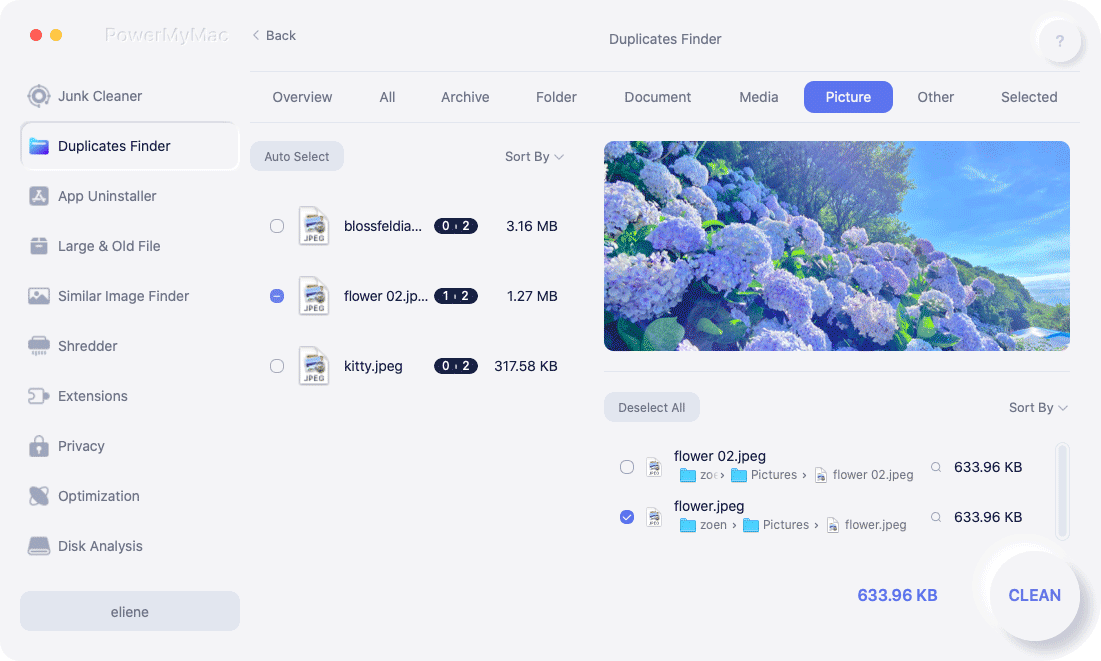
In this case, you might need an effective tool called PowerMyMac to help you quickly locate all the photos and clean them out if you don't need them anymore. You can have a free try this software to see if it can solve your problems.
Do not forget to find and delete all the copies that you acquired later to prevent the files from taking up disk space on your Mac. In such cases, you can also use the "Similar Image Finder" and "Duplicate Finder" tools in PowerMyMac to clean up unnecessary files like similar or duplicate photos after locating them.
Part 3. Bonus Tips: How to Use the Photos App to Import Photos to Mac
If this is your first time to use the Photos app, it will provide you with an overview of how your library looks like with all your photos and videos imported. You will get a quick introduction to some of the features and tools as well as learn how to create concrete memories with the help of printable objects such as photo books, calendars and more.
After finishing the tour of the app and you have gone through the initial configuration, you are ready to import your photos and videos.
Importing Photos to Mac
You can utilize several ways to import your media content to the Photos app which is based on where you have been storing the files. Follow the ways below and you will also know where are imported photos stored on Mac more clearly.
#1. Import photos from an iPhone or digital camera
- Link your iPhone or camera to your Mac using a USB cable. There is a need to unlock your iPhone using your password and then click on “Trust” when asked to “Trust This Computer”.
- In case the Photo app does not automatically open, access the app on your Mac.
- Once the Photos app launches, it will provide you with the “Import” screen that has all the photos and videos on your iPhone or camera. In case you cannot see the “Import” screen, simply tap on your iPhone or camera in the Photos sidebar beneath the “Devices”.
- At this point, you can choose either to “Import All New Items” or choose a batch and click on “Import Selected”.
#2. Upload photos from a folder or external hard drive in Finder
If these are the sources, you have several options to choose from. In case your photos and videos are stored in an external hard drive, you must make sure that it is linked first. You can proceed with one of the following:
- Move the files from the drive into the Photos window
- Drag files from the drive onto the Photos icon that you can find in the Dock
- In the Photos app, proceed to File > Import from the menu bar. Select the photos or videos that you want to import and tap on “Review” for Import
Remember that the Photos app copies the photos and videos into the Photos Library. The original file is left either on your device or in its folder.
Let's Wrap It up
With the options stated above, you now know where are photos stored on Mac and can easily locate your photos on your Mac. Just make sure that once you locate your photos, you do not have any duplicates. Remember that these duplicates or similar photos can take up precious disk space on your Mac.


Jucemar2023-07-14 13:09:09
Preciso um help, no Macbook os SSD são pequenos e coloquei a fototeca inteira no SSD Externo Pro Sandisk, abrir ela e navegar está super rápido pois o ssd é bom. Mas tentar importar fotos para a fototeca no ssd externo fica processando e não tem sucesso, apenas se a fototeca estiver no macbook. Alguém tem alguma solução para importar fotos na fototeca no hd externo?
Andy2022-03-21 04:03:46
Good article. FYI: When I want to import a photo or video to my PHOTOS App I go to Finder and locate the items that I want to import. I press the CMD key and select all of the photos that I want to import or, if the photos are in a long uninterrupted list, ie "file 01.png", "file 02.png" all the way to "file 100.png" or more and I want to import the entire list of photos, I click on the first file in the list ie "file 01.png" then I hold down the shift and click on the last file in the list ie "file 100.png" and the entire list will be highlighted. Then I right click in the highlighted list and a window opens. I go down the list to "Share" and I click on it and a list opens showing different Apps on my Mac with one being "Add to Photos". You click on this and leave the room if you have a long list and when you come back open the PHOTOS App and the imported photos will appear in your Sidebar on the left under Library-Imports under the date you did the import. I tried to paste where the Share-Add to Photos is located but I am unable to do this. If my long highlighted list has files that aren't photos or videos ie pdf or doc type files, I simply highlight everything in the list and then hold down the CMD key and un-select the files that will not import into PHOTOS. It won't import the undesirable files anyway so if you try to include an undesirable file it give you an error message and you hunt down the renegade file and redo the highlight the list and un-select the undesirable files and then try the right click-Share-Add to Photos and go to grab a sandwich or if you have thousands of files to Import, go to bed! Now I will post my question to Chloe in a separate post. I hope this helps someone. Andy
Ab2021-10-02 17:47:12
Originele foto’s staan niet in structuur zoals afgebeeld in screenshot onder 5, maar nu in map Masters onderverdeeld in A-F en 1-10 met een structuur van cijfers, letters en tekens en niet meer in hiërarchieke structuur jaar, maand en dag. Hoe is dit op te lossen zodat geïmporteerde foto’s in masters map weer te traceren zijn in jaar, maand en dag.
mirèse2021-03-27 09:58:47
Ik heb Big Sure en wil Photo Booth gebruiken. Hij vindt de bib niet. Welke bib aanduiden? En wat zijn de gevolgen voor het gebruik zonder Photo Booth?
iMyMac2021-03-28 08:08:31
Hier is een Photo Booth-gebruikershandleiding in Big Sur, ik hoop dat dit u kan helpen: https://support.apple.com/guide/photo-booth/welcome-pbhl8ee47f3a/mac
Sherri Zuckerman2021-01-16 16:35:20
I can not figure this out. Every article says something different and none of them work for me. First of all, I'm using Big Sur and there is no "masters" folder in my package contents, there's only "originals". When I go into that folder I only have images up to 2015. it's very confusing and I'm so tired of how mac has done this from the start with their photos programs.
John2022-01-05 16:01:02
I had the same issue but I was thrown off by the first reference at the top of the article, which is ~/Pictures/Photos Library.photoslibrary/Masters/. I did not have a Masters folder. I tried a CLI search for a file in my pic library but it didn't find it. I then went back to the article and found a 2nd ref for the location. The next reference worked for me, which was ~/Pictures/Photos Library.photoslibrary/resources/derivatives/masters.
Tanya2022-11-04 06:40:16
John, I just want to let you know, you SAVED ME with your comment. OMG! Thank you. You are genius. By helping me thanks to you writing this comment, I found my master files. I could only find random files in "originals" where they are like fragmented memories all out of order on the timeline. This is done on PURPOSE by screwball Apple. Thank you for helping me.
Dan2021-12-18 04:19:00
Masters folder used to exist until Mojave. Since Catalina, it's Originals.
Владимир2020-08-23 19:37:41
Доброго вам всем.... перенёс данные с MacBook Air 2015 на MacBook 2017. Делал это с помощью утилиты миграция данных. После этого на air обновил систему до Catalina. После пытался открыть приложение фото, но сразу не получилось, а когда открыл, то фотографий там небыло. Не на этом не на другом маке нет фотографий в программе фото. Куда они могли деться? Почему это произошло? Есть вариант их вернуть, если резервной копии небыло ? Спасибо за дельные советы
iMyMac2020-08-24 19:59:23
Здравствуйте, я предлагаю вам связаться с продавцом используемой вами утилиты переноса данных.
Alyssa2020-04-03 09:49:50
Buongiorno, ho da anni un problema con Foto, in pratica ho due "album" differenti di Foto con differenti fotografie al interno. Se vado sotto informazioni di sistema per gestire lo spazio sul mac, trovo; l'app di Foto, ma se poi vado su documenti - Browser file - iCloud (archivio) - scrivania, trovo l'app di foto concentro altre fotografie. Posso aprire entrambi gli "album" di foto e trasferire le fotografie del telefono o su uno o sul altro. Come faccio ad avere una cola cartella Foto con dentro tutte le fotografie? Grazie mille per la disponibilità è da un po' ce cerco la soluzione ma non so come fare
Pieciana2019-12-17 15:14:11
I put the songs in a folder on the desktop and iTunes always creates a copy in its own media library folder. How can I remove iTunes Backup?
iMyMac2019-12-17 16:02:03
We have created an article before and it can solve your problem, please check this article link (https://www.imymac.com/powermymac/how-to-remove-duplicate-songs-in-itunes.html) to read the details. Thanks for your support!
Davy2019-12-10 16:05:07
Lucky to see your tips, I want to back up all my favorite photos but can't find them on my Mac. Now I have done the backup, so happy!
iMyMac2019-12-10 17:04:07
Thanks for your support!