The iPhoto or the upgraded version of Photos on Yosemite is considered as the default application on Mac for transferring photos from iPhone to a Mac. There are some users though that experience an issue – iPhone photos not showing up on Mac.
Generally, this issue can also affect users who recently updated to iOS 10, 11 or even the latest iOS 12. If you want to deal with the issue on iPhone photos not showing up on Mac, you must take time to read this article.
Article GuideA Close Look on Photos on MacCommon Ways to Fix “iPhone Photos Not Showing up on Mac” IssueWhere Can I Find the Photos Stored on Mac?Quick Tip on Using the Similar Photo Tool by PowerMyMac
People Also Read:How to Fix Photos Won't Import from iPhone to Mac EffectivelyHow to Clear iPod Photo Cache on Mac OS X?
A Close Look on Photos on Mac
The Photos application is responsible for managing all photos and videos. For those who have used iPhoto in earlier Macs, Photos is considered the next level in photo organization.
Before Photos came into the picture, Apple offered two specific applications for the management of photos and videos – Aperture and iPhoto. Those who want a simple way in managing photos and lack photography skills, iPhoto is the preferred choice while Aperture is ideal if there is editing involved.
With the arrival of the Photos application, it becomes a combination of both apps. It combines the features of the two applications with the addition of other features such as iCloud Photo Library and Photo Sharing.
For those who have utilized iPhoto before, using Photos will be a breeze. In the main window, you can have your photos, collections, and albums with a navigation menu to the left side as well as viewing options that you can change on the top part.
Generally, the main distinction between Photos and iPhoto is the overall performance. There are limitations in iPhoto when handling larger libraries where it starts to lag as well as restrictions on the sizes of the albums and collections. With Photos, there are no limitations and capable of handling bigger libraries.
Common Ways to Fix “iPhone Photos Not Showing up on Mac” Issue
If you are faced with the “iPhone photos not showing up on Mac” issue, there are several methods that you can use that worked successfully for some users.
- Update your Mac OS. It is recommended to update your Mac and iPhone to the latest version. If possible, update your devices to Mac OS X Yosemite and later. This might be the solution if iPhone photos not showing up on Mac.
- Unplug your iPhone and quit iPhoto/Photos including iTunes. After unplugging and turning off the applications, plug your iPhone back and restart iPhoto/Photos. In some cases, you might see a prompt on your iPhone asking “Trust This Computer” when you plug it in for the second time. Simply tap on “Trust” to continue. It is also necessary to keep it unlocked to successfully import photos from iPhone to iPhoto/Photos.
- Rebuild your iPhoto thumbnails. In case your photo stream has been transferred to your iPhoto library but you could not find them when iPhoto is opened, simply follow these steps:
- Create a backup of your iPhoto Library in case of data missing
- Close iPhoto if it is open and go to Finder > Application, select iPhoto without opening it.
- Tap on Command + Option keys until you see the Photo Library First Aid window. In case you have iPhoto 9.2 and earlier, the interface will appear different but almost the same.
- Choose “Rebuild Thumbnails”. It might take some time if you have a large library. After this, relaunch iPhoto and search for your missing pictures.
- Remove any photo storage service. For those who are using a photo storage service on Mac such as Dropbox. It might be conflicting with iPhoto. It is recommended to close Dropbox or remove it entirely which might be the solution for the issue in which photos do not show up.
- Check if iCloud Photo Library or My Photo Stream has been enabled. In case it is enabled, your photos might already be on your computer. This is the reason why those photos do not appear in iPhoto.
- When checking out the options on the iCloud Photo Library, there are steps to follow. For Mac, proceed to iPhoto/Photos > Preferences on the menu bar > General > iCloud. On iPhone with iOS 10.3/11/12, proceed to Settings > Your Name > iCloud and then Photos. In case you have iOS 10.2 or previous versions, simply move to Settings > iCloud > Photos.
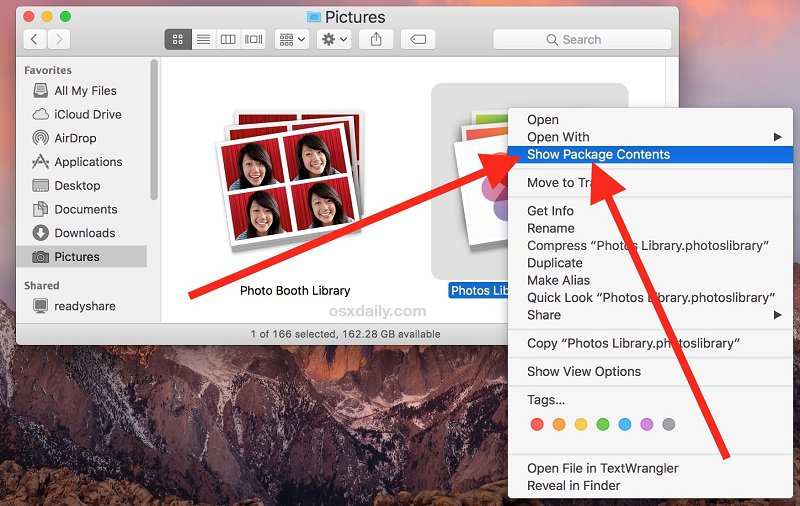
- If you want to confirm whether your photos have already been imported, simply proceed to iPhoto/Photos > Preferences > General > Show in Finder. At this point, right tap the files to choose Show Package Contents to view details or access ~Pictures/iPhoto Library/Masters.
Where Can I Find the Photos Stored on Mac?
Photos stores your photos and videos in a specific library. This is an advantage since it is easy to find your files, but then again the process in accessing the definite files can be confusing for most Mac users. When finding the photos stored on your device, the first task is to find the Photos Library.
- Open Photos. On the menu panel, you can tap on Photos.
- Go to “Preferences” and proceed to “General”
- On the upper part of the interface, you will find the Library Location. Tap on “Show in Finder”.
Once you locate the Photos Library file, there is not much that you can do. If you double-click on it, it simply goes to Photos. The only way to locate the fundamental files of your photos and videos is to follow these steps.
- Right-click on the Photos Library so you can access an alternate menu
- On this menu, choose “Show Package Contents”
- Open the folder labeled as “Masters” which is where you will find all your photos and videos, organized according to date.
Quick Tip on Using the Similar Photo Tool by PowerMyMac
By now, you have already successfully managed the issue of iPhone photos not showing up on Mac with the help of the methods discussed above. In case you have many photos to organize, it is best to use a handy tool by iMyMac PowerMyMac, specifically the Similar Image Finder tool.
The Similar Image Finder tool by PowerMyMac functions as a photo manager that can assist you in finding and cleaning similar or duplicate photos on your Mac.
Let us take a close look at the steps on how to use the tool.
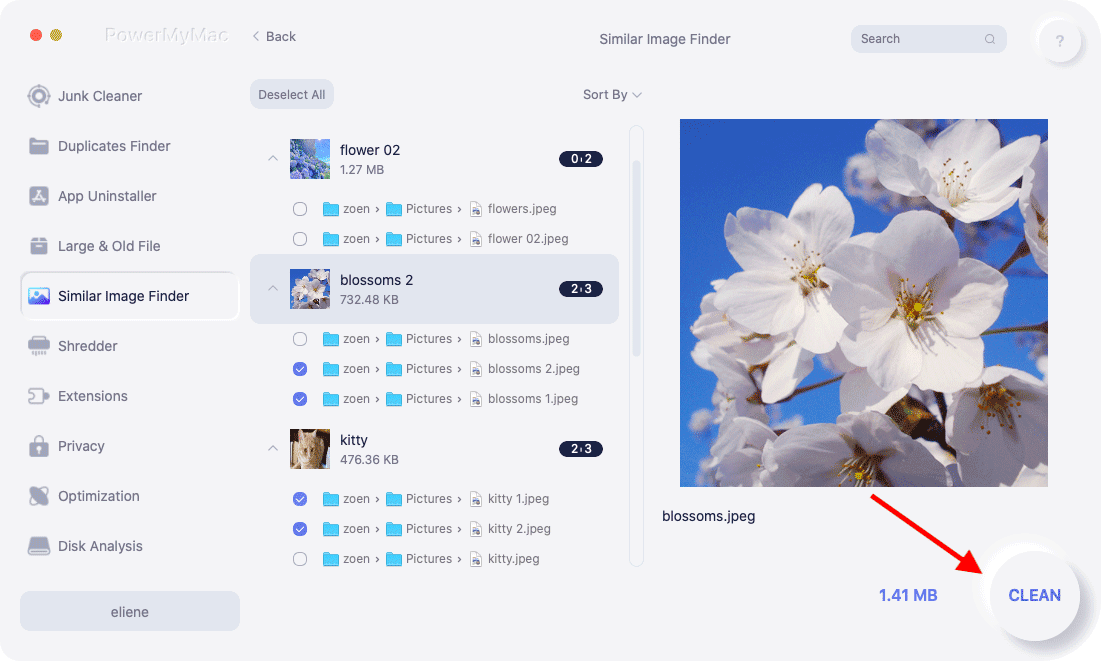
Step 1. On the PowerMyMac interface, tap on the Toolkit module and select the Similar Image Finder tool.

Step 2. Tap on the “Scan” button on the interface. This will initiate the process of finding and detecting similar photos on your Mac.
Step 3. After the scan, similar photos are displayed on the left side of the interface. On the right, tap on the photos and preview.
Step 4. Select the similar photos that you want to remove.
Step 5. Tap on the “Clean” button on the bottom right corner to get rid of all the similar photos that you have selected. The time span of the cleaning process is based on the size of the similar photos to be removed.