


Every Mac includes numerous built-in typefaces, and you might just simply download additional fonts mostly from Apple and some other sites. You may remove or disable any typeface whenever you wouldn't want that to show throughout your applications. That’s why we’ll talk about how to install fonts on Mac.
Furthermore, installing fonts into Apple devices was a simple process across all Mac users. There was no necessity to be such a computer whiz and with a few easy steps could let anyone install, download, and even set whichever fonts you wish to see in your Mac.
Contents: Part 1. How to Install Fonts on MacPart 2. Disabling and Removing Fonts on MacPart 3. Conclusion
Part 1. How to Install Fonts on Mac
But before you can implement how to install fonts on Mac, then you all must first locate and download it. Almost the majority of websites provide free typefaces. However, there were those who are genuinely uncommon and wonderful, and they may cost you just few money. Make sure prior to actually downloading free fonts, check the licensing terms for information about how to utilize the typefaces.
If it states "for individual use only," users are not permitted to be using the typeface in commercial applications. While looking for some different fonts for your Mac, be sure the choices you select are appropriate with your latest macOS. Actually, look just at the file description and when it finishes mostly with ".ttc," ".otf,” and ".ttf," you're good to go. After you've found fonts that you admire you may download these just like every other item. Fonts are often sent in.zip formats that can be unzipped by a double click. Upon downloading the files containing those additional fonts into your Mac, choose one method to install them. See below:
Install Fonts on Mac Manually
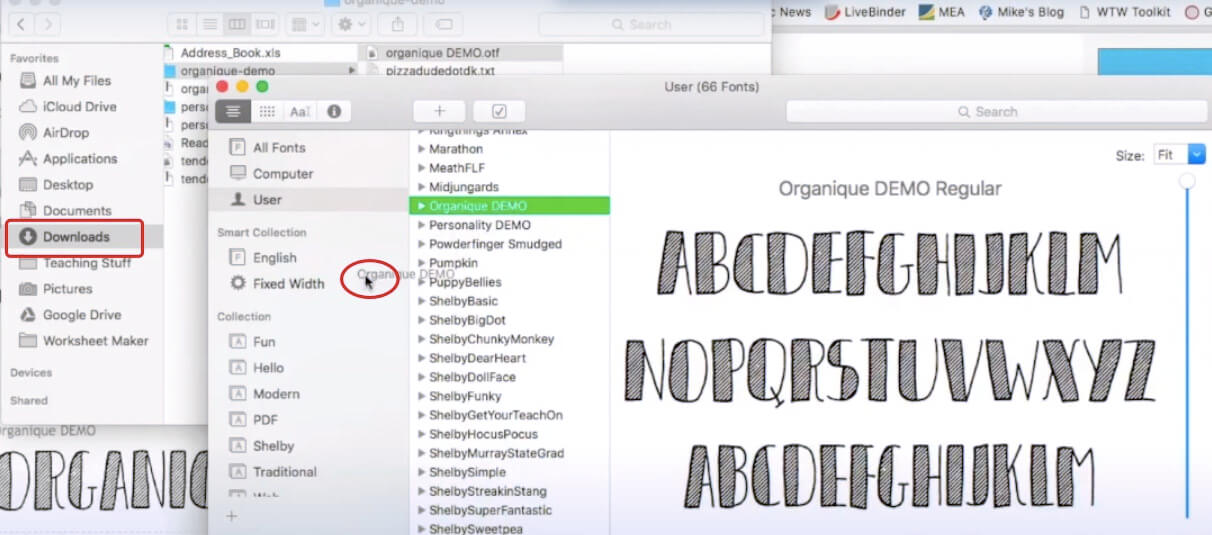
To implement how to install fonts on Mac, users will not require to utilize Font Book. It may be accomplished manually by further moving font samples into Library/Fonts. However, the Library directory, as well as its subdirectories, were being masked off users' views since OS X 10.7 Lion. As a result, you'll have to put in slightly additional effort to find it:
- Launch on Finder, then from the top menu section, press on “Go”.
- Afterwards, from the drop-down list, click and choose “Go to Folder”.
- Then, into the popup window, enter ~/Library/Fonts and then select “Go”.
- After that, the fonts’ directory will appear.
- From the Fonts’ directory, copy then paste on all of the unzipped font formats. Then you’re done.
How to Install Fonts on Mac on Word
To also insert a font into Word for Mac, just follow these steps:
- Install each font throughout the manner indicated earlier.
- Font Book must be opened.
- From Windows Office, located at the left corner, drop and drag the fonts you’ve chosen.
- That is all there is to it. Your typeface must be accessible within Word for Mac following rebooting your Mac.
Part 2. Disabling and Removing Fonts on Mac
Getting a satisfactory collection of fonts only for Mac provides a wide range of aesthetic possibilities. With almost all of them, though, it becomes more difficult plus time-consuming somehow to select the best one. Furthermore, it clogs off your Mac. This is why understanding how to administer fonts off a Mac would be just as vital as understanding how and where to install those.
To prevent system complexity, we recommend that you remove or perhaps even disable any typefaces that you do not use. This was essential to note that you really could just erase or deactivate default fonts. You do have the option to remove any typefaces that you have installed directly. You had two choices for said typefaces you've installed: deactivate and remove. When you delete fonts off your Mac, then you also are erasing them completely into the system. Whenever you'd prefer a previously deleted one once again, you'll just have to restore it.
Removing Fonts into a Mac
- Open the Font Book.
- Choose all the fonts you’d prefer or intended to remove from your system.
- Then, hit on the key “Delete”.
- Finally, from the popup window that was displayed, press on the option “Remove”.
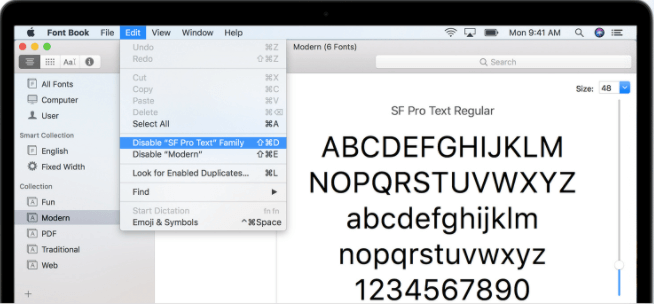
Disabling fonts off a Mac, implies again that these will stay into the system and yet shall not longer effectively-being displayed in programs or even the Fonts interface.
Disabling Fonts into a Mac
- Open the Font Book.
- Choose all the fonts you’d prefer or intended to remove from your system.
- Into the top corner, look for the option “Disable”, then press it.
- Finally, when a popup window will be displayed, hit on the option “Disable”.
Then overall you are already good!
Part 3. Conclusion
This article talks about how to install fonts on mac. Basically, we give a simple and easy guide on how to install manually and how to install fonts for Words. In addition, you can also see in this article the easy steps on how to disable and remove font into your mac system. Hopefully, these guides will help you in terms of your font installation, disabling, and removing. Don’t forget to get PowerMyMac in order to keep your computer healthy and in tip-top condition.

