


Anaconda was a Python installation that also includes a program controller, even an environmental administrator, as well as a compilation of numerous open-source programs. It is indeed very important for information jobs because this includes several empirical packages such as SciPy, sci-kit learns, Pandas, as well as NumPy.
This is also the preferred way for downloading Jupyter Notebooks. To know more on how to install anaconda on mac, just follow the steps and guidelines below:
Article GuidePart 1. How to Install the Graphical Installation of Anaconda on MacPart 2. How to Install Anaconda on Mac Using the Command LinePart 3. Testing the Installation of Anaconda on Mac
Part 1. How to Install the Graphical Installation of Anaconda on Mac
Using just a graphical installer for installing Anaconda seems to be actually the easiest method to do it. Here are the following steps you should follow to install anaconda on Mac with the Graphical Installation:

- The first to do was head into the webpage of Anaconda and after that, from there choose the Python 3X Graphical Installer or otherwise the Python 2X Graphical Installer. Whenever you really ensured which version of Python you would use and install in your system, then you must choose Python 3, the last option. Please do keep in mind don’t select between the other two.
- Next, you must now locate the one you have download and you must double tap on that.
- From the screen, you’ll see a popup message, just select the option continue.
- Then, from there again on the main screen, just click again the option Continue which is located in the bottom part of the screen.
- Keep in mind that once you have installed the Anaconda, it would then alter your bash account even if either the Anaconda 3 or perhaps the Anaconda 2, regarding the version of Python you have to obtain in your system. This would then be essential for later. And also tap on the option “Continue”.
- From there, you must now press on the Continue so that you’ll obtain the License Agreement. Afterward, you would then need to read and also tap on the option “Agree” into the License Agreement prior to actually tapping on the option “Continue”.
- After that, select the option “Install”.
- You'll then ask for your passcode, which would be generally the same as that you have been using to secure your Mac whenever you boot everything up. When you've already entered your passcode, select the Install Software button.
- Keep going by clicking the button. Since you prefer, you may install Microsoft Visual Studio Code, even though it is not needed. This is known as an Integrated Development Environment (IDE).
- Users should have seen a screen indicating that the download is successful. Quit the installer then throw everything through the trash.

Part 2. How to Install Anaconda on Mac Using the Command Line
- Launch on the terminal.
- After that, you must install the version of Python 3.7 or perhaps 2.7.
- “Throughout needed to finalize the setup process, carefully study the licensing agreement”, again the installers suggest. To see the licensing conditions, press Enter.
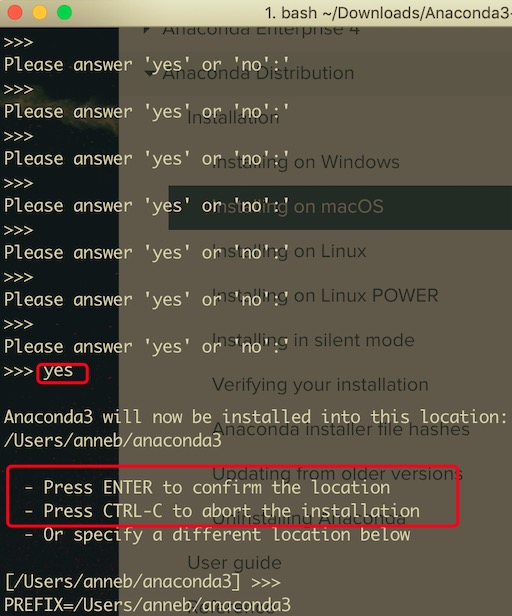
- After the agreement towards the licensing conditions, scroll towards the end of the screen as well as type yes.
- Then installer allows users to verify the destination by pressing Enter, stop the installation by pressing
CTRL-C, or provide another installation area by pressingCTRL-C. Whenever you verify the default settings, a dialog will appear as well as the setup would proceed. - The installation asks, "Do you want the installer to execute conda-init to activate Anaconda3?" It advises you to say "yes".
- “Thank you for installing Anaconda!” says this installer.
- For such Anaconda installer will take full effect, quit as well as reopen your terminal interface.
Part 3. Testing the Installation of Anaconda on Mac
After you install Anaconda on Mac, launch a current terminal window upon your Mac. So do just that, select the Spotlight magnified lens somewhere at the topmost right on your screen, input “terminal”, and afterward choose the terminal button.
A Jupyter Notebook would be another fantastic approach to check your installation. Once again to launch a Jupyter Notebook, enter the following code into your main terminal. Whereas if the command failed, Anaconda will be most likely not even on your paths.
The above article offered a step-by-step guideline for installing Anaconda on Mac. This graphical installation of Anaconda might not be the only option to install Anaconda; another command prompt installer may also be used, and that is generally the simplest. We hope this helps you install Anaconda on Mac. Have quite a pleasant and delightful day.

