


Sharing files with other people is one of the most common scenarios for those people who are working on a project, on the business field, and for just a case. And with that, there are actually a lot of ways on how you can transfer over your files from one device to another.
For Mac users, you can have your file transferred over to another device by using any cloud services. You can use your Dropbox, iCloud, Google Drive, and even send them over via email which is the most common way for you to transfer files to another person.
However, there is actually one simple way for every Mac users to transfer their files over to another device. And that is by using the AirDrop on Mac. But not all Mac users and iOS users actually know about this method. That is why in this article, we are going to show you on how you can access AirDrop on Mac and send and receive any files from any other macOS device or iOS device.
So let us learn more about the AirDrop feature on your Mac and how you can use it to share files with another device that you have.
TIPS:
Contents: Part 1. All About AirDrop on Mac Part 2. How to Turn On AirDrop on Mac Part 3. Using AirDrop on MacPart 4. Clean Up Your Mac from Unwanted FilesPart 5. Conclusion
Part 1. All About AirDrop on Mac
AirDrop is known to be as a wireless method that you can use to transfer any of your files from your Mac to another Mac or iOS device. This goes the same with receiving them. The only thing that you will be needing to do is for you to make sure that you are connected to a Wi-Fi connection and that your Bluetooth is turned on in your Mac or iOS device.
And since that AirDrop is considered to be a wireless method for you to transfer over your files to another device, then that means that it relies on Bluetooth and Wi-Fi connection. This is because AirDrop will be needing the Bluetooth connection so that it can detect any nearby device. And the Wi-Fi connection is used when you are transferring over a file to another device.
Part 2. How to Turn On AirDrop on Mac
Before you start using your AirDrop on your Mac, you have to make sure first that you can turn it on. And for you to be able to do this, here is a quick step by step method that you can follow.
Step 1: Launch Finder on your Mac.
Step 2: After that, choose on the “Go” button located at the menu bar.
Step 3: Locate AirDrop.
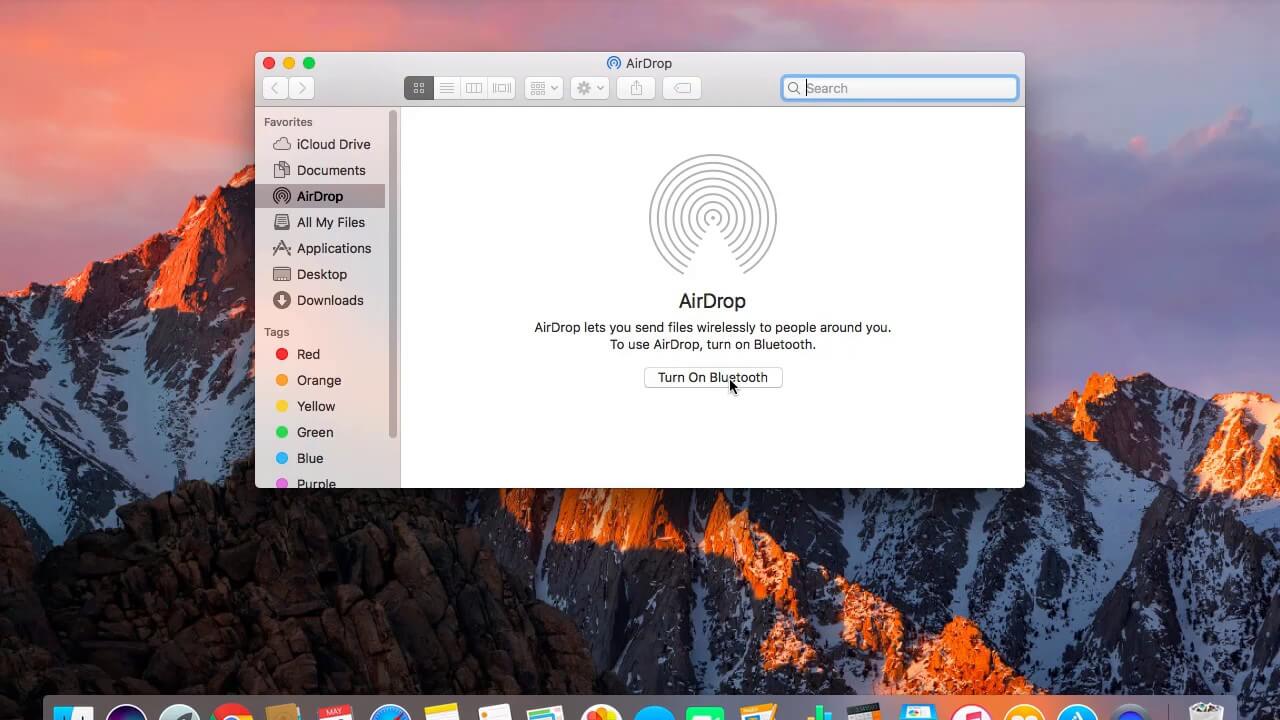
Step 4: Once located, click on it and a new window will appear on your screen.
Step 5: Then check that Bluetooth connection is turned on. And Bluetooth connection is on, your AirDrop on Mac will then be automatically enabled.
Step 6: Then, from the AirDrop window, you will then be given an option for you to select the devices that will allow detecting your Mac.
Step 7: From there, just click on the “Allow me to be discovered by everyone”.
Step 8: Then choose from the options wherein you would want to connect your Mac. You can choose from the option Contacts, or you can also select to choose the option wherein anyone within the range to detect your Mac.
Part 3. Using AirDrop on Mac
Now that you can turn on AirDrop on your Mac, then that means that you can now send and receive files wirelessly. And on your Mac, there are actually three ways to use AirDrop and send files from your Mac.
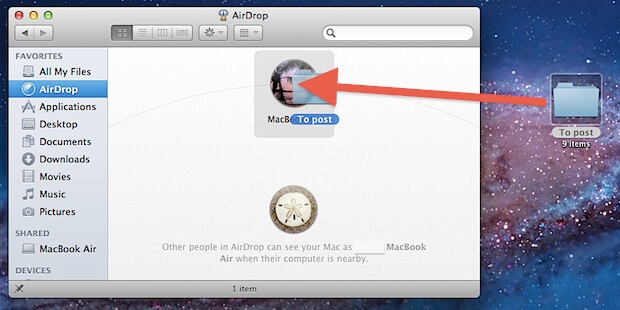
Way #1. Use AirDrop on Mac via Drag and Drop
Step 1: Launch Finder on your Mac and then choose AirDrop from its sidebar.
Step 2: After that, just wait until you see all a list of AirDrop users that is detected by your Mac’s Bluetooth connection.
Step 3: After that, go to the location of the file that you are going to share.
Step 4: Once that you have found the files that you want to share, drag the files over to the device that is going to receive it.
Step 5: Once done, click on the “Send” button.
Way #2. Use AirDrop on Mac via Context Menu
Step 1: Launch the Finder app on your Mac.
Step 2: From there, go to the location wherein the files that you want to share is located.
Step 3: Then, highlight the one that you are going to share.
Step 4: Then press and hold on the Control key on your keyboard and right click on your mouse.
Step 5: After that, click on the “Share” button located on your menu.
Step 6: Then click on AirDrop on the Share menu.
Step 7: Then choose the device that you would want to send the files to.
Step 8: Once that you are done, click on the “Done” button.
Way #3. Use AirDrop on Mac via Share Feature
This method that we are going to show you is the one that you can also use on any of your iOS devices to transfer over your files to a Mac device. To know how you can use the Share feature, here is what you need to do.
Step 1: Go to the files that you are going to share.
Step 2: Once located, find the “Share” button from your application.
Step 3: Once that you have located the Share feature, have the files you are going to transfer highlighted.
Step 4: And then, press and hold the “Control” key and press right-click on your mouse.
Step 5: Once done, click on the “Share” button located on your menu.
Step 6: And then, select the AirDrop feature from the Share menu.
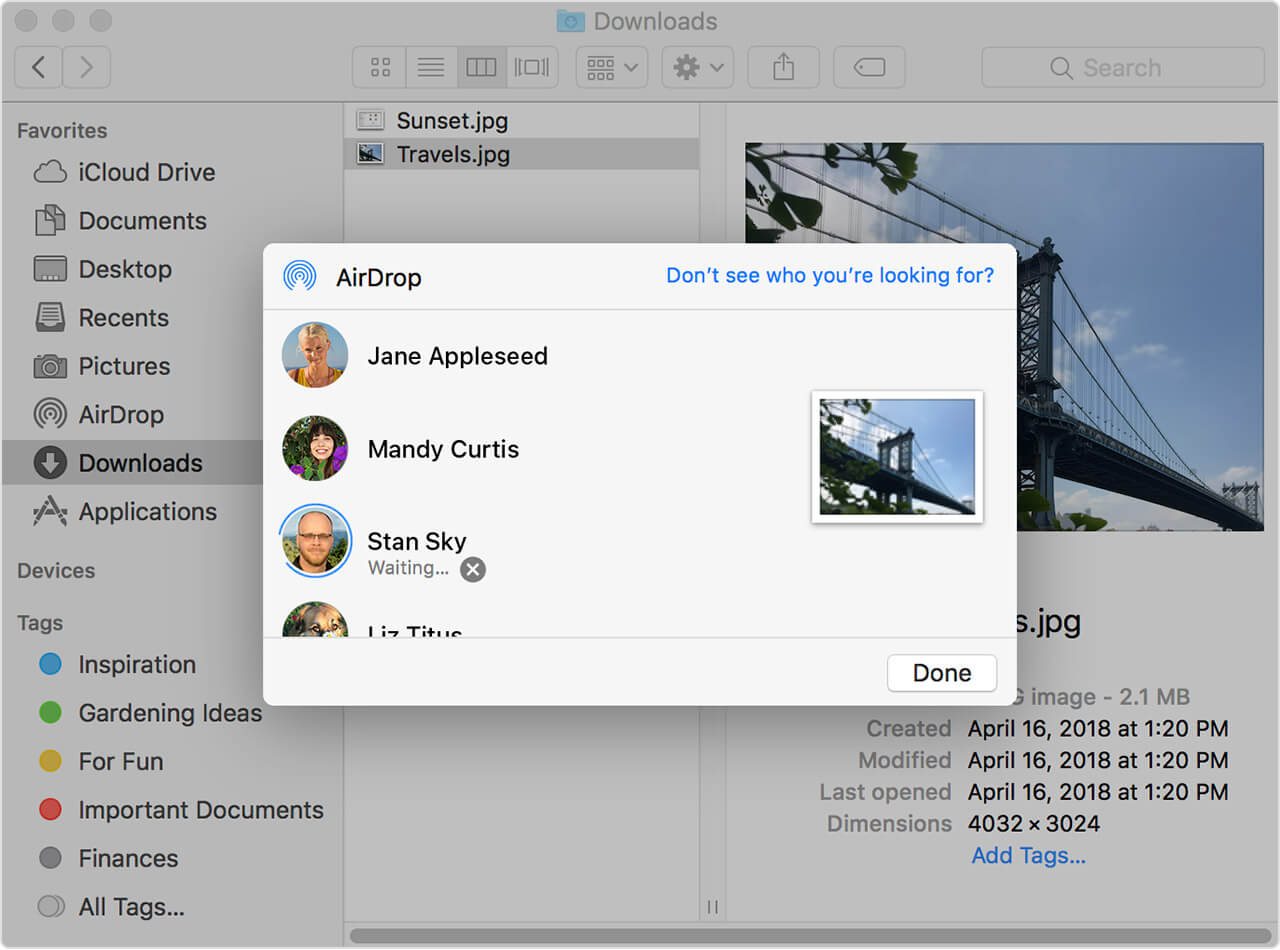
Step 7: Then choose the device wherein you would want to share your files from the list on your screen.
Step 8: Once that you have selected on the device, click on the “Done” button.
So that is how you can use AirDrop on Mac to send out files from your Mac to another device. And in case you are going to receive any files using AirDrop, you actually have the option to either accept or reject it.
You will know that you have an incoming file using AirDrop when you see a request on your AirDrop window, or you can also see the request as a notification on your device. And all of the files that you are going to receive via AirDrop will all be saved on your Downloads folder.
Part 4. Clean Up Your Mac from Unwanted Files
Since that you are aiming to transfer your files from your Mac to another Mac or iOS device and vice versa, then it is time for you to clean up your Mac and remove those unwanted files. And you can do this with the help of the iMyMac PowerMyMac.
PowerMyMac is one of the most powerful and effective tools that you can use to remove all those files that you no longer need. This way, you will have more space for your new files. And in order for you to free up space and remove those files that you no longer need, here is what you need to do. Let us start by cleaning up all the junk files on your Mac.
Step 1. Download and Install PowerMyMac
Download the PowerMyMac from its official website and have it installed on your Mac.
Step 2. Open the Program
Run the program. And as you can see on the main page of the program, you will see the system status of your Mac.
Step 3. Select the Junk Cleaner Module
From the main interface of the program, there are several modules that you can choose from. Choose Junk Cleaner to start cleaning up all your junks on your Mac.
Step 4. Scan Your Mac
Clicking on the SCAN button scan out all kinds of files on Mac. Then all you have to do is to wait until the scanning process is complete. That way, all the categories and files under system junk will be shown on your screen.
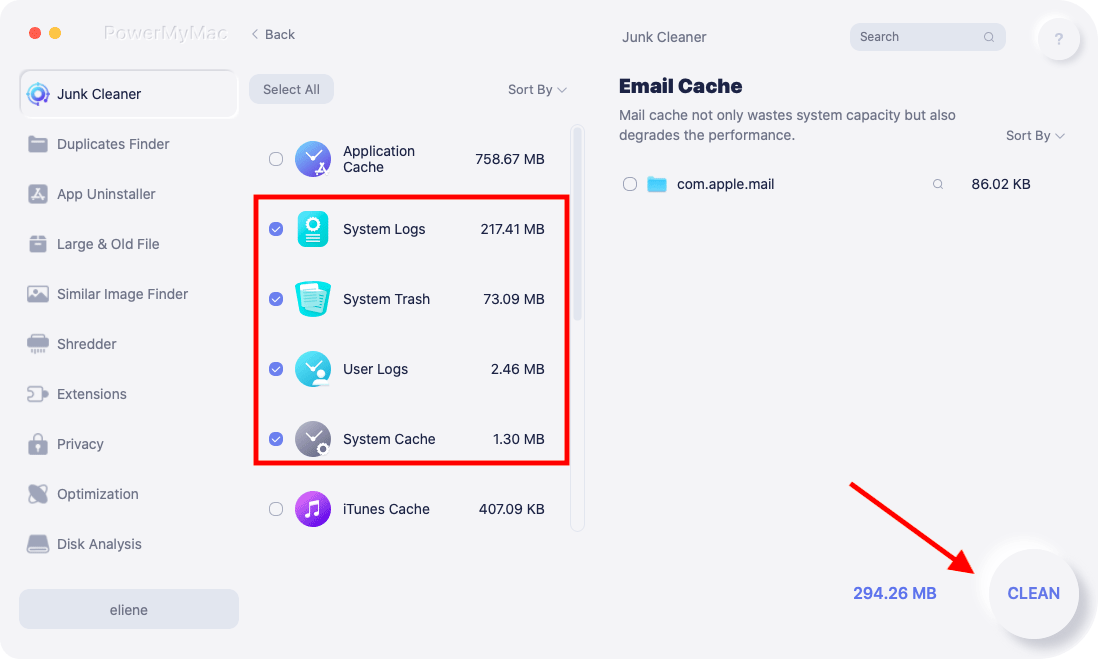
Step 5. Choose All Files to Delete
Then, from the files that are shown on your screen, simply choose all the files that you would want to remove from your Mac. Do this by clicking on each file to put a mark on it.
Step 6. Clean Up Your Mac
After choosing all the junks that you would want to remove from your Mac, simply click on the CLEAN button. The cleaning process will then start so just wait until the program is done cleaning up your Mac.
Part 5. Conclusion
So there you have it! Using Airdrop on your Mac is considered to be the simplest and easiest way to share any of your files from your Mac to another Mac or any iOS device and vice versa. All you have to do is to make sure that you have turned on your Bluetooth and Wi-Fi connection. Using the AirDrop on your Mac, transferring files to another device will be easier than using any other platforms. It is because you will send them over to devices that are actually within your Mac’s range
Also, make sure that your Mac is free from all those files that you no longer need. This way, you will make more room for the new files that you are going to get and as well as to have your Mac run on its best performance.
And by using the iMyMac PowerMyMac on your Mac, you can get rid of all the files that you no longer need. Same goes with all the application that you no longer use on your Mac. Aside from that, you will also manage all of the files that you have on your Mac, assure that your Mac will all be cleaned up accordingly and so that you will have a better experience on using your Mac.

