


To accelerate the process of troubleshooting problems with CrashPlan, one easy step you may take is you clear CrashPlan cache. The data that is kept in your backup will not be affected in any way, nor will the settings be altered, even if you delete CrashPlan cache. You can resolve problems with just an online location by issuing a command that is unique to the location in question.
In addition, you have the option of clearing your cache in a manual process. When you manually remove the app's cache, then, you may be able to fix problems with online locations, in addition to those that occur locally and with backup to other machines.
Contents: Part 1. Can I Delete CrashPlan Cache?Part 2. Where is CrashPlan/Code42 Cache Stored?Part 3. Automatically Clear CrashPlan/Code42 Cache on MacPart 4. How Do I Manually Clear the CrashPlan CachePart 5. Conclusion
Part 1. Can I Delete CrashPlan Cache?
Similar to how a web browser caches temporary data on your system, the CrashPlan software does the same. Speed is a key to cache in the CrashPlan application.
Caching in such a single, compact area enables the CrashPlan application to rapidly retrieve data regarding your documents to expedite backup creation, create records of files that are ready for restoration, and keep track of any changes made to each item in your restoration selection.
During a document validation scan, which is carried out to make sure your recovery is functioning properly, the cached files also were utilized to swiftly evaluate the information in your machine with data stored at the location.
Occasionally, some process in your system may modify, remove, or make obsolete changes to this cache. This may result in the CrashPlan application reporting false data regarding your restoration status, the documents that are accessible for restoration, and other things. In these situations, we suggest you clear CrashPlan cache to fix the problem.
Part 2. Where is CrashPlan/Code42 Cache Stored?
The Code42 app's caching focuses on speed. The Code42 application can rapidly construct listings of files that are accessible for restoration thanks to caching inside one condensed area. It can also keep track of any changes made to every file within your backup choice and accelerate the backup system.
The following data is saved in the Code42 application. Each of the backup-selected files, Versions of every file, the locations to which you backup, the status of your backup, and the present backup situation. Each operating system has a different location for the cache folder.
- C:
ProgramDataCrashPlancachein Windows /Library/Caches/CrashPlanon a Mac/usr/local/crashplan/cacheon Linux
There are instances when this cache goes out of date, is updated by some other function on your system, or gets erased. Because of this, the Code42 app may present incorrect details on the state of your backups, any data that are accessible for restoration, and other relevant details. In these kinds of situations, we recommend that you clear CrashPlan cache on your computer so that you can fix the problem.

Part 3. Automatically Clear CrashPlan/Code42 Cache on Mac
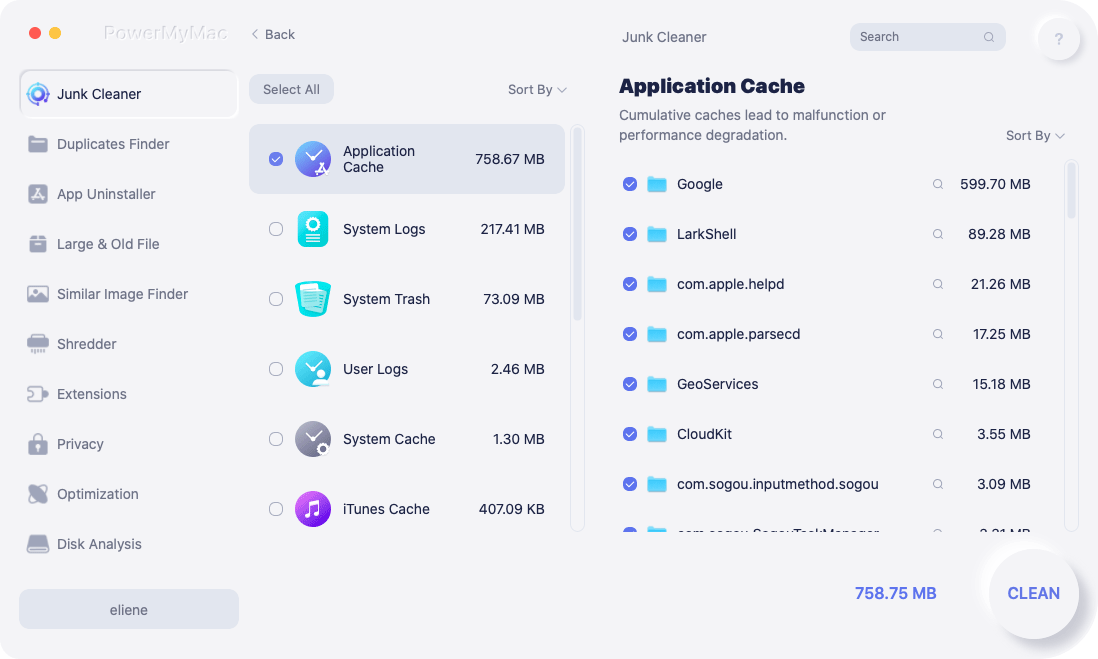
iMyMac PowerMyMac will delete any files and apps on your Mac or Windows that have not been utilized in a certain amount of time. By utilizing PowerMyMac Junk Cleaner, you may clear CrashPlan cache on your computer, which will free up storage space. Malicious software may be scanned for on your Mac and Windows when it is remotely connected to the Internet.
Remove everything that can be removed from the situation. Users of Mac and Windows computers can quickly and simply delete CrashPlan cache on their Macs or Windows by using the PowerMyMac Junk Cleaner. The steps involved are described below.
- Select SCAN from the list of available choices within the Junk Cleaner program to start the process of examining your Mac or Windows for files that aren't supposed to be there. This will start the process of looking for junk files.
- Once the scan has been completed, gather all of the unwanted files that were found on your machine and arrange them into one group.
- To clear CrashPlan cache, make a selection of the things that you want to remove; alternatively, if you want to delete everything, make a selection of all of the items.
- Selecting "CLEAN" from the drop-down menu will immediately result in the removal of any information that is not necessary. A notification pop-up with the header "Cleaned Completed" will show on the screen after the process of cleaning has been finished. You will be able to see a depiction of the entire amount of space that's also available, in addition to the quantity of storage that is currently being used, on the screen at the same time. Simply clicking on the Review button will bring you back to the lists, where you may delete more files.
Part 4. How Do I Manually Clear the CrashPlan Cache
If you're having difficulties with the CrashPlan app, one fast step you can take to resolve the problem is to clear CrashPlan cache.
- Launch the CrashPlan app on your device.
- If it's required, you should log in with your account.
- Entering the appropriate hotkey, depending on your operating system, will open the CrashPlan Commands menu:
- In Windows, use Control+Shift+C.
- Option+Command+C on a Macintosh
- In Linux, use Control+Shift+C.
- The preceding command must be entered, followed by the Enter key:
deauthorize - Launch your CrashPlan app and log in to your account. After logging in, the cache will reset to its original state.
It is possible to manually clear CrashPlan cache in the situation that you aren't able to accomplish anything with the CrashPlan Commands.
- CrashPlan's service should be terminate
- Proceed towards the cache folder associated with your os by navigating to:
- Windows users should go to C:
\ProgramData\CrashPlan\cache -
/Library/Caches/CrashPlanon a Macintosh - If you're using Linux, go to
/usr/local/crashplan/cache.
- Delete all of the folders and files that can be found inside this directory.
- Clear up the garbage on your gadget.
- Begin the process of using CrashPlan.
Part 5. Conclusion
It is a simple process to clear CrashPlan cache. You can do it manually or with the help of third-party software PowerMyMac, if you want the easiest, fastest, and safest way, then PowerMyMac is the best tool you can use. You can use it to eliminate the Google Drive cache if you want. It is also most recommended by many users due to its high efficiency and ease to use. Get the program now!

