


 I use a MacBook Pro and I’ve been buying new versions of it ever since it was released. This is because it is great for editing photos and videos which is my line of work. I bought the most powerful MacBook Pro available but I’m noticing that it’s kind of slowing down. They said I should clear application cache to speed my Mac up. How do I do this?
Here's how to clear the application cache on your Mac.
Contents: Part 1. What Is Cache?Part 2. How to Clean up Application Cache Quickly?Part 3. How to Manually Clear The Application Cache? Part 4. Conclusion
People Also Read:How to Clear iPod Photo Cache on Mac OS X?2 Solutions to Delete Temporary Files.
Have you noticed that your Mac device is becoming too slow? Are you in the middle of a task and your Mac completely freezes out? Some people experience a very slow Mac device and this can be very frustrating. Although Mac devices are very powerful computers, they can sometimes slow down because of a variety of reasons. One reason for a slow Mac device is the use of too much memory.
Another is full storage space. When there are a few spaces on your hard disk, this means there is less space allocated for performing tasks efficiently. And one of the biggest culprits of a fully occupied hard disk is the adding up of cache. So what is this cache and how does it affect your Mac device? How do you delete the cache to release some of the space?
Part 1. What Is Cache?
To give you a better user experience, cache files are put into storage by your system and its applications. Browser stores cache files too. The said cache files can be of various types such as images, documents, videos, etc. And they are stored in order for processes to speed up.
One example would be the browser Safari. It downloads and saves images on a particular web page you visit and stores it as the cache. In this way, the next time you visit that specific page, you don’t have to re-download the images all over again. It makes the process faster.
After some period of time, cache files increase in size significantly. Although cache files are actually temporary and they can be deleted, most people forget to actually remove them. That’s why cache files take up a significant part of your hard disk drive and it leads to the slowing of your Mac device.
Cache files include application cache, system cache, library cache, browser cache, and a whole lot more. Different types of operating systems store their cache in various different folders of the computer. However, the macOS puts cache files inside the cache location.
The primary use of cache is to enhance the experience of the user. However, the build-up of these cache files can result in a full disk drive. They are relatively small in size. However, if it takes too long for you to delete these cache files they can grow considerably larger. When this happens, your system is left to use a little amount of space in order to operate. Thus, the smooth performance of your Mac device is affected.
To ensure that you regularly have a great user experience on your Mac device, it is important for you to remove cache often. The Mac device is relatively difficult to clean compared to others. This is because destination folders can be found under multiple folders and files. Thus, if you do not have the knowledge to use your Mac, you might be wondering how to clean the cache properly.
Part 2. How to Clean up Application Cache Quickly?
If you simply want to delete your files and stop worrying about deleting the wrong data, it is recommended for you to use a tool such as iMyMac PowerMyMac. Here’s why:
01 - It gives you the capability to delete unimportant data on your Mac device. In this way, it speed up the performance of your Mac because files that clog it are removed.
02 - It helps you to powerfully scan your entire device leaving no unnecessary file behind.
03 - The entire process of scanning your device and deleting unnecessary data can be done in a few simple clicks.
04 - It provides a display of different data. Plus, you can sort these files by date, time, size, etc. You can even preview the data before actually getting to delete them.
05 - You are in control of everything. You can choose which files to keep and which files to actually delete.
06 - It provides you with the entire tool for the first 500MB of data without having to pay for it. Thus, it comes with a free trial.
Here’s how to use it. Just follow the steps below:
Step 1. Download and Launch PowerMyMac on Your Mac
Download the tool from the official website of the software. Open the tool within your device. Press Junk Cleaner. This can be found on the left side of the interface.
Step 2. Scanning Junk File
Click the SCAN button. Wait until the results are out. It will show the unnecessary files in a variety of categories.
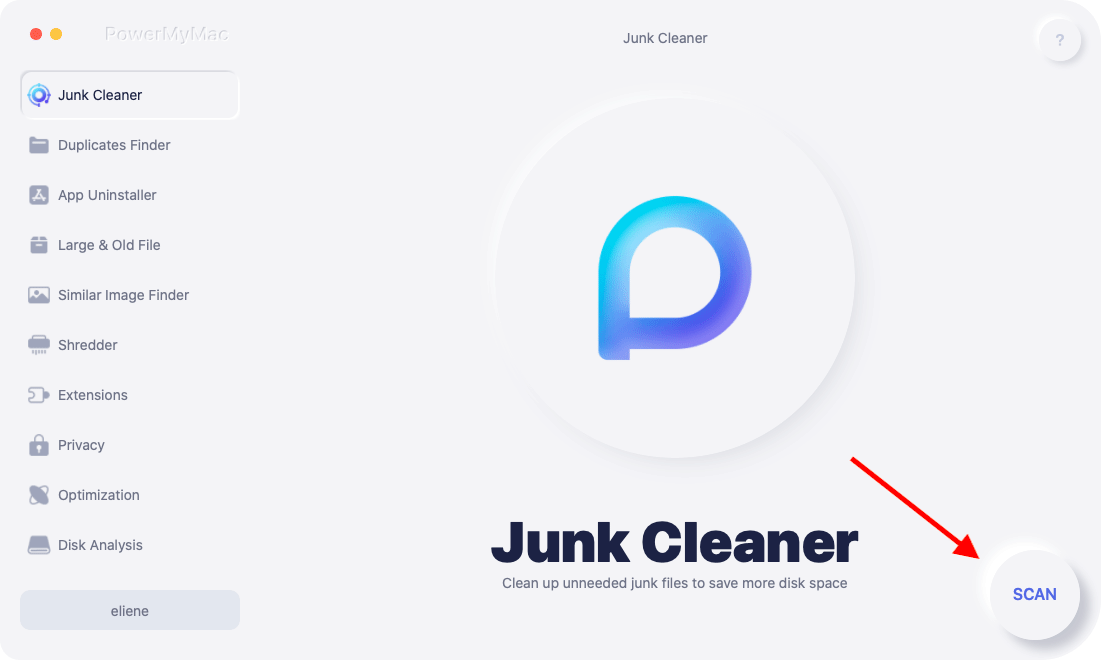
Step 3. Review and Select Application Cache to Clean Up
Select a specific category. Preview the files in the category you selected. Select all or select some files you wish to delete. Press the CLEAN button. Wait until the entire cleanup process is finished.

Part 3. How to Manually Clear The Application Cache?
Some would opt to clean their cache themselves. There are different types of cache files. Each type of cache file is put into storage of multiple locations. There are different ways to clean them too. Here’s how to do each step-by-step:
Manual Deletion Of User Cache
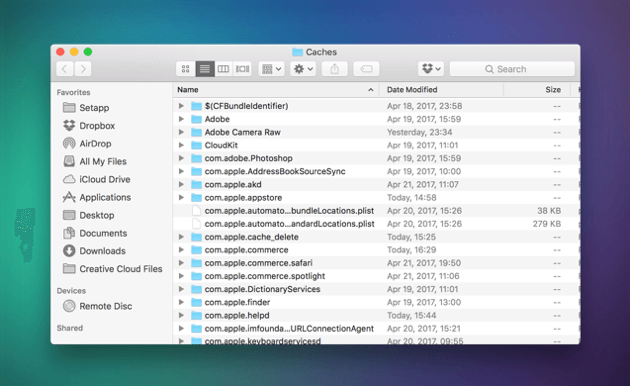
This type of cache, the user cache, takes up the largest part in your disk drive. It is located in the User Cache Folder and is located at ~/Library/Caches. Here's how to delete them manually step-by-step:
Step 01 - Go to File folder.
Step 02 - Visit the Go menu.
Step 03 - Choose Go To Folder.
Step 04 - Type the following: ~/Library/Caches
Step 05 - Press Enter.
Step 06 - Visit every folder that is displayed and delete each and every file contained within it. It is recommended that you remove the contents of the folder and not delete the folder itself.
It is important to note that user caches contain important data. Some users stated that errors occurred in opening system applications and files after removing the user cache. Thus, it is important for you to create a backup in order to be able to restore it in case something happens.
Below are the steps you can follow to create a backup:
Step 01 - Go to File folder.
Step 02 - Visit the Go menu.
Step 03 - Choose Go To Folder.
Step 04 - Type the following: ~/Library/Caches
Step 05 - Press Enter.
Step 06 - Select every file by pressing Ctrl + A.
Step 07 - Copy all of these files and folders.
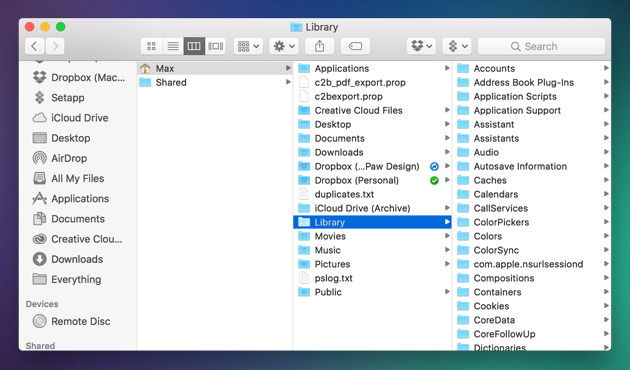
Step 08 - Go back to the Library.
Step 09 - Create a new folder and label it User Cache.
Step 10 - Copy all the data you have selected before into this folder.
Manual Deletion of App Cache And System Cache
System cache is composed of files put into storage by system applications that are running in the background of your Mac operating system. App cache is composed of downloaded media files of applications that are there to make it operate faster. It is also composed of temporary download files, system thumbnails, etc.
Although these files are very useful for the app, they can take up a large amount of space and it is necessary to clean them up. In order to clean up App cache, you simply have to type out the ~/Library/Caches using the steps stated above. After which, you should find the folder with the app’s name within it. Delete all the files contained in this folder.
It is important to remember that it is not safe to clean app cache manually. Essential data are contained within the app cache folders. Thus, it is best to back up the data first before actually deleting it. You may simply delete the backup at one point in time when you think the deleted app cache is not causing harm to the app.
Flushing Out Mac’s DNS Cache
One type of your system cache, DNS Cache, are actually old cache entries that serve to translate domain names towards IP addresses.
When you clean your DNS cache regularly, you make sure that you have uninterrupted connection towards a variety of websites. There are different methods for cleaning your DNS cache for different versions of the Mac OS.
For Versions Previous To That Of OS X 10.10.0
Step 01 - Go to Spotlight.
Step 02 - Type Terminal in order to launch the Terminal.
Step 03 - Type the following: “sudo dscacheutil -flushcache; sudo killall -HUP mDNSResponder; ” say cache flushed
Step 04 - Input your administrator password in order to finish the job.
For Versions OS X 10.10.0 And Higher
Step 01 - Go to Spotlight.
Step 02 - Type Terminal in order to launch the Terminal.
Step 03 - Type the following: "sudo discoveryutil mdnsflushcache; sudo discoveryutil udnsflushcaches; ” say flushed
Step 04 - Input your administrator password in order to finish the job.
Manually Cleaning Up Your Browser Cache
One of the most popular pastimes is surfing the net. Plus, it has become a major source of income for a lot of people. However, as you move from site to site and page to page, the activity you do all add up to the size of the browser cache.
Browser cache consists of data from websites such as scripts, images, etc. This is to ensure that your browsing experience becomes faster. The next time you visit a site you have previously visited, some data is loaded from the browser cache instead of the Internet.
When you clean your browser cache you are doing yourself two things. First, you’re freeing up more space on your hard disk drive (or solid state drive). Second, you’re protecting your privacy cause your browser history is wiped out. Plus, it even helps you avoid errors such as 402 and 502, among others. These errors are often the result of a corrupted browser cache.
Each type of browser stores their cache differently. Thus, cleaning the cache takes different steps for different browsers. Chrome’s cache can be found in Settings. Safari stores it in Privacy. While Firefox stores it in History. These are the steps to help you delete the different cache on your browsers
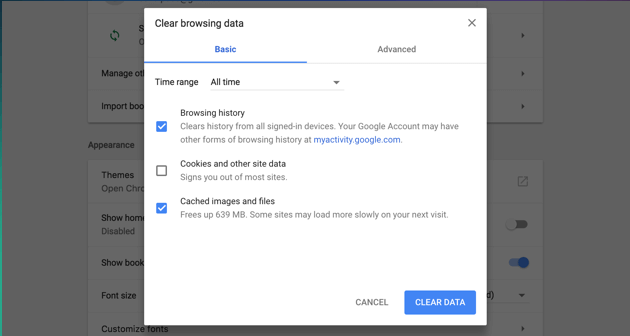
How To Remove Cache On Chrome
- Press the Options icon. This can be found in the Chrome browser’s top-right corner.
- Select Settings.
- On the left side menu, select More Tools.
- Press Clear Browsing Data.
- Select the following options only: Cached images, caches files, and browsing history.
- Choose The Beginning Of Time.
- Press the button named Clear Browsing Data.
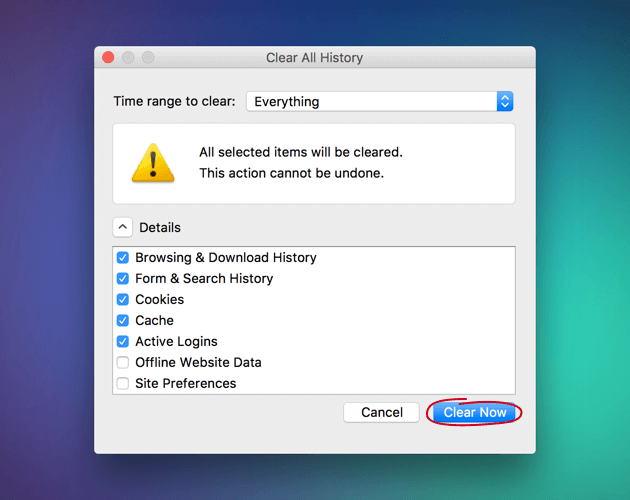
How To Remove Cache On FireFox
- Go to the History menu.
- Choose Clear Recent History.
- Find the drop-down menu that contains the time range.
- Select your desired time range. Or to remove all cache, choose Everything.
- Press the down arrow next to the label Details.
- Select Cache only.
- Press Clear Now.
- Exit the browser.
- Reopen the browser.
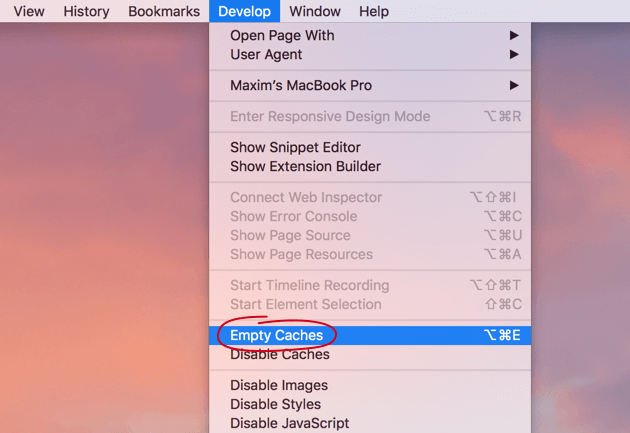
How To Remove Cache On Safari
- Go to the top menu.
- Select Safari.
- Press Preferences.
- Select Advanced Tab.
- Activate the showing of the Develop menu within the menu bar.
- Visit Develop located within the menu bar.
- Select Empty Caches.
- Close Safari.
- Reopen Safari again.
It is also recommended for you to clean DNS cache in order to speed up the process of clearing up your cache. It is also suggested that you delete or empty the Trash after the cleanup process.
In order to delete Trash, hit Ctrl + Click upon the Trash icon. After which, choose Empty Trash. After these steps, you must also reboot your Mac device for a total overhaul. This results in the Mac device formulating new cache files.
Manually deleting junk files is a very time consuming tasks. Plus it is not that safe. Important files that are crucial to the system and its applications can be deleted. Plus, it takes up a lot of your effort as well. That’s why we recommend a tool for you to do this.
Part 4. Conclusion
Cache files are important in speeding up the performance of your Mac device. But they can’t be corrupted and they can take too much of your space.
That’s why it is recommended for you to clean them up. You can do this manually or you can do this with a tool called PowerMyMac The choice is up to you.

