


Xee is a popular image viewer for Mac that allows users to view and edit various types of image files. However, if you're experiencing issues with Xee or simply want to free up some space on your Mac, you may want to uninstall it. While the method to uninstall Xee Mac might seem straightforward, some users have reported encountering issues during the process. In this article, we'll walk you through the step-by-step process of uninstalling Xee on your Mac, ensuring that all its associated files are removed from your system.
Contents: Part 1. Do I Need Xee on My Mac?Part 2. How to Manually Uninstall Xee on Mac Step by StepPart 3. How Do I Uninstall Xee Safely and Completely?Part 4. Conclusion
Part 1. Do I Need Xee on My Mac?
Xee is an image viewer application designed specifically for macOS. It allows users to view and browse various types of image files, including JPEG, PNG, GIF, and many others. Xee provides a simple and intuitive interface with various tools that allow users to rotate, crop, zoom, and resize images. It also supports keyboard shortcuts and provides quick access to frequently used functions, making it a popular choice among Mac users who work with images.

Reasons to Uninstall Xee on Mac
While Xee is a useful tool for many Mac users, there may be several reasons why someone would want to uninstall it. Here are a few possible reasons:
- No longer needed: If you previously used Xee to view and edit images but no longer need it, you may want to uninstall it to free up space on your Mac.
- Conflicts with other software: Xee may conflict with other software or applications on your Mac, causing errors or performance issues. In such cases, it may be necessary to uninstall Xee to resolve the conflicts.
- Outdated software: Xee has not been updated for several years and may not be compatible with the latest versions of macOS. If you are running a newer version of macOS, you may encounter issues with Xee and need to uninstall it.
- Security concerns: If you are concerned about the security of your Mac, you may want to uninstall Xee as it has not been updated in several years and may contain vulnerabilities that could be exploited by malicious actors.
Problems Users Encounter When Uninstalling Xee on Mac
While uninstalling Xee on Mac is generally a straightforward process, some users may encounter issues or errors. Here are a few problems you may encounter when uninstalling Xee on Mac:
- Incomplete uninstallation: If you use a standard uninstallation method, it may not remove all Xee-related files and folders from your system. This can leave behind unused files, which may take up valuable disk space on your Mac.
- Error messages: Sometimes, when uninstalling Xee, you may encounter error messages indicating that certain files or folders cannot be deleted. This can happen if the file is in use by another program or if you don’t have the necessary permissions to delete the file.
- Uninstalling Xee may also cause issues with other applications that rely on Xee for image viewing and editing. In such cases, you may need to reinstall or update those applications to ensure they continue to work properly.
- If you manually delete Xee-related files and folders without using a proper uninstallation method, it may lead to system instability or other issues. Therefore, it is always recommended to use a reliable uninstallation method or tool to remove Xee from your Mac.
Part 2. How to Manually Uninstall Xee on Mac Step by Step
By following these steps, you should be able to manually uninstall Xee and remove all its related components from your Mac. Here are more detailed instructions for each step to manually uninstall Xee on Mac:
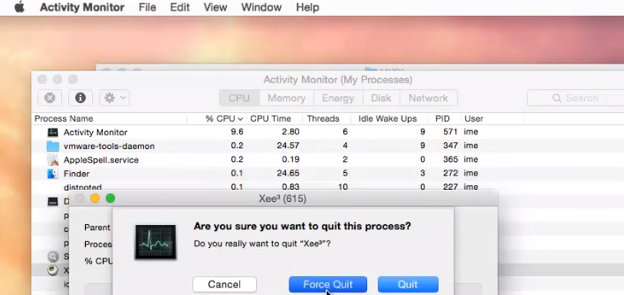
- Quit Xee and any other related applications that may be running.
Before starting the uninstallation process, make sure that Xee and any other related applications are closed to prevent any conflicts or issues. You can do that by quitting Xee in the Activity Window of your Mac computer.
- Open the Finder application and click on the "Go" menu in the top menu bar.
Open the Finder application on your Mac and click on the "Go" menu in the top menu bar. In the "Go" menu, select "Go to Folder" from the dropdown menu.
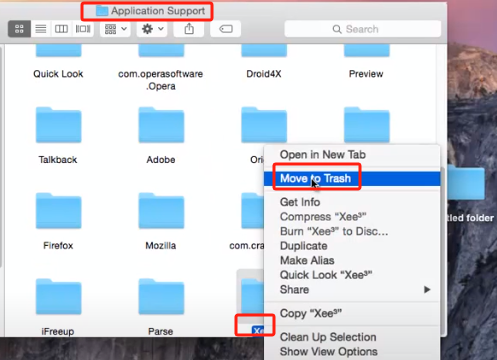
- In the "Go to Folder" window that appears, type "/Library/" and hit "Go".
In the "Go to Folder" window, type "/Library/" (without quotes) and click on "Go". This will take you to the system Library folder. In the Library folder, locate the "Application Support" folder and open it.
- Locate the "Xee" folder and drag it to the Trash.
In the Application Support folder, find the "Xee" folder and drag it to the Trash. This will remove Xee's support files and preferences from your Mac.
- Go back to the "Library" folder.
Go back to the Library folder and open the "Preferences" folder. Find the file named "com.pixelespresso.Xee.plist" and drag it to the Trash. This file contains Xee's preferences and settings.
- Open the "Caches" folder and locate the "Xee" folder.
Open the "Caches" folder in the Library directory and find the "Xee" folder. Drag it to the Trash. This folder contains cached data and temporary files that Xee has generated.
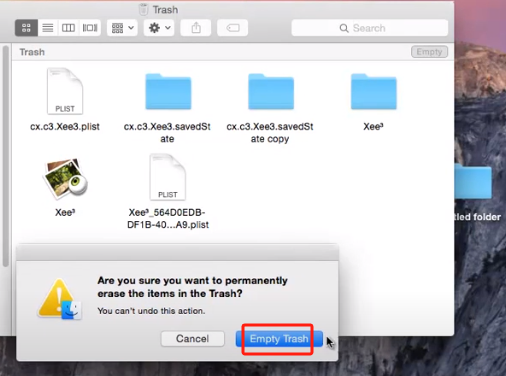
- Empty the Trash.
After moving all Xee-related files and folders to the Trash, make sure to empty the Trash to permanently delete them from your Mac. Restarting your Mac will ensure that all Xee-related processes are terminated, and any cached data or settings are cleared from memory.
Part 3. How Do I Uninstall Xee Safely and Completely?
PowerMyMac is a powerful Mac cleaning and optimization tool that helps you optimize your Mac's performance, clean up junk files, remove apps, and free up storage space. With its user-friendly interface and advanced features, it provides an easy and effective solution to keep your Mac running smoothly and efficiently.
PowerMyMac’s App Uninstaller can help you locate all the apps on your Mac as well as the related files for you to delete quickly. This excellent tool provides a simple and effective solution for keeping your Mac in top condition for Mac users who want to optimize their Mac's performance.
Here are the steps to use this tool to uninstall Xee on Mac and its leftovers:
- Download and install PowerMyMac on your Mac.
- Launch the application and click on the “App Uninstaller” module on the left-hand side.
- Then click the “SCAN” button to find all the apps that have been installed on your Mac and their related files.
- Once the scan is complete, select all the Xee-related files that you want to remove.
- Click on the “CLEAN” button to remove Xee totally.

By following these steps, you should be able to uninstall Xee on Mac and its leftovers from your Mac. The App Uninstaller module can scan for and remove all related files, including preferences, cache files, and support files. This ensures that all traces of Xee are removed from your Mac, helping to free up storage space and improve performance.
Part 4. Conclusion
In conclusion, if you're looking for a reliable and efficient way to uninstall Xee on Mac, we highly recommend using PowerMyMac. Not only does it remove Xee and its related files thoroughly, but it also offers a user-friendly interface that makes the process easy.
It also offers several other tools to optimize your Mac's performance and free up storage space, such as a junk cleaner, duplicate finder, and large file scanner. This makes it an all-in-one solution for keeping your Mac running smoothly and efficiently, ensuring that you can enjoy using your Mac without any performance issues.

