


Upgrading to a new Mac? Well, you’ll need to move data to your new Mac. You have to back up your files before wiping everything out into a clean slate. This ensures you don’t leave personal data on your computer when giving it away or selling it. However, you must erase your hard drive or SSD securely.
For starters, you can still wield a sledgehammer or blow it into smithereens with your gun to render the data irretrievable with foolproof destruction and disposal. Conversely, less destructive ways exist to nuke everything without inflicting mechanical damage. It comes in handy before you hit the streets for a sale or hand over to a new user.
This article will walk you through how to erase everything on a Mac.
Contents: Part 1. Backup Data on Your Hard Drive before ErasingPart 2. How to Securely Erase Everything on A MacPart 3. Alternatives to Securely Erasing SSDs & HDDs
People Also Read:How to Securely Delete Files on MacThe Best Mac File Shredder in 2023

Part 1. Backup Data on Your Hard Drive before Erasing
Know Your Drive
At the outset, you need to determine whether you own an HDD or SSD drive. Hit the Apple menu and choose “About this Mac”. Next, click on the “Storage” tab to access the type of drive running your system. You should see a SATA Disk (HDD), Solid State SATA Drive (SSD), and a Mac SuperDrive.
Create a Backup Beforehand
As noted above, you’ll need to transfer essential data on your hard drive elsewhere. OS X’s integrated Time Machine backup software comes in handy. With a local backup version at hand and secure cloud storage, your data remains secure.
Prepare your hardware and software for backup. External hard drives offer an ideal solution. Once you confirm your data backup copy, its time swings into action. Post-OS X 10.7 Lion Macs come with OS X Recovery as part of their operating system.
Part 2. How to Securely Erase Everything on A Mac
Do I Need to Clear a Slow and Tired Mac?
You don’t have to reformat your hard drive and re-install a fresh version of the operating system to wipe out old junk or speed up your Mac. Try the safest, all-in-one utility to free up GB of storage space. iMyMac PowerMyMac offers a powerful software equipped with advanced algorithms to speed up your machine. It allows you to securely erase data on your Mac permanently. The all-in-one cleaner has a novel search and collation algorithm to identify and effectively slough off useless temporary junk data, caches, log files, uninstalled apps and duplicates.

A slow Mac will get a new lease of life, download PowerMyMac. It computes the status of your Mac system including CPU, memory, and storage space. It detects and deletes digital clutter, large or obsolete files, and junk. Best of all, PowerMyMac gives you full control as you select items to preview before you nuke.
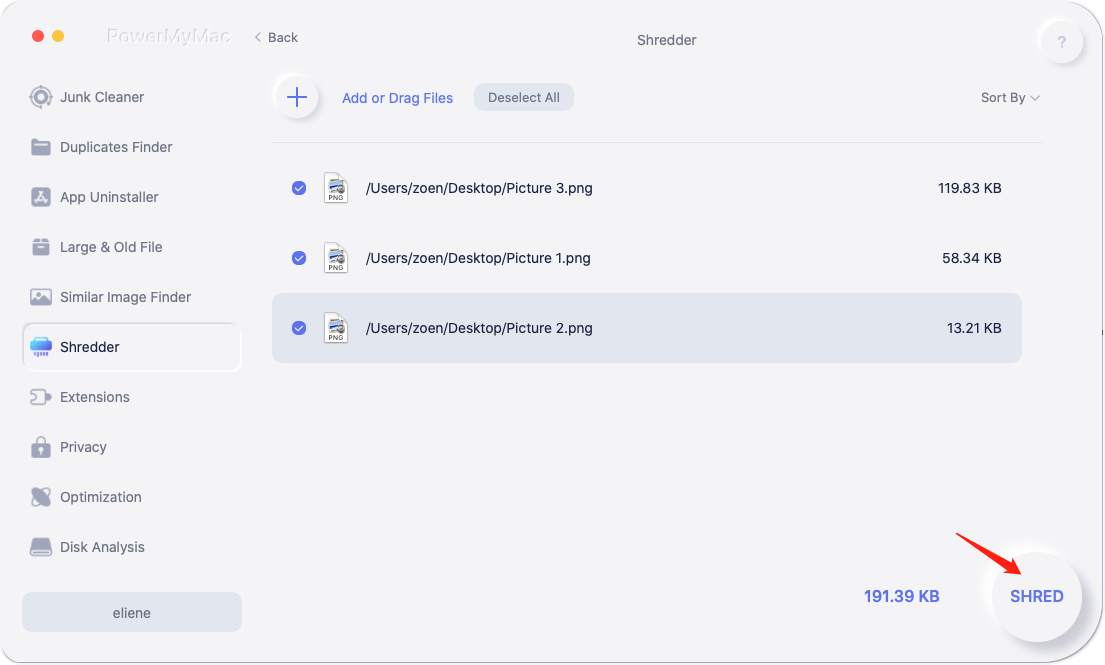
If you are going to use PowerMyMac's Shredder to erase everything on your Mac, let us now take a close look at the following steps.
Step 1. Download and Install PowerMyMac on Your Device.
Proceed to the official iMyMac website and download PowerMyMac to your Mac. Once you have installed this software, you are ready to clean your device from all unwanted files.
Simply wait for the installation process to finish. Then running PowerMyMac on your device. Choose the “Shredder” module from the left side.
Step 2. Select the Files to Remove
After tapping on the “Shredder”, you will be presented with the interface of the tool. At this point, you must select the files that you want to remove from your device.
Step 3. Reviewing and Selecting the Files to Remove
Once you have selected the files to remove, they are presented on the main interface which you can review. There is also an option “Add or Drag Files” that allows you to add more files in case you forget something. Simply check the files that you want to remove and tap on the “SHRED” button.
Step 4. Successful Removal
All the files that you have selected will be removed by this software from your device. On the main interface, you will see “Cleanup Completed” along with the space cleaned and the available on your disk drive.
You can also check out remaining items by tapping on the “Review” button if you want to free up more space.
How to Wipe out a Mac Hard Disk Drive (HDD)

- Switch off your Mac and then press the power button.
- Immediately latch on the
command + R - Wait until Apple’s logo thrusts into view.
- Choose “Disk Utility” in the OS X Utilities menu and hit Continue.
- Select the hard drive you want to wipe out by tapping on it in the sidebar.
- Click on the Erase button followed by Security Options.
- The Security Options page includes a slider that allows you to manipulate the process.
You have four choices in the Security Options slider. “Fastest” means quick but vulnerable, a file recovery app could potentially reconstruct data. Drag that slider rightward unfolds incrementally more secure erasing. Disk Utility’s ultra-secure level obliterates the data used to expose the files on your disk, then inscribes zeroes along the disk surface multiple times to get rid of any traces of your information. This level is commensurate to the DoD 5220.22-M spec.
- Once you’ve chosen the option of secure erasing, click the OK button.
- Hit the Erase button to get started. More patience is required for high-level security as these methods eat up hours to complete the process.
Erase SSDs Safely, and Why Not To
New Macs hitting the stores come with solid-state drives (SSDs) except iMac or Mac mini, which also ship pure SSD variants to order. You don’t have to securely erase SSDs in Disk Utility. Apple eliminated these options for SSDs because a cursory erase makes data irretrievable. If you’re skeptical “Standard Erase” will not do the trick, try other options below.
Part 3. Alternatives to Securely Erasing SSDs & HDDs
Alternative 1. FileVault

FileVault keeps your SSD data safe with full-disk encryption for your Mac. Activate FileVault to encrypt hard drive data making it inaccessible without a password. Onto the downside, loss of password or encryption key could spell doom to your data.
- When you initially set up your new Mac, it prompts you to turn FileVault on.
- If you omitted the option, you can toggle on FileVault afterward by hitting System Preferences, click Security & Privacy, and select the FileVault tab. The initial encryption process and decryption take chunks of time.
- With FileVault activated, you can reboot your computer into its Recovery System. Restart the Mac and hold down the command and R keys.
- Nuke the hard drive with Disk Utility after unlocking it by hitting the disk, choosing the File menu, and click Unlock. This erases the FileVault key making data on the drive futile.
Avoid invoking FileVault for conventional hard disk drives, Apple recommends it for SSD-equipped Macs.
Alternative 2. Apple’s Terminal App
Terminal tools up with command-line interface link to the OS X operating system. Terminal dwells in the Utilities directory, but you can get it via Mac’s recovery system.
- Boot your Mac into the Recovery partition, select the Utilities menu and click on Terminal to launch it.
- Enter
diskutil secureErase freespace VALUE /Volumes/DRIVEin the Terminal command line. That signals your Mac to safely wipe out the free space on your SSD. - Tweak the VALUE to a digit in the region of 0 to 4. For instance, 2 represents a 7-pass erase and 4 a 3-pass erase.
Final Thoughts
To sum up, Mac has simplified ways to reformat your hard drive and protect personal data. Remember to back up important files, sign out of everything and implement a foolproof erasing process if you part with your Mac. If you need to wipe out your disk before upgrading to High Sierra, use Mac OS Extended (Journaled). You may want to physically smash a drive to make data irretrievable. Follow a scientific guideline on how to annihilate your hard drive permanently and protect nature by disposing of the remains safely.
Still scratching your head over either erasing your SSD or HDD? Please drop us a line below in our forums. We’ve carved a vibrant community of Apple owners eager to pitch in with nifty insights.

