


When using a brand new external hard drive or flash disk, it is vital to ensure compatibility by formatting the drive to the Mac OS Extended filesystem.
Essentially, it is vital for those who are using generic PC drives which are pre-formatted to be Windows compatible instead for the Mac OS.
Linking an external hard drive or USB flash disk to a Mac usually works fine since the Mac OS can easily decipher other types of filesystem formats including Windows MS-DOS, FAT, FAT32, NTFS, and ExFAT formats. So, how to format USB on Mac?
If you want to learn how to format USB on Mac for Windows, the steps are relatively easy to do. Just move onto the first part in this post, then you will get what you want.
TIPS:
Article GuidePart 1. How to Format USB on Mac?Part 2. What is The Best Format for USB Drive on Mac?Part 3. How to Format A USB Drive to FAT32 on Mac?Part 4. It's A Wrap!
Part 1. How to Format USB on Mac?
It is important to note that drives formatted as FAT32 can be read from and written to by a Mac OS, but it is not considered optimal and you might face issues in the long run.
If you have a USB drive formatted as FAT 32 or any other format other than the Mac OS Extended (HFS+) or APFS, it is best to format the drive.
Unless you are planning on utilizing the drive between a Windows and Mac, it is recommended to format it entirely on a Mac compatible filesystem.
You can easily work your way on how to format USB on Mac. It can be achieved in the same manner for all types of drives and through all connections. Generally, formatting a drive will remove all data and any partitions present on the disk.
- Link the hard drive or USB to your Mac
- Open Disk Utility that you can find in Applications > Utilities
- Find the drive name from the left side of Disk Utility and tap on it
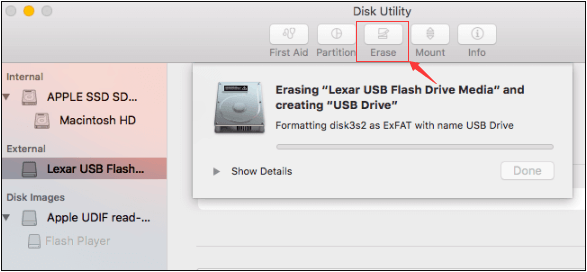
- Tap on the “Erase” tab that you can find across the top
- Just next to the “Format” option, tap on the contextual menu and choose “Mac OS Extended (Journaled)”
- Provide a name that you want for the drive. You can change at any point.
- Tap on “Erase” and authorize again on the next window that will pop up
The steps on how to format USB on Mac is relatively easy. Your USB drive will now format and erase everything on it.
The smaller external hard drives such as USB flash keys and SSD’s format quickly while a bigger drive might take a longer time. Once the formatting is completed, the drive is formatted to the Mac OS compatible filesystem.
Bonus Tip: How to Use NTFS Tool with iMyMac PowerMyMac
Though couldn’t help format USB on Mac, the NTFS tool in the Toolkit module of iMyMac PowerMyMac can help read and write files from SSD, HDD or a flash drive that has been formatted under Windows.
By the way, iMyMac PowerMyMac is an all-around software for Mac that provides you with a variety of tools for maintenance and optimization.
Tip: The current version does not support the following function temporarily, but a special software that supports the following function will be released in the future.
Let us take a close look at the steps on how to use NTFS tool with iMyMac PowerMyMac.
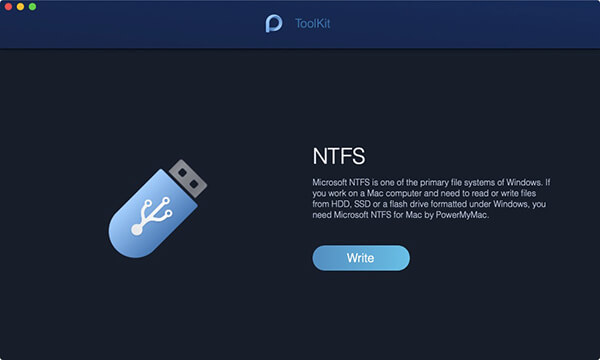
- You will find the NTFS tool in the ToolKit module of PowerMyMac. Simply tap on the ToolKit and pick NTFS.
- On the interface of NTFS, tap on the “Write” button to start to copy, edit or delete or initiate other instructions on your files from SSD, HDD or a flash drive that has been formatted under Windows on your Mac. In case a pop-up window that shows “Fail” appears on the screen, you must install NTFS – 3G and Osxfuse before you can utilize the tool.
- You will be provided with USB information on the left side while the files and folders in the USB are listed on the right column. At this point, you must move one of the files from the USB to the upper blank site.
- Tap on the “Write” button and the file that you dragged is being transferred in your USB. Once the chosen file disappears in the site or a message shows up, the process to write is finished. Furthermore, you will also find the icon of your USB different from the moment when it was inserted into your Mac. It is also an indication of successful writing.
- Once the writing is finished, tap on the “Unmount” button so that you can remove your USB from your Mac.
Part 2. What is The Best Format for USB Drive on Mac?
In case you are using a Mac with High Sierra OS or later, you can choose between 2 options as file formats – APFS as well as the Mac OS Extended. The vital point to remember is that disks formatted as APFS will not be recognized by Macs that have OS versions older than High Sierra. If you think there is a need to plug the USB drive into a Mac running on an older version, it must be formatted as Mac OS Extended.
Generally, APFS is adjusted for SSD (solid state drive) which includes flash drives. If you want to start a reformat process on a flash drive on a Mac, you must select APFS. As for hard drives, APFS is relatively faster and more dependable than Mac OS Extended.
Lastly, if you are planning to use the USB drive as a site for Time Machine backups, you should choose Mac OS Extended. It is important to note that Time Machine will not back up to an APFS-formatted disk and if you will choose one to be used with Time Machine, it offers to reformat in the Mac OS Extended format. In addition, you can back up a disk formatted in APFS to a Mac OS Extended Time Machine drive.
Types of File Formats
- OS X Extended (Journaled).The standard but only compatible with Macs. It is also called as HFS+ and necessary for those who intend to use the drive for Time Machine backups.
- OS X Extended (Case-sensitive, Journaled).For a specific file system, it is important to note that “file” is distinct from “File”. On the default setting, the Mac OS X does not utilize a specific system. Remember that the selection is available since it matches with the outdated performance of UNIX. Furthermore, some individuals still prefer to use it.
- OS X Extended (Journaled, Encrypted).The same as the “standard OS X Extended”, but with added encryption. You are required to key in a password. This password must be entered every time you connect your drive to your Mac.
- OS X Extended (Case-sensitive, Journaled, Encrypted). Similar to the “standard OS X Extended” but with the additional encryption feature.
- MS-DOS (FAT). A highly well-attuned option yet has its share of limitations. Each file should be 4GB. This file system is not suggested unless you have a device that requires FAT32.
- This is a compatible choice as older FAT file systems, but it has also drawbacks. This is the ideal file system if you are going to share the drive with Windows PCs or other devices such as Xbox One or PlayStation 4 consoles. Generally, it is the perfect multi-platform file system. It is not supported natively on several Linux variants but you have the option to install the ExFAT support on Linux.
Part 3. How to Format A USB Drive to FAT32 on Mac?
If you want to learn how to format USB on Mac, specifically to FAT32 on Mac, the reason is to be able to use the drive on both Windows PC and on Mac. You might also be planning to use the drive as a storage for a media player or to record TV shows on a TV with a built-in USB port.
Tip: If you don't want to format your USB drive to save storage, you can simply use a Mac cleaner tool to free up your space and it's pretty easy to do.
Remember that FAT32 can be read and written to on both Mac and Windows. This makes it a versatile option. Nevertheless, there is a limitation that you should be aware of – each file has a maximum size of 4GB. This is going to be an issue if you are using the USB drive to store large video files.
The solution is ExFAT where it does not have a maximum file limit. Another advantage is that it can be read from and written to on any Mac that runs on Mac OS X Snow Leopard or later and on Windows.
If you want to learn how to format USB on Mac FAT32 or ExFAT, follow these steps:
- Attach the USB drive into your Mac
- Proceed to Applications > Utilities and open Disk Utility
- Tap on the USB drive that you will find in the sidebar in Disk Utility
- Tap on “Erase” in the Disk Utility
- Key in a name for the newly formatted disk
- Tap on the Format menu and decide between MS-DOS (FAT32) or ExFAT
- Tap on “Erase”
At this point, the USB drive is wiped out and formatted as either ExFAT or FAT32 which is based on the format that you will select.
Part 4. It's A Wrap!
With the simple steps on how to format USB on Mac, you can easily finish this task using Disk Utility.
Remember though that when you decide to format the disk, you will eradicate all the data stored on it. In case you still require that data for future use, you must create a copy on a different disk before you start.
Furthermore, there are several formats to select from and each has its own advantages and drawbacks.
With the NTFS tool in iMyMac PowerMyMac, it is also another efficient approach that you can utilize.


Olo2022-04-28 23:27:12
Jeśli podzielę pendriva na 2 partycję, jedną sformatuję MacOs Extended a drugą ExFat, żebym mógł używać z windowsem, to po podłaczeniu windows nie wykrywam partycji MacOs (co zrozumiałe), ale pojawia się okienko by sformatować pendriva. Czy da się zrobić, żeby ten komunikat nie występował?