


It is easy and simple to transfer content across an iOS device such as iPad and iPhone to your Mac and computers or laptops. Apple's email, OneDrive, iCloud Drive as well as Dropbox are mostly just several of the available options available.
AirDrop, on the other hand, is certainly the most basic way of all. You can share files by using AirDrop from Mac to iPhone and even other Apple devices. This iOS and macOS feature lets users now share files instantly through one iOS or a Mac through one electronic device towards the other without first transferring them to an intermediary server.
AirDrop was launched with macOS X Lion, allowing the Mac subscribers into exchanging files with each other directly onto the Finder, without immediately transferring them into a cloud storage provider or a server, even they had been practically close to one another. AirDrop has been used to exchange file types for both iOS and Mac devices since iOS 7.
Contents: Part 1. Could AirDrop be Used into MacBook?Part 2. How to Make Use of AirDrop?Part 3. How to Use AirDrop to Share File from a Mac to an iPhonePart 4. What Should You Do If AirDrop Wouldn’t Work on Your Mac?
Part 1. Could AirDrop be Used into MacBook?
Users may use the AirDrop to exchange files even with any other Macs, even if they are MacBook or a certain Mac, as long as your Mac is running at least macOS X Lion. Open the Finder menu and pick on the Go option to discover if the Mac you are using has AirDrop. Once AirDrop appears as a menu, you're good to go.

Part 2. How to Make Use of AirDrop?
Before you begin to AirDrop from Mac to iPhone, there are several things you need to do:
- Make sure to check that each device that you wish to transfer files with should be within 30 feet of one another.
- If you're exchanging files with another Mac, verify the Network settings from both of the systems.
Here's how you do it:
- Select System Preferences from the Apple option.
- Simply select, Security and Privacy button.
- Tap onto the Firewall tab, also the displayed padlock, and afterward simply enter your password.
- On the following page the Firewall Options, click the button next to block any incoming connections located at the uppermost part of the screen.
Both devices do not have to be linked to a similar iCloud account since AirDrop is intended to let you exchange various files with other users and also to the devices you own. If the devices with which you wish to transfer files are linked to a separate iCloud acc, the device's owner must allow the approaching link once the files may be shared.
After you've configured it, double-check that each device must turn on its Bluetooth and are connected to Wi-Fi.
- From the menu bar in your Mac and, once Wi-Fi was turned off and doesn’t connect, tap onto the Wi-Fi button to select a network.
- When Bluetooth has been switched off, go over System Settings and choose pick Bluetooth pane, and then turn on Bluetooth.
- If you wish to exchange files on an iOS device, just go to App settings and ensure that Wi-Fi and Bluetooth are both turned on.
Turning on AirDrop on iOS and in Mac
To be able to AirDrop from Mac to iPhone, you should turn it on first. Here are the steps you should follow in order to accomplish this:
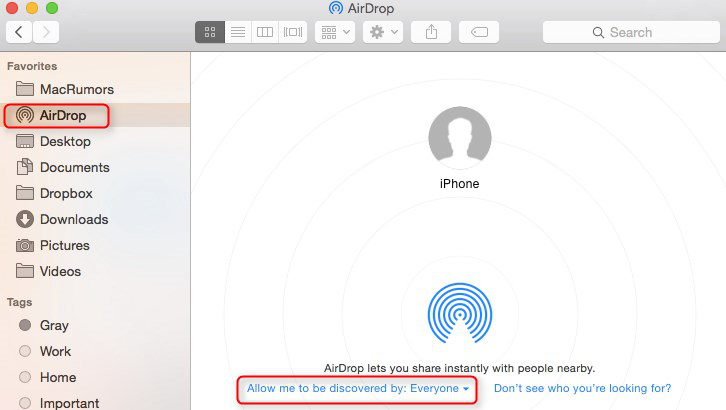
- From your Mac, go to the Go menu by clicking the Finder logo into the Dock, then select AirDrop.
- Select the option that allows me to be discovered by: at the bottom of the window that opens, and then select Everyone or Contacts Only.
- Go to Settings > General > AirDrop on the iPad or iPhone with whom you wish to exchange files and choose Everyone or Contacts Only.
Part 3. How to Use AirDrop to Share File from a Mac to an iPhone
Here’s how to AirDrop from Mac to iPhone in order to share files:
- Launch a new tab in the Finder.
- In the window's sidebar, select AirDrop.
- You should have seen your iPhone there in the window, which is named after the AppleID to which it is linked. Once you have AirDrop set on several devices, you will view them there.
- Move the file format you would like to exchange from the folder over to the iPhone icon you like to exchange with when you open the Finder window.
- Drop it over the icon.
- On an iPhone, a menu should pop up in which you may choose which app to be used to access the files. Select whichever application you like to use.
- Your files must now be accessible in that app.
AirDrop may also be used to transfer files on any certain macOS program that supports it via the Share menu. Simply click the Share icon, pick AirDrop, and choose your iPhone.
Use Airdrop To Transfer File From An iPhone To A Mac
Here’s how to AirDrop from Mac to iPhone wherein the files are transferred from the iPhone device to your Mac:
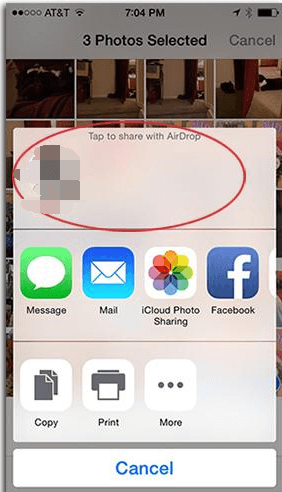
- Launch an application that provides the Share option on your iPhone.
- Select a document you intend to transfer into your Mac.
- Chose the Share tab.
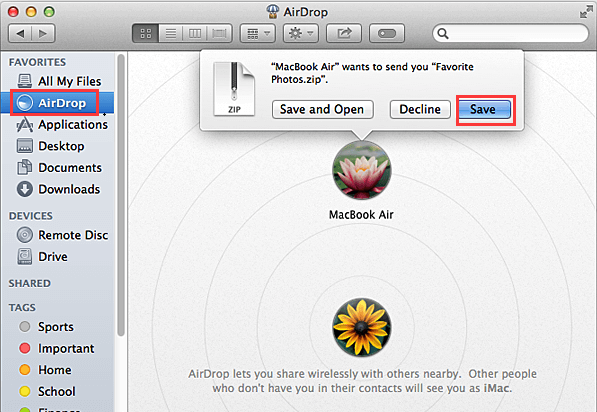
- You'll see a menu with several options, including AirDrop to your Mac or any devices nearby.
- Choose your Mac.
- Then a file was sent to your Mac.
- When a notification appeared on your mac, Click Open to view the file.
Part 4. What Should You Do If AirDrop Wouldn’t Work on Your Mac?
How to do when AirDrop from Mac to iPhone not working? Once AirDrop does not function, try turning off Bluetooth and Wi-Fi and afterward turn it on. If it still doesn't work, restart your System. After that, try to use again the AirDrop.
This article has given you a variety of step-by-step guides on how to AirDrop from Mac to iPhone. Along with giving insights about how to use AirDrop to transfer files, we also give tips for you to remember when both devices are connected with each other. We hope you had a great day. Happy Listening!

