


AirDrop is the ultimate platform to send photos, files, videos, location, contacts, and more across all Apple devices. But, can you Airdrop from iPhone to Mac? Let’s discover how to use AirDrop efficiently in this article!
Contents: Part 1. What is AirDrop?Part 2. How to Use AirDrop on iPhone, iPad, and iPod TouchPart 3. Can You AirDrop from iPhone to Mac?Part 3. Bonus Tip: Finding Duplicate Files QuicklyPart 4. Summary
Part 1. What is AirDrop?
Transferring and sharing has never been easy with AirDrop especially across all iOS devices. Using AirDrop, you can wirelessly send documents, files, maps, websites, and more from your iPhone, iPad, iPod Touch, and Mac.
AirDrop is powered by Bluetooth and is a built-in iOS feature that creates a peer-to-peer network between iOS devices within the approximate range of 30 feet. It should be the first choice for file sharing since it does not require any internet to transfer thus, making it more secure and faster.
Part 2. How to Use AirDrop on iPhone, iPad, and iPod Touch
All it takes is a few taps on any of your iOS devices and you are sure to share contents across effortlessly and seamlessly. AirDrop was launched back in iOS 7 and OS Yosemite which works for those who have enabled this feature on their devices. Users can opt to send and receive files from contacts list or from selected friends.
By default, it only allows you to share contents with people on your contacts since AirDrop highly depends on your contacts for privacy purposes. If you want to Airdrop maps or location to other people, you can simply add each other to your contacts or you can switch it to work with everyone.
To turn on AirDrop on iPhone and iPad, follow these steps:
- Open Control Center by swiping up from the bottom of your iPhone or iPad
- Enable Bluetooth and ensure that Wi-Fi is on. (You just need Wi-Fi on to transfer contents)
- Tap on AirDrop
- Tap Contacts Only or Everyone
AirDrop Contents from iPhone or iPad
- Select the desired file to send with AirDrop
- Tap the Share or Arrow button at the bottom right of your
- Tap the name of a person or device you want to share to with
- If you are sending it with a contact, make sure you have logged in to your iCloud account to avoid data leakage. If sending with everyone, a pop up will appear showing someone is trying to send you via AirDrop. You can easily decline and ignore the transfer if you don’t recognize the sender.
Part 3. Can You AirDrop from iPhone to Mac?
Sharing files from your iPhone to Mac is very easy especially with AirDrop. All you need is to enable the feature on both devices and initiate the sharing.
AirDrop from iPhone to Mac
Under Finder, you can easily drag and drop files to AirDrop and also see a list of available devices. You can even send it to a person’s name or your contact and they’ll be able to receive it on AirDrop.
Learn how to AirDrop photos from iPhone to Mac:
- Tap the Sharing icon using the iPhone device you want to share with Mac
- Open Finder on your Mac and click on AirDrop among the listed options on the left. Tick the box for “Allow me to be discovered by” and choose the desired option. You can select “Everyone” or Contacts “Only”. Keep Finder open until AirDrop is enabled
- On your iPhone sharing screen, tap on the AirDrop icon. Wait until your Mac is listed among nearby devices. Tap your Mac device name to begin the file transfer
- All the transferred files will be saved in the Downloads folder which is where AirDrop files go to by default.
- Close the Finder Window once you are done transferring files. As long as the window is open, you will keep on receiving files from connected devices.
Tips:
AirDrop is working on iOS 7 and above and should have Bluetooth enabled. The same thing goes with Mac, as long as you are using OS Yosemite and higher, AirDrop works flawlessly.
Part 3. Bonus Tip: Finding Duplicate Files Quickly
Now that you know how to AirDrop from iPhone to Mac and across any iOS devices, for sure, you got plenty of photos, documents, and files that are saved duplicate on your computer. It might take some time to work out and remove these duplicate files. However, there is an all-in-one solution that offers an effective and comprehensive program that caters all the essentials tools needed by Apple devices.
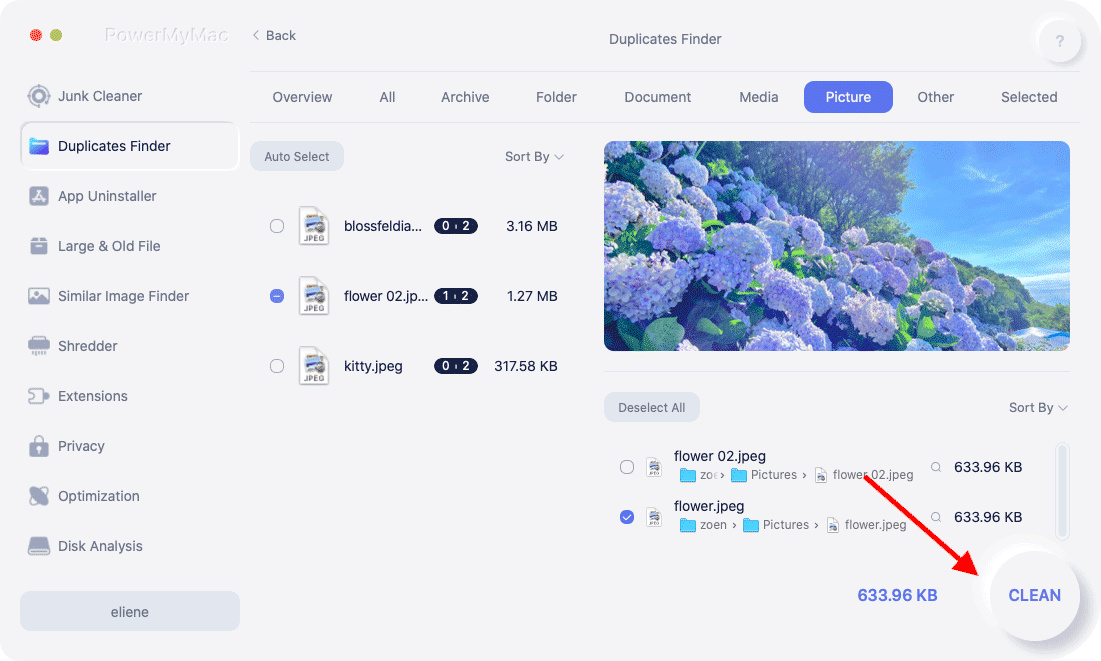
iMyMac PowerMyMac – Duplicates Finder helps you to easily locate all duplicate files including videos, images, music, documents and more. Duplicate files appear when we forget to delete the copies we made and later on clog up the entire hard drive, leaving you with low-performing Mac.
You can manually find and erase these files but then it may not be enough or you might overlook some files. PowerMyMac's Duplicates Finder does the work automatically by performing a powerful search and displays all the result for you to selectively remove these files.
How does it Work?
- Download and launch the program on your Mac. Choose Duplicates Finder among the tools in the main menu.
- Click the Scan button and let it scan the entire device. You can see the total percentage it has gone through on the left side.
- A list of scanned results will be displayed on the screen. You can be selective on which files you wish to erase. Click the Clean button.
Apart from finding duplicates, PowerMyMac also offers other essential tools that can check the system status, clean all unnecessary files, and optimize your device.
Part 4. Summary
So going back to the first question: Can you AirDrop from iPhone to Mac? The answer is a big YES! As long as you have the most updated iOS version and both devices are compatible, then there is no problem AirDropping any contents. You don’t have to look any further, make use of the built-in features of your device and discover great things ahead!
Do you have some awesome tips or tricks about AirDropping between iOS and Mac OS? Let us know in the comments below.

