


This is an article on how to create Windows 10 bootable USB on Mac. Whether you're having significant problems on your Computer as well as can't completely boot onto Windows 10, you'll need to fix or perhaps restore the computer system to really restore everything back up as well as running. You'll use the bootable Windows Ten USB drive for this, and indeed the easiest option to make one of these from fresh would be simply to use the same other Device.
One of the most effective methods for creating a Windows Ten bootable standard USB on Mac would be to manually configure format another flash drive as well as put the necessary data onto it by using it into Mac's Port. Because there is a storage element at work, the overall process may get rather complex. Now, let’s talk about how to create Windows 10 bootable USB on Mac.
Contents: Part 1. What Are The Requirements Needed to Create A Windows 10 Bootable USB on MacPart 2. How to Create Windows 10 Bootable USB on MacConclusion
Part 1. What Are The Requirements Needed to Create A Windows 10 Bootable USB on Mac
Now to proceed with how to create Windows 10 bootable USB on Mac, you should obtain an install ISO copy of Windows Ten installed onto your Mac. This is a database that stores everything which will be in the bootable disk Windows Ten USB flash drive you're ready to finally make. You may securely install the newest release of Windows Ten just along with using Safari or perhaps a third-party search engine to get to Microsoft's Downloads Windows Ten webpage.
You should therefore also download HomeBrew onto your Mac. This is an easily accessible computer program administrator which should be used to install a controller program named wimlib. Recent Windows Ten ISO files include a document termed “install.wim” which is nearly 4 gigabytes total size. Users could obtain through the limits using wimlib whilst dividing or perhaps even reducing the “install.wim” files.

Part 2. How to Create Windows 10 Bootable USB on Mac
Throughout this article, we'll teach users how to do it through a Mac.
- Obtain the Windows Ten ISO disk. You may get the ISO disk directly within Windows. All we've been starting to do now was fully legal and has already been approved by Microsoft. If you've had a newer machine, you should get the latest versions. To really be safe, just use the 32-bit edition unless you're unsure.
- Plug your USB flash drive onto the Mac. Insert the Flash drive onto your Mac. Afterwards, launch the port. You may accomplish this one in MacOS Spotlight by simply simultaneously clicking this ⌘ as well as Space key, from there entering "terminal" as well as click tab enter. Don't ever be afraid of its command prompt.
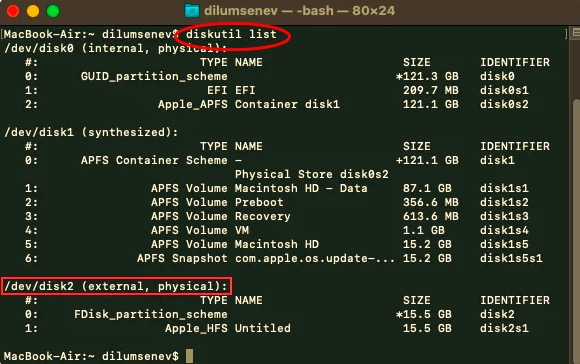
- To find out which of these disk that USB stick has been put on, just use diskutil tool. To launch Mac Spotlight, then use ⌘ plus space tab key. After which input "terminal" then choose Terminal first on the dropdown menu. Copy then paste each command prompt onto the terminal, then press enter: lists of diskutil.
- Format the Flash drive so that it will operate into Windows. After that, format the Flash drive into Windows FAT32. It is indeed a format that Windows Ten understands. Use the appropriate disk size from the Flash drive to execute the recommended command. After that, you'll notice a prompt display. This should take approximately 20 secs on such a modern computer, but it could take more time on such an outdated machine. This should be noted because, for some devices, you might instead use the function, that partitions by using MBR standard rather than GPT.
- Attach that Windows Ten directory with hdiutil as well as start preparing it all for transferring. Now we'll prepare the downloaded ISO disk for copying to the USB device. You must locate as well as utilize the Windows Ten ISO disk which just you now obtained.
- Transfer the Windows Ten ISO into the USB flash drive. Next, use the recommended command and transfer anything except that directory across. Afterwards execute the command that will install Homebrew. After this, as the prompt command "brew install wimlib," along with using Homebrew can install a system known wimlib. Now proceed along and make the folder where you'll be copying the data. After which execute the specified instruction. After that, you may detach your USB drive off the Mac using the Finder. It's worth noting that Windows would automatically reconnect those folders later on throughout the installation process.
- Insert your Flash drive onto the mac and begin installing Windows. The mac system must now boot immediately from the USB device. When it doesn't, then probably have to go into the BIOS of your current mac system and even modify the boot configuration and reboot through your USB device. Windows would display a display and perhaps begin the installation procedure. Make use of your latest mac system and its freshly installed version of Windows.
Conclusion
Now, you’ve learned how to create Windows 10 bootable USB on Mac. This article solely tackles how users can create windows ten bootable USB on Mac. Along with the certain things that we need in order to obtain a bootable windows 10 USB on mac, we also left a great guide on how users can obtain and create the mentioned bootable USB for Mac. It’s clear that it’s very easy to create Windows 10 bootable USB on Mac. We hoped that you had a wonderful day!

