


Mac users format an external hard drive before handing over to another person to erase existing data. But accessory manufacturers tend to craft accessories or peripherals gravitating towards Windows because a vast majority of external hard drives come preformatted for Windows.
Sometimes, preparing an external drive for backups or copying items onto it also entails total obliteration of data. You also have to format before setting up a new external hard drive to stash your Aperture Library. Most external hard drives are pre-formatted as FAT 32. Although it’s compatible with Mac OS X, it’s not suitable for Aperture.
If you encounter this scenario, read on to implement full compatibility with your Mac.
Contents: Part 1: Differences Between Some Common File SystemsPart 2: Easy Way to Format An External Drive for MacPart 3: Other Approachs to Format An External Hard Drive
People Also Read:Guide on How to Clone Mac Hard Drive to SSD The Best External Hard Drive for Mac in 2022
Part 1: Differences Between Some Common File Systems
MS-DOS FAT
MS-DOS FAT or FAT32 on some versions allows you to format a hard drive compatible with Windows or Mac. It pales in comparison to new file systems hitting the market with file support sizes of more than 4GB. FAT32 cannot transfer files beyond the 4GB limit.
ExFAT
ExFAT surpasses the 4GB capacity supported by MS-DOS FAT systems. Even better, this hard drive is compatible with both Windows and Mac. It can write on both computer systems.
APFS (Apple File System)
APPS, Apple’s newly-created file system was incubated along with the High Sierra upgrade. It became the default format for internal drives or newer external hard drives dedicated for Mac. The APPS boasts better efficiency, reliability, and allows you to encrypt to shield data for your computer. However, it’s not compatible with older generations of macOS, Windows, and Linux.
Mac OS Extended
Apple out-crowded this file format with the launch of High Sierra in 2017. For pre-High Sierra Macs, it has MacOS Extended (Journaled) as the default. Alternatively, MacOS Extended (Journaled, Encrypted) to thwart unauthorized access to a lost or misplaced drive. MacOS Extended (Case-sensitive, Journaled, Encrypted) works for file names with capital letters.
NTFS
NTFS acts as Windows’ default file system. MacOS reads NTFS but it doesn’t write to it. However, third-party tools for compatibility exist in the market.
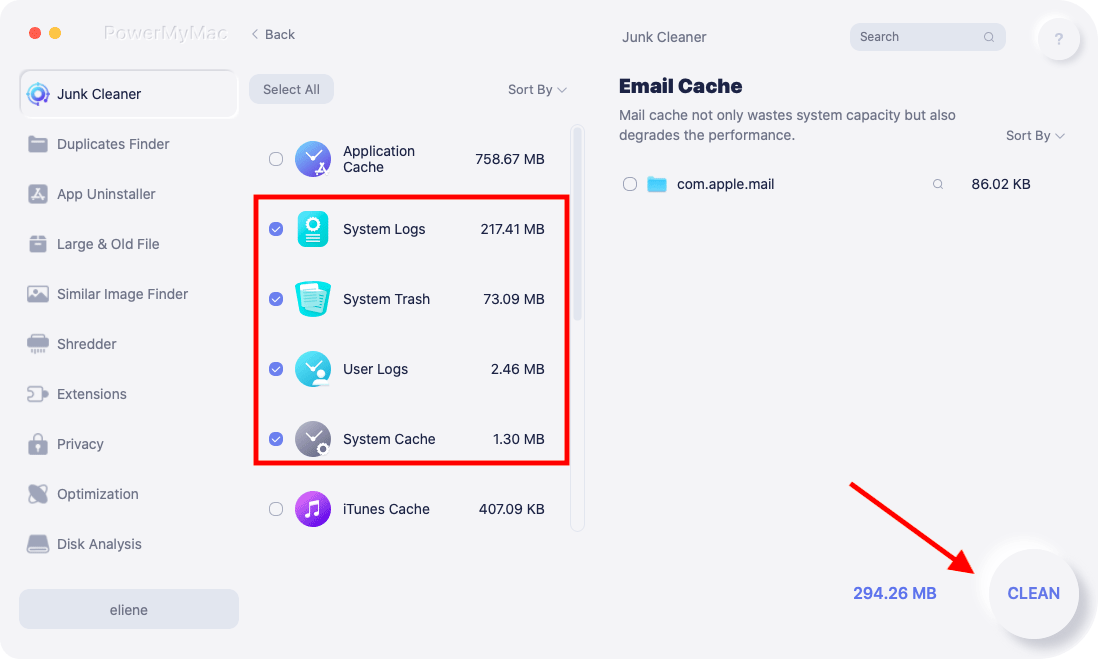
Know the Best Mac Cleaner’s Optimization Utilities
Steer clear of unnecessary files that bog down and hog your Mac’s memory with iMyMac PowerMyMac. We have extensive experience in developing useful Mac apps and tune-up software. Keeping your computer in shipshape condition proves futile with clutter and junk encroaching disk space in your system.
Our software development unveils groundbreaking new technologies to ensure you milk your Mac for all its worth. Download PowerMyMac to tool up with a multi-maintenance arsenal developed to resuscitate and get your iMac or MacBook Pro in fine fettle. It packs a performance monitor, memory retriever, smart cleanup technology, and utilities for iTunes, email attachments, or duplicates.
Part 2: Easy Way to Format An External Drive for Mac
- Go to Disk Utility from Applications or press Command+ Space and enter Disk Utility.
- Once Disk Utility is launched, a list of drives at your disposal on the left. Select the drive you wish to format.
- Formatting means permanent deletion, create a backup to salvage critical items.
- Tap the Erase function from the four options accessible in the main window.
- Disk Utility automatically selects a format for you from the file systems discussed above.
- To dictate another option, select the Formatting menu to throw up the drop-down window. Click the format you desire in tandem with possibilities offered by foregoing file formats.
- Next, name the drive.
- Click on the Security Options button. This will pop up another window that allows you to select how you want to format the drive, with a slider to reset from Fastest to Most Secure. Hover the slider to the option titled “This option writes a single pass over the entire disk”. It gives an extra layer of security by safely erasing every grain of data.
- Most Secure means total annihilation. Move the slider rightwards to overwrite the drive three times. The flip side is taking more time to do the job.
- Choose Erase and sit back as the contents go down the chute putting the drive at-the-ready. A progress bar will keep you updated.

Part 3: Other Approachs to Format An External Hard Drive
Approach 1: Format External Drives for Pairing with Aperture
Your external FireWire and USB hard drive comes in handy to stack referenced images, Aperture Library, or Vaults. Setting up the external hard drive properly renders efficient performance. From Finder, select Go> Utilities to launch the /Applications/Utilities folder.
Open Disk Utility and click on the icon for the external hard drive on the left of the sidebar. Hit the Erase tab on the top of the window. Select the corresponding file system in the Volume Format menu. Type the name for the external hard drive in the Name field. Tap the Erase button.
Approach 2: Format for Mac & PC
You may want to format the drive to duplicate files between a Mac and a PC. Simply follow the detailed steps in Part III of this article with ExFAT as the file system format.
Approach 3: Use Time Machine
Time Machine comports with HFS+ or MAC OS Extended. Don’t try formatting the drive for Time Machine with APFS. Time Machine can’t synchronize with APFS.
Final Thoughts
With the steps outlined above, you can have a freshly formatted hard drive to thwart any efforts to retrieve data with third-party applications.
Besides, you can format a drive in exFAT to make it readable to Windows and Mac. It allows you to read and write anything across the platforms. The file formats compatible with your Mac depending on the version of the computer. Mac users who switch systems should refer to the fast, easy steps for a format that reads and writes both systems. Use them for a hard-disk you carry around frequently or devices with different systems. Using Disk Utility reformats in the wink of an eye.
Whether it’s Aperture Library or the formatting of an external hard drive for massive files, the possibilities are limitless. File system formats available in Disk Utility on Mac broaden the horizons of compatibility.

