


After so long, you’ve been given a computer, Macintosh in particular. But alas, what you were looking for is a Windows desktop. You want to use programs like Microsoft Office, Notepad++, and more, but you know very well that it only works on your Windows computer.
As hard as it may be, that’s just how it is but is it really?
The majority of users, probably including you, only know how to run Mac programs in their Mac, or Windows programs in Windows.
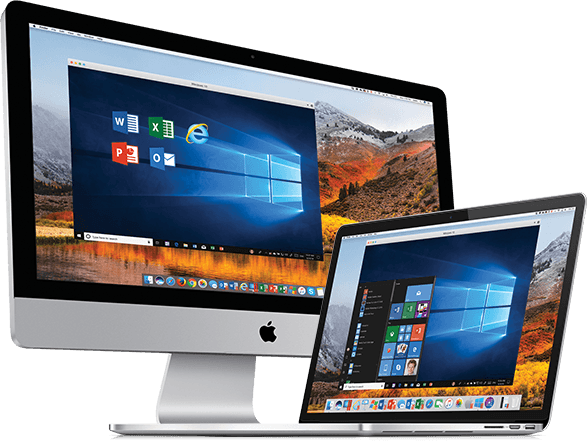
Little did they know that there’s a better way of doing things, and that is by running Windows on your new Macintosh.
However, while we might make it seem easy, it’s actually a bit harder than you think.
That’s why this article will show you each step on how to run Windows on Mac so you can enjoy the benefits that you’ve yearned for since long.
Article GuideMinimum RequirementsUsing iMyMac PowerMyMac to Prepare for Windows InstallationInstalling Windows on Mac Using Boot CampConclusion
People Also Read:How to Install Windows on MacTop 6 Ways to Remove Virus from Mac
Minimum Requirements
Before anything else, you should know the minimum requirements of your Mac so you can follow our instructions smoothly.
Let’s start with the different models of Mac.
Compatible Models for Boot Camp
Some models support Windows, while others do not. Also, remember that if the model supports Windows, it will naturally have Boot Camp in its system.
All you have to do is find it, which won’t be a problem since we’ll walk you through that later.
For now, take a look at the models that can run Boot Camp, and consequently, Windows.
- iMac (2012 and later)*
- Mac mini (2012 and later)
- MacBook Air (2012 and later)
- MacBook Pro (2012 and later)
- Mac mini Server (Late 2012)
- Mac Pro (Late 2013)
- MacBook (2015 and later)
- iMac Pro (2017)
If your Mac device belongs to one of these models, you can proceed to read the other 2 requirements.
Update Fees
While it may not be a requirement yet, it will be when an update comes for your Windows system.
Since there are regular updates, you’ll always be required to pay a fee for each update. However, this will only be minimal and some may even be free.
Either way, remember that you’ll have to invest at some point anyway, so there’s no need to worry about this so much. And of course, let’s not forget about the RAM requirement.
RAM
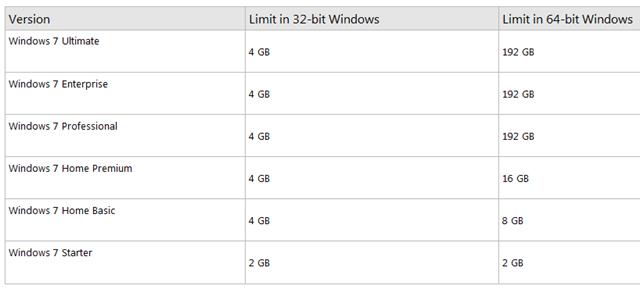
If you’re looking for a way on how to run Windows on Mac smoothly, your Macintosh should have at least 8GB of RAM.
Yes, 8GB. While this may be a bit big for those who are yet to buy a Mac, it’s actually the average size of RAM.
While you may still run Windows on Mac with a RAM lower than 8GB, you’ll have some problems with the performance.
With these requirements taken care of, you can now prepare for the installation of Windows on your Mac.
Using iMyMac PowerMyMac to Prepare for Windows Installation
Before the actual installation, you’ll have to prepare your Mac for any necessary changes to be done. This includes backing up your files, cleaning your hard disk, etc.
To do this, you might want to consider using iMyMac PowerMyMac, software specially designed for Mac users to modify their operating system.
Here are the three steps on preparing your Mac so you can run Windows.
Inspect the Specifications of Your Mac
Obviously, you’ll have to check if your Mac is actually qualified for the installation of Windows. If not, you will have no choice but to settle for your current operating system.
As a recap, the minimum requirements is a compatible model and 8GB of RAM. The update fee is up to your own volition.
Here’s how you can check your Mac’s specifications for the RAM:
- In your Mac, you’ll see an Apple icon in the top-left corner of the screen. You will need to click this.
- You will then be shown a dropdown menu which will have an option “About this Mac”, and that’s where you’ll have to click again.
- You’ll see in the resulting window the Overview tab of your Mac’s specs, including the RAM size. You can also click the Memory tab for more details.
As for the model, you can only identify a Mac using the serial number you were given, and there are different ways on how you can look for it:
- Follow the previous step so you can get to the Overview tab of your Mac’s specs. Here you’ll see your Serial Number.
- The second easiest way to find your Serial Number is by checking your Mac’s bottom, though you should unplug it first. This is where the Serial Number is typically written.
- The third and hardest way is to check your Mac’s original packaging receipt that will show the Serial Number.
- After finding the Serial Number, search on the internet what model your Mac using the number. Each model has a pattern with their Serial Numbers.
Confirming your Mac’s qualifications is important as it may damage the device if it doesn’t meet the requirements but still undergoes the installation process.
Clean Your Hard Disk
After confirming your Mac’s qualifications, you should also make sure you have 55GB of free space. This will be for files from the Windows installation.
We know how terrifying it is to do it manually, so you can always take the easy way, and also the safest way around. We recommend using PowerMyMac.
PowerMyMac is an all-in-one tool for Mac users that contains several features and can clean different types of junks. It can also ignore the necessary files if you intend to.

Here’s a look at the different kinds of junks you can delete with PowerMyMac:
- System Junk
- iPhoto Junk
- Email Junk
- Similar Photo
- iTunes Junk
- Trash Bin Files
- Large & Old Files
- Duplicates
With only a few clicks, you can clean your Mac off all the junks you don’t need and you’ll only have to wait for a few minutes for it to complete.
To enjoy the benefits and convenience of quick cleaning, follow these steps:
- Download PowerMyMac here.
- Run PowerMyMac and click the Master Scan module.
- Choose which type of junk you want to clean first. (Email, iTunes, iPhoto, etc.)
- Click Scan.
- Uncheck the files you need to be spared then click
With this, you would already have cleaned gigabytes worth of unnecessary files off your Mac. This will give you more than enough space to install Windows. But there’s still another step for preparations.
Back Up Necessary Files
In case the operation fails, you should have a backup of your files.
Since there have been many cases up to now where users unintentionally delete necessary files, PowerMyMac, developed their own feature where they can restore deleted files.
While it’s different with backups, it can also work if you want to learn how to run Windows on Mac.
It will also help you confirm the existence of your backups in the software’s Status module. With this, you are now in the final step of how to run Windows on Mac.
Installing Windows on Mac Using Boot Camp
With everything set up and good to go, you can now take the first step of installing windows on your Mac using the Boot Camp feature.
Step 1: Download Windows 10 Disk Image
The first thing you’ll need to do is download the Windows 10 disk image from Microsoft’s official website. Here are the steps on how to do this:
- Visit this website where Windows 10 disk image is located.
- You should then click Download This Tool.
- Lastly, install the tool in your Mac.
With the tool installed, you are now ready to run Boot Camp Assistant.
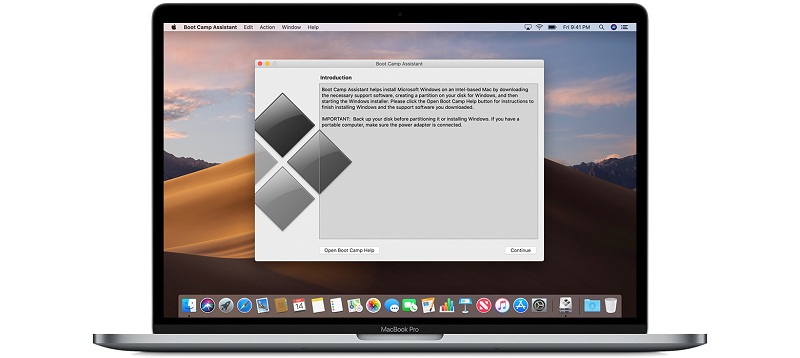
Step 2: Run Boot Camp Assistant
The Boot Camp Assistant will be your “Assistant” throughout the installation process. This tool can be found by default in the Applications of your Mac, then in the Utility folder.
Running Boot Camp Assistant will cause it to automatically search for the ISO file that you’ve downloaded in the first step.
Step 3: Partition and Format
If you are using a flash or optical drive in the process, you might be asked where you want Windows to be installed.
If that’s the case, then choose the BOOTCAMP partition and then click the Format button.
If you’re not using a flash drive or optical drive, this will be done automatically and you’ll have to proceed to step 4 immediately after step 2.
Step 4: Windows Installation
Finally, the one thing that you’ve been waiting for, how to run Windows on Mac. As you may have already guessed, this is the most exciting part, but you’ll find that this can be a bit difficult.
So fasten your seatbelts as we enumerate the steps on how to run Windows on Mac:
- Locate your ISO file and press the Install button.
- Type in your Password (if you have any) and you will see the setup screen of Windows.
- Choose your desired language.
- Click the Install Now button.
- Type in the Product Key that was provided to you or if you weren’t provided any key, simply clicks the “I don’t have a product key” option.
- Choose Windows Home or Windows 10 Pro in the selection and click the Next button.
- Click Drive 0 Partition X: BOOTCAMP:
- Click the Next button and wait as Windows is being installed.
- Once the Setup screen flashes, you can either choose the Customize Your Installation or Use Express Settings option. In the case of Customize Your Installation, we suggest turning off all settings and check only what you think works for you.
- If you’re asked to create an account, follow their instructions. Create a username, or even add a password for tighter security.
- Click Next.
- You will then be asked if you want the Cortana personal assistant to be enabled for you. You can also click the Not Now button if you want to disable it.
After these 12 steps, Windows should already boot completely.
There will then be a Welcome box in which you’ll have to accept the terms in the license agreement provided. You will then be directed to click the Install button. After the installation, click Finish and your machine will automatically restart.
However, there are cases where it doesn’t do this automatically. In that case, there’s only one thing you need to do.
Step 5: Reboot Your Mac
Some models don’t reboot automatically even after you do the steps previously mentioned. Regardless, you’ll have to restart your Mac to access Windows. But it’s not that simple.
First, you have to turn off your Mac. Then, turn it on but this time, while holding the Option (Alt) key. You will then be required to choose which drive you want to boot on.
After choosing the drive, you now have a dual-operating system Mac device at your fingertips.
Conclusion
Before, you didn’t have any device. Then, you were given a Mac, even though you wanted a Windows. But now, you have a device that is compatible with both Mac and Windows programs.
While the process is a bit long, there’s no better way of handling things than having a third-party software at your disposal.
Not only is it helpful in many ways, but it’s also actually very safe with all the credentials needed.
At the end of the day, you are now able to download Windows programs that you weren’t able to do, for several reasons.

