


As with the vast majority of Mac users, uninstalling an installed application from their macs would be as simple as dragging the software application towards the trash, and that there seems to be another major concern throughout this section that frequently causes problems for individuals because that is the remnants difficulty.
Apart from software designed for such Windows operating system, however many apps installed within Mac Operating Systems may be uninstalled with simplicity and robustness. DivX has always been a video compression program created by DivX Incorporated. Whenever you want to uninstall DivX Mac for several other out of more circumstances, check out this article. We would demonstrate how to properly uninstall DivX on Mac.
Article GuidePart 1. What Is DivX for Mac?Part 2. How to Uninstall DivX Player on Mac?Part 3. Completely Uninstall DivX with All ComponentsConclusion
Part 1. What Is DivX for Mac?
DivX on Mac was very much a high definition production as well as a viewing software package that includes just about all the capabilities necessary to generate as well as display DivX multimedia content mostly using the Mac. Furthermore, the DivX codecs (including those Pro options), this same DivX Converter, its DivX Web Player, as well as DivX playback capabilities would be included within DivX for Mac.
Part 2. How to Uninstall DivX Player on Mac?
Just about all Mac System apps do seem to be packages that thus incorporate almost all, and sometimes as at certainly the majority, of such files required to execute that particular app, i.e. those who generally self-contained. Thereby further, unlike with the Windows programs uninstallation technique of utilizing the control center, Mac users may just move whatever obsolete software somehow to the Trash as well as the uninstallation procedure will begin.
Yet even with this, you should have been mindful when transferring commoditized applications to and through the Trash leaves almost all of its constituents onto your Mac. You may manually uninstall DivX on Mac by following these methods:
- Stop all the DivX processes with the use of the Activity Monitor
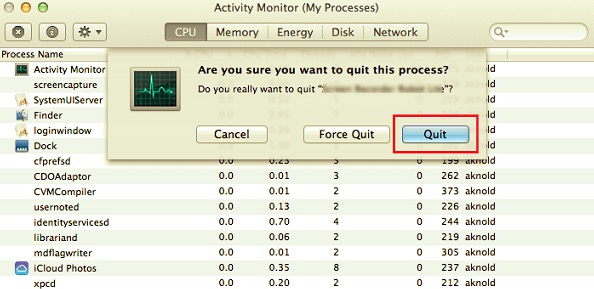
Prior to actually doing to uninstall DivX on Mac, you should close everything and stop most of its operations. But unless DivX so far has been halted, you may forcibly stop it just by pressing Command + Option + Escape, selecting DivX throughout the pop-up displays, as well as clicking Force Quit (using such technique enabling force quit functions for this with the visible program but not so much for the underlying operations.).
Run Activity Monitor within Launchpad's Utility service directory as well as choose All Tasks from the drop-down list from the highest point of the screen. Choose the DivX activities mostly in the menu, press the Quit Activity symbol from the left part of the screen, and thereafter press Quit from this pop-up dropdown menu (but unless something doesn't function, consider Force Quit).
- Delete DivX application using the Trash
Once again to begin to uninstall DivX on Mac, ensure that you are logged onto your Mac having nothing but your admin user, otherwise you may be prompted for something like a passcode just before attempting to eradicate anything.
Inside the Finder, expand the Applications file folder, when it does not have seemed throughout the right side of the page, go over to almost all Navigation Bar, allow access to the “Go” menu, as well as then choose Applications throughout somewhere in the file, after which, you must look again for DivX apps whilst also entering its own search bar sphere, and afterward move that one into the Mac Trash (throughout your Mac dock) to actually start the uninstall procedure. Put it another way, you may transfer the entire DivX icon/folder into mac Trash through using Command + Del or perhaps even selecting the File as well as Drag into Mac Trash options.
Part 3. Completely Uninstall DivX with All Components
Regardless of the assumption that further DivX has been deleted into the Mac Trash, many such residual caches, databases, memory units, and certain other odd items may still be there inside the mac’s pretty tough disk. To completely uninstall DivX on Mac, you can manually identify and delete just about all items associated with DivX. Spotlights could be utilized to find the correct names.
Several of those certain DivX preferences records can be found towards the Preferences database within your user's library database and hence the general framework Archive sequestered there or something near the bottom of this with the cloud computing resources, however, the supplementary files have sometimes been found all across Library, possibly mostly in Application Management database.
- Load the Finder, and after that browse to that same Option Panel, just choose the “Go” button, as well as finally select the relevant access: And from there, specify the path of both the
Application Supportingdirectories such as in Folder, followed by/Library. - After which, primarily in folders, seek for any files and documents containing the overall system or perhaps even the creator's identity. Whereupon, to get rid of them, right-click them and pick the option "Move to Trash".

Further to that, there may be kernels and root file system changes that have not been easily evident. In such a case, you would perform a Google search for DivX extensions. You can also use Terminal (again from Applications or perhaps utility interface) to see the characteristics of the affected folder and delete the afflicted feature.
- Again when, in order to finish the operation, you should empty your Mac Trash. After that, if you've decided to totally delete DivX from Mac, the latter thing you'd do is empty into Mac Trash. To completely clean up off your Mac trash, right-click upon that Mac Trash symbol under the dock and pick on the option “Empty on Mac Trash”, and otherwise pick “Empty on Mac Trash” again from Finder options.
Remember: You can't undo quite an operation, so simply be quite certain you haven't mistakenly damaged anything prior to actually executing it. Before really emptying furthermore the Mac Trash, totally correct upon that items throughout the Mac Trash decide and select Turned Back mainly in records. Reboot your Mac when you are still hesitant to empty the Mac Trash.
But nevertheless, you might very much like to avoid the higher risk of manually wiping another such configuration file as well as, likewise, to uninstall DivX on Mac as quickly as well as efficiently made possible.
A proficient uninstaller handy platform could also have already been considered perfectly advantageous to do so with that, because this might also too much like rising its increased and thus even huge majority of certain directories, which would have to often have cloud-based information as well as seemingly login files, which can offer additional a comprehensive but rather completely done automatically removal.
The Easiest Way to Remove DivX from Your Mac
Sometimes when you purely wish to save a lot of time when manually uninstall DivX on Mac, or maybe you're facing difficulties trying to erase all this and placing that as well handed into the Trash, so unless you're not confident which directories and maybe even records are associated with said DivX app onto your Mac, you might quite use third-party uninstaller into assisting you entirely with data files.
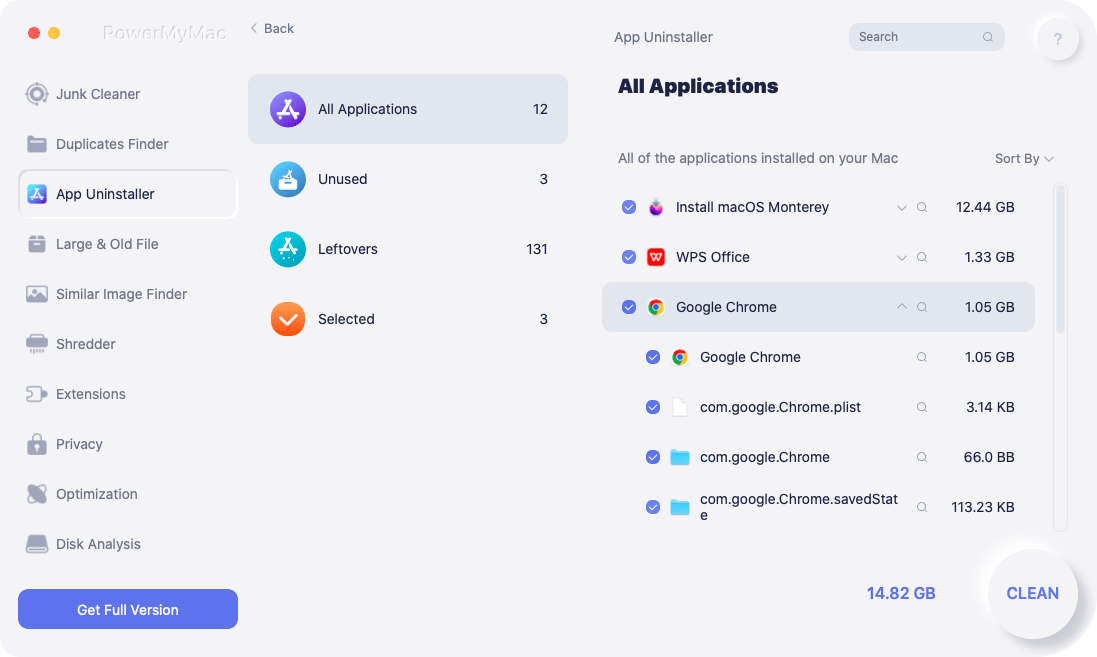
PowerMyMac’s Uninstaller was such a software uninstaller that was being used to remove programs from the Mac Operating system. Such a software uninstaller was a very useful tool that allowed you to completely remove any software as well as its associated information but with solely very few keystrokes.
You may also conserve efforts by hunting for app-related folders sequentially. Evaluate how effective this program was in removing most of the unneeded and otherwise superfluous applications from your Mac. Let's just have a peek at how to completely uninstall DivX on Mac utilizing the simple steps below:
- Launch first the PowerMyMac Uninstaller program, right from there instantly choose the application which you intended to uninstall, then after which click on the option “Scan”.
- Afterward, into the navigation interface, start to look for further DivX.app or otherwise, make use on the search panel, and from there type on the term “DivX”.
- Henceforth, by selecting DivX.app, all capabilities from each software, but also any related data files, might be instantly accessible. After which, pick cleaning yet again to finish getting rid of everything.
- Provided because such software seems to have the majority of DivX elements, there should always remain remnant data shortly after the application got removed; that everything you had to perform would just place inside that very specific term in the search engine, then the needed datasets will then be presented. To thoroughly eliminate but also uninstall DivX on Mac, select all the contents, then after which hit on the button “Clean”.
Conclusion
This article has talked about how to properly uninstall DivX on Mac. Alongside the main point of this article, we also give a simple insight into what was DivX is all about and how you could erase or delete all of its leftovers and residues after the uninstallation process.
In addition to this information and guidelines, we also introduced to you PowerMyMac’s Uninstaller which was a great tool for uninstalling applications as well as on removing and eliminating such leftovers and even residues of the uninstalled app. We hope that this would then help you whenever your DivX has been not functioning for you lately. Have a positive and pleasant week ahead.

