


Android Studio is a type of development software designed to make it easier for developers and programmers to develop programs. For various reasons, some people wish to uninstall Android Studio Mac.
However, not everyone is aware of how to totally delete an application from Mac. Many Mac users just drag icons to the Trash to delete unneeded software. But this will remain leftovers and risk having problems with your computer. Continue to read the guide below to know more about removing the Android Studio in your Mac in 3 different ways.
Contents: Part 1. Why Cannot Uninstall Android Studio on Mac?Part 2. How to Delete Android Studio Project Mac?Part 3. How to Fully Uninstall Android Studio from Mac?Part 4. Conclusion
Part 1. Why Cannot Uninstall Android Studio on Mac?
If you're having trouble uninstalling Android Studio on your Mac, several factors could be causing the issue:
- If Android Studio or related processes are running in the background, macOS might prevent you from uninstalling it. You can open Activity Monitor, look for Android Studio, and select and force quit it.
- You might not have the proper permissions to delete Android Studio. Ensure you're logged in as an administrator.
- Simply dragging Android Studio to the Trash may not remove all of its components, which can interfere with the uninstallation.
- If your Android Studio installation is corrupted, it might not uninstall properly. You can reinstall Android Studio from the official website, then try uninstalling again after ensuring a clean install.
Part 2. How to Delete Android Studio Project Mac?
Uninstall Android Studio on Mac from Terminal
As previously stated, you cannot simply drag and drop the selected app (Android Studio) to the Trash. This is because programs will leave their leftover files or service files on your Mac. Use the Terminal command line to uninstall Android Studio on Mac and all of its remnant files at once. To get started, follow the steps below:
- Launch Mac Terminal.
- Use Terminal to run the following commands:
rm -Rf /Applications/Android\ Studio.apprm -Rf ~/Library/Preferences/AndroidStudio*rm -Rf ~/Library/Preferences/com.google.android.*rm -Rf ~/Library/Preferences/com.android.*rm -Rf ~/Library/Application\ Support/AndroidStudio*rm -Rf ~/Library/Logs/AndroidStudio*rm -Rf ~/Library/Caches/AndroidStudio*rm -Rf ~/.AndroidStudio*rm -Rf ~/AndroidStudioProjectsrm -Rf ~/.gradlerm -Rf ~/.androidrm -Rf ~/Library/Android*
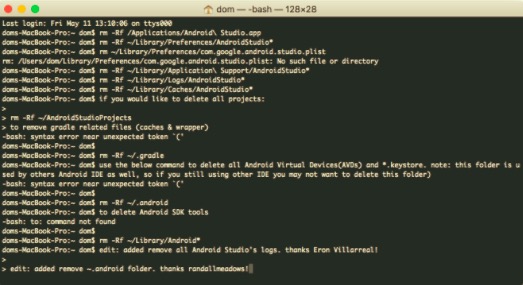
By entering these, you can delete Android Studio as well as the app's associated files.
Remove Android Studio Completely with Related Files
If you are not familar with Terminal, you need to take some time and effort to manually uninstall Android Studio on Mac. Because Android Studio generates a large number of service files that you must manually locate and delete.

Follow these steps to start with the proper uninstallation of Android Studio:
- Android Studio should be closed first and removed from the Applications folder. If the app is frozen, you may also press
Cmd + Opt + Esc, choose Android Studio in the pop-up dialog, then select Force Quit to quit the software. - Remove the
AndroidStudioProjectsfolder from your Home folder if you wish to erase your projects as well. - Go to the system
Libraryfolder. Now find and delete all of the service files created by the program while you were using it. Look for them in the following subfolders:
~/Library/Android(Android Studio will be eliminated once you remove this folder)~/Library/Preferences/AndroidStudio~/Library/Preferences/com.android~/Library/Preferences/com.google.android~/Library/Caches/AndroidStudio~/Library/Application/Support/AndroidStudio~/Library/Logs/AndroidStudio
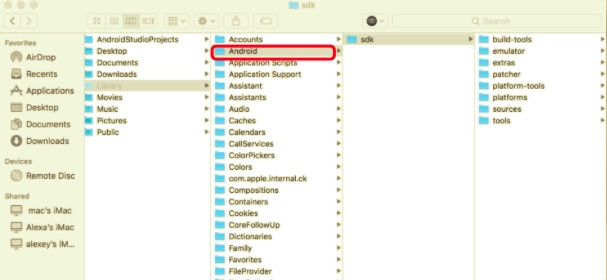
Once you've found and removed all of Android Studio's remnants, clear the Trash to complete the uninstallation process. If you found this approach difficult or unfamiliar, you can use a professional tool that removes an app thoroughly which will be discussed in the next section of this article.
Part 3. How to Fully Uninstall Android Studio from Mac?
Uninstalling the software manually can be very specific and consumes a lot of your time. Aside from deleting the app, you will have to manually find all Android Studio-related files just to make sure it was removed completely and does not take up space from your hard drive. That is why it is highly recommended for all Mac users to use the PowerMyMac app to delete an app without much hassle immediately.
PowerMyMac is an app that comes with an Uninstaller tool. It uninstalls an app and its related files all at once. If you are unsure or not familiar with using Terminal or using the manual approach, you can use this automatic uninstaller tool as a safe alternative. As it is a faster and easier way to remove any unwanted app thoroughly, it could also save you time from finding all of the files on your device.
To uninstall Android Studio on Mac automatically, you can follow the steps below:
- Download and install PowerMyMac, then launch the app.
- Click the App Uninstaller and click SCAN to allow the software to scan all your apps installed on your Mac, then a list of all apps will appear on your left side.
- Find the Android Studio from the list, or you can input and enter its name on the Search box to locate it quickly. Click the selected app, and its associated files will appear on the right side of the page.
- Click the Android Studio, and press the CLEAN button to remove the app and its associated files.
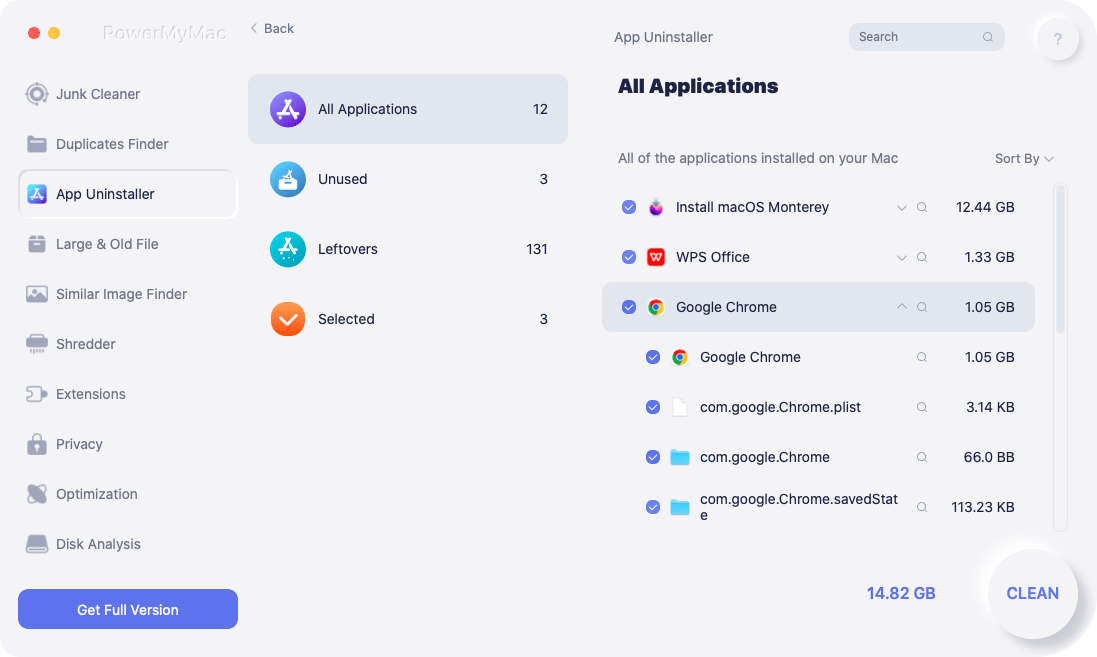
Once done, a pop-up dialog will appear on your screen "Cleanup Completed". It will also show how many files were removed and how much space the PowerMyMac freed your hard drive.
Part 4. Conclusion
To sum it all up, you can uninstall Android Studio on Mac via Terminal, where you have to put in commands that will delete the app along with its related files all at once. Or do it manually, which means not just deleting the app alone but finding the app's associated files in different folders and deleting them.
Lastly, PowerMyMac can automatically remove the Android Studio and its leftover files in just a few clicks. This may be the most recommended method as it is a very convenient, efficient, and faster method compared to others. But whatever process you may use, always keep in mind to make sure you have removed the app entirely because leaving other files behind can cause issues with the Mac performance or consume unnecessary space to your hard drive.

