


When you shut the laptop lid, your MacBook will automatically go to sleep. However, something unexpected occurs. The light is seen coming from the Mac's flanks. Additionally, the MacBook doesn't display the login screen when the lid is opened; it just remains on the Desktop. Closing the lid indeed prevents your Mac from going to sleep.
This terrible problem can quickly deplete your power and shorten the lifespan of your device. It might be that you have anti-sleeping software installed. If you choose to uninstall NoSleep on Mac because you have changed your mind, you can do so by following the instructions on this page. This article introduces two ways to totally remove apps from Mac and the specific operation steps for your reference.
Contents: Part 1. What Is NoSleep Mac Part 2. Quickest Way to Uninstall NoSleep on Mac EffortlesslyPart 3. How Do I Quit and Uninstall NoSleep from Mac ManuallyPart 4. Conclusion
Part 1. What Is NoSleep Mac
Users of macOS laptops may benefit from NoSleep for Mac, a little system program, to fully use their devices' hardware and software even while their laptop covers are closed. Although a lot of Mac users like that when their computer's lid is closed, all programs automatically pause and macOS goes to sleep, in certain circumstances this default response might interfere with your business or personal requirements.
You can fully use the programs that are running by keeping OS active while the lid is closed. The fact that this program eliminates the so-called "accidental doze" effect, which may occur when your cover is slanted to be extremely near to the keyboard, is another reason why many users are happy with it. But this will quickly drain Mac's power and shorten the life of the device, so in order to prolong the life of the Mac, users will choose to Uninstall NoSleep on Mac.
Although there is a method for disabling the automatic sleep function in macOS customization settings, most Mac laptop users do not care to spend time learning this challenging method. Instead, they may utilize an app similar to the application to do the same task with a few mouse clicks, or even turn on automatic preference to keep the OS on when specific criteria are satisfied.
Part 2. Quickest Way to Uninstall NoSleep on Mac Effortlessly
Want to do a quick and thorough removal? Why not use a dedicated uninstaller to uninstall NoSleep Mac? Although removing software on a Mac is quite straightforward, a lot of temporary and junk files are created. Your Mac will not become cluttered with unnecessary objects if you eliminate this trash using iMyMac PowerMyMac.
It is really easy to use and straightforward to comprehend. The PowerMyMac Uninstaller is a little tool that is optimized for the most current versions of macOS and can swiftly remove every component of the target program with only a few clicks. The uninstallation steps are as follows, if necessary, you can also use it to remove Desktop Manager.
- To find any previously downloaded programs on your computer, click SCAN. Next, choose App Uninstaller.
- The categories Selected, Unused, Leftovers, and All Apps are located on the left side of the screen. The right side of the All Apps menu will display each app. Use the list to find your undesirable software, or type its name into the search bar in the top right corner.
- After selecting the software you want to uninstall, click the Unfold icon to search through any linked files and the Search button to find out more. To uninstall NoSleep on Mac and the files they are connected with, choose CLEAN.
- You can see the amount of disk space that is now free as well as the number of files that have been cleaned up in a pop-up window titled "Cleaned Completed".Simply choose the Review option to remove any more applications, then go back to the results of the scanning page.

Part 3. How Do I Quit and Uninstall NoSleep from Mac Manually
The trash-to-delete feature is compatible with every version of Mac OS X and beyond, and the majority of Mac programs are independent. Most of the time, you can uninstall NoSleep on Mac on your computer by using the drag-and-drop method. The typical methods to uninstall NoSleep are as follows:
- Stop all running instances of NoSleep and any associated processes.
- Open Finder on a Mac and choose Applications from the sidebar.
- Look for NoSleep within the
/Applicationsdirectory, then drag & drop its icon onto the Trash icon at the dock's very end. Additionally, you may choose the Move to Trash choice from the submenu when you right-click or control-click the NoSleep icon. - To approve the update, enter the administrator password when requested and press OK.
- From the menu bar, select Finder > Empty Trash. Alternately, right-click the trash icon and choose Empty Trash, then select Empty Trash once again in the pop-up window to uninstall NoSleep on Mac.

Some users may believe there is no risk involved in keeping outdated preferences and assistance files on the hard disk. That depends, I guess. These files often take up minimal space and don't create issues. However, if you wish to make a new installation or free up important disk space, it is not advised to leave them alone.
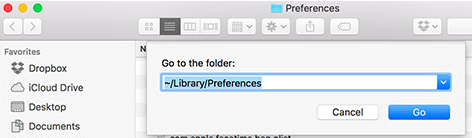
- Launch Finder and select the Go > Go to Folder option from the menu bar.
- To open it, enter
/Libraryinto the Go to Folder field and press the Enter key. - When the
/Libraryfolder appears, put NoSleep's keyword(s) or the name of its seller in the Search field, and click the Library beside the Search: button once again. - As your findings are shown, find and click on the items that match the keyword(s) you entered, then use the right-click menu to pick the Move to Trash choice.
- Re-do the previous steps to remove any remnants of NoSleep in the
~/Librarydirectory.
While /Library is located within your Home Folder, /Library is located at the root level of the hard drive. To fully uninstall NoSleep on Mac, relevant files must be deleted from both of these places. The following folders may contain junk files:
-
/Library ~/Library/Library/Application Support~/Library/Application Support/Library/Preferences~/Library/Preferences/Library/Caches/~/Library/Caches//Library/LaunchAgents~/Library/LaunchAgents/Library/LaunchDaemons~/Library/LaunchDaemons/Library/PreferencePanes~/Library/PreferencePanes/Library/StartupItems~/Library/StartupItems
Part 4. Conclusion
It might be hard to uninstall NoSleep on Mac, but this piece will walk you through each step. Depending on your choice, you can either directly manually uninstall or automatically by using PowerMyMac to uninstall NoSleep permanently.

