


If you seldom use an app, you may want to remove it from your Mac. We’re talking about PostgreSQL here. This is a very powerful app that is used for databases. It acts as an extension of your usual SQL language. To uninstall PostgreSQL Mac is not that easy if you do it manually. And reinstalling it back again is no easy feat either. Check out our guide below to remove it completely from your Mac.
Contents: Part 1. How to Fully Uninstall PostgreSQL on Mac?Part 2. How Do I Uninstall PostgreSQL without Third-Party Software? Part 3. How to Reinstall PostgreSQL on Mac?Conclusion
Part 1. How to Fully Uninstall PostgreSQL on Mac?
Now, we will start with the easy part. We will teach you how to quickly uninstall Postgres on Mac through a powerful tool called iMyMac PowerMyMac.
In fact, this software is a Mac optimizer. One of its mini tools is what you call an App Uninstaller. This App Uninstaller tool can be used to remove all types of apps from your Mac computer easily. That includes removing its associated trace files.
Here are the steps you should follow in order to uninstall Postgres easily using PowerMyMac:
- Grab, Install, Launch. The first thing you should do is to download the PowerMyMac tool on its website. Use your Mac to install it on the device. Then, you can finally launch the tool to start the uninstallation.
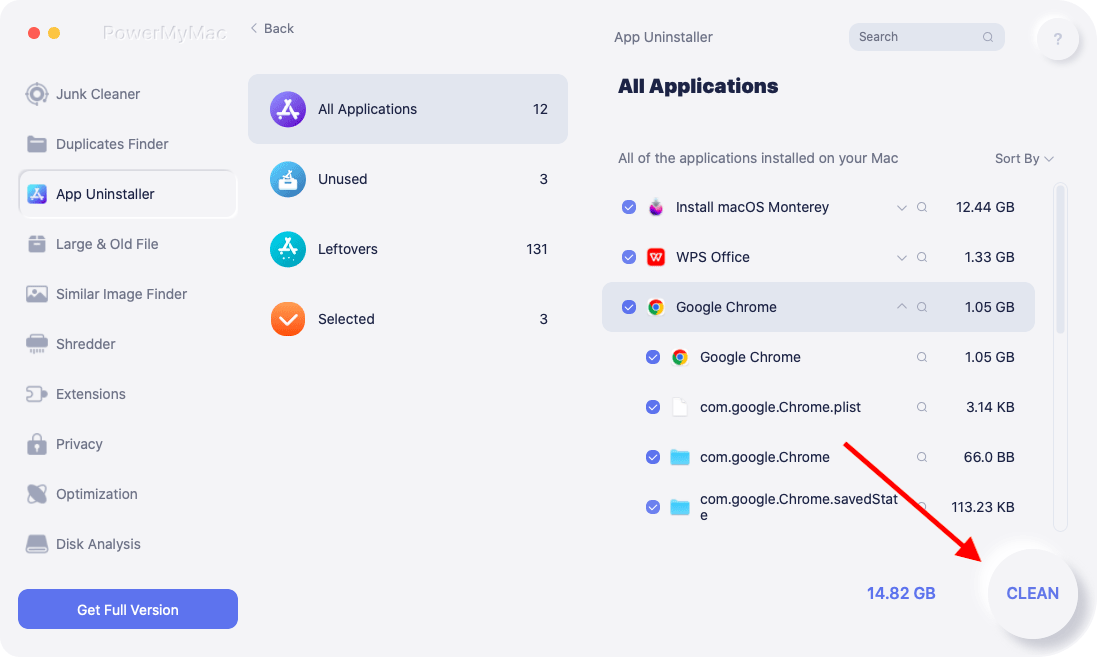
- Click App Uninstaller The next step is to click the module labelled Uninstaller. This can be found on the left hand side of the interface of PowerMyMac.
- Click SCAN. Click the Scan button in order to locate all installed apps on your Mac computer. Wait for the list to appear and choose the appropriate app to remove.
- Click CLEAN. The next step is to click the Clean button.
- Wait For Confirmation. Wait until PowerMyMac confirms that the uninstallation process is complete.
Part 2. How Do I Uninstall PostgreSQL without Third-Party Software?
So, how do you uninstall Postgres on your computer without using third-party software? We will teach it to you here The manual way of removing PostgreSQL is not recommended, because you may delete important system files crucial to the operation of your Mac computer. Nonetheless, we will teach you how to uninstall Postgres on Mac using the manual method below.

How to Remove PostgreSQL from Mac Using Terminal?
To uninstall Postgres on Mac completely, the deletion of the app is not enough. There are a lot of associated files that come with it, which you have to delete as well. They take up a lot of space within your computer. So, below are the steps to uninstall it manually through Terminal:
- You should first exit the server of PostgreSQL on your Mac. Press the icon that looks like an elephant. This will be within your Mac’s toolbar. Click the option that says Shutdown Server.
- Open Applications > Utilities > Terminal.
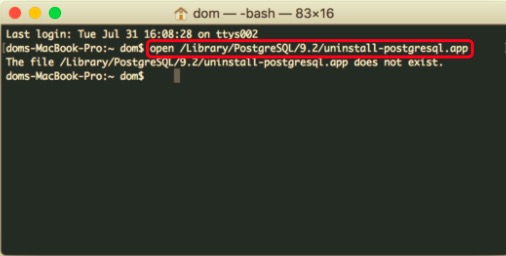
- Type the command within the Terminal:
openIf that command doesn’t work, you can use this command instead:/Library/PostgreSQL/9.2/uninstall-postgresql.appsudo /Library/PostgreSQL/9.1/uninstall-postgresql,app/Contents/MAacOs/installbuilder.sh - Input your Mac’s admin password in order to open its uninstaller. Wait until the first part of the uninstallation process is complete.
- After that, you should delete the INI file from your Mac. To do this, type the following:
sudo rm /etc/postgres-reg.ini - Then, you should delete the folder of PostgreSQL in the Library. To do that, type the command:
sudo rm –rf /Library/PostgreSQL - After that, you should delete the user of PostgreSQL. Visit your Mac’s System Preferences, then go to Users & Groups. After that, press the icon that looks like a lock and input your admin password for unlocking. Then, choose PostgreSQL. Then, press the minus (-) icon.
- After that, open the Terminal again in order to continue to uninstall Postgres. Use the command:
sudo rm /etc/sysctl.conf
So, that’s how to uninstall Postgres on Mac using the Terminal. It can be very daunting that’s why we recommend that you use PowerMyMac instead. The second tool is an easier way to uninstall Postgres.
You can also use Homebrew to remove PostgreSQL:
$ brew remove postgresql
How to Manually Uninstall PostgreSQL on Mac?
Here’s how to manually uninstall Postgres from Mac. Check out our steps below:
- Go to Activity Monitor and exit all the apps related to PostgreSQL. After that move the PostgreSQL application to Trash.
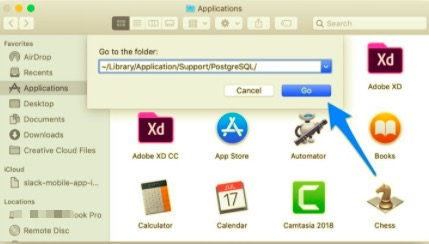
- Visit Finder then go to Go. After that visit Go To Folder and input the following:
~/Library/Application/Support/PostgreSQL/. - Locate all the associated files and folders of PostgreSQL. These can usually be found in the folders named as
WebKit, Application State, Saved, Preferences, Logs, Frameworks, Containers, Caches, Application Support, etc. - Empty your Mac’s Trash. After that restart your computer to complete the uninstallation.
Part 3. How to Reinstall PostgreSQL on Mac?
To reinstall PostgreSQL on a Mac, follow these steps:
- Install via Homebrew (recommended for ease of use):
brew install postgresql - Once installed, initialize the PostgreSQL database:
initdb /usr/local/var/postgres - Start PostgreSQL:
brew services start postgresql - Confirm PostgreSQL is running:
psql --version
This should reinstall PostgreSQL successfully. If you need a specific version, use brew install postgresql@version_number.
Conclusion
This guide has taught you how to uninstall Postgres on Mac easily. We have given manual ways on how to do it. One manual but daunting way is the Terminal. Another complicated way is to delete trace files one by one.
These manual ways are not recommended, because you can easily delete files important for your system to function. As such, we recommend that you use PowerMyMac to do it.
This is a great way to optimize your Mac. Plus, it has an uninstaller to help you remove apps from Mac. Check the tool today!

