


SnapNDrag Pro is a popular screen capture and screenshot tool for Mac users. However, there may come a time when you need to uninstall the app from your system, whether it's to free up space, resolve technical issues, or simply because you no longer need it. If you're struggling to uninstall SnapNDrag Pro from Mac, you're not alone. In this article, we'll walk you through the process of uninstalling SnapNDrag Pro step-by-step, using both manual and automated methods. So, let's get started!
Contents: Part 1. What Is SnapNDrag Pro for MacPart 2. Automatically Uninstall SnapNDrag Pro on Mac without LeftoversPart 3. Classic Way to Remove SnapNDrag Pro from MacPart 4. Conclusion
Part 1. What Is SnapNDrag Pro for Mac
SnapNDrag Pro is a powerful and user-friendly screen capture and screenshot application for Mac users. The app allows users to capture any area of their screen, including full screen, window, or a specific region, and save it as an image file. SnapNDrag Pro also comes with a variety of useful features, such as the ability to add annotations, resize images, and share screenshots directly from the app.
SnapNDrag Pro is a versatile and reliable screen capture tool that is popular among Mac users for its simplicity and functionality. However, if you're no longer using the app or need to free up space on your Mac, it may be time to uninstall SnapNDrag Pro.
There can be several reasons why you may want to uninstall SnapNDrag Pro from Mac. Here are a few common ones:
- You no longer need the app: You may have used SnapNDrag Pro for a specific project or task, but no longer require it on your system.
- You’re experiencing technical issues: If SnapNDrag Pro is not functioning correctly, or you’re experiencing crashes or other technical issues, you may need to remove and reinstall the app to fix the problem.
- You’re running low on storage space: As with any application, SnapNDrag Pro can take up valuable storage space on your Mac. If you’re running low on storage, uninstalling the app can help free up some space.
When it comes to removing SnapNDrag Pro from your Mac, some users may encounter a few common problems. One issue that users may face is the app refusing to uninstall, which can happen if the app is currently in use or if there are files or components of the app still active on the system. Additionally, some users may be unsure of the correct method for uninstalling the app, which can result in incomplete or unsuccessful removal.
Part 2. Automatically Uninstall SnapNDrag Pro on Mac without Leftovers
If you're looking for a quick and easy way to uninstall SnapNDrag Pro from Mac without any leftover files or components, an automated solution like iMyMac PowerMyMac is a great option.
PowerMyMac is a powerful and versatile utility tool that can help you optimize and maintain your Mac system. One of its key features is the App Uninstaller, which allows you to easily remove unwanted applications and their associated files with just a few clicks.
Here’s how you can use PowerMyMac to uninstall SnapNDrag Pro on your Mac:
- Download and install PowerMyMac on your Mac.
- Launch the app and click on the “App Uninstaller” option in the left-hand menu. Click the SCAN button.
- Once the scan is complete, review the list of apps, and files, and select the ones you want to delete. Select SnapNDrag Pro from the list of installed applications on your Mac.
- Click on the “CLEAN” button to uninstall SnapNDrag Pro from Mac with all its associated files.

PowerMyMac's App Uninstaller feature ensures that all leftover files and components of the app are completely removed from your system, preventing any potential conflicts or issues down the line. In addition to SnapNDrag Pro, to prolong the life of your Mac, it's time to remove such consuming applications as NoSleep, try PowerMyMac to delete it and optimize your Mac.
Overall, using an automated solution like PowerMyMac can make the process of uninstalling SnapNDrag Pro on your Mac quick and hassle-free. With just a few clicks, you can completely remove the app and free up valuable storage space on your system.
Part 3. Classic Way to Remove SnapNDrag Pro from Mac
If you prefer to uninstall SnapNDrag Pro from Mac manually, there is a classic way to do so. Here's how:
- Quit SnapNDrag Pro: Before you can uninstall the app, make sure to quit it completely.
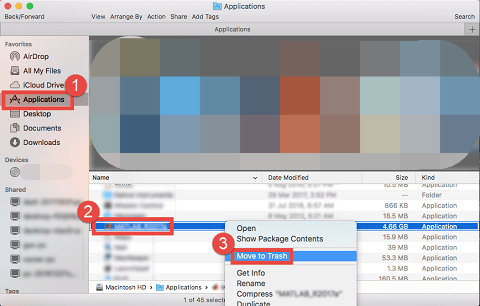
- Drag SnapNDrag Pro to the Trash: Locate SnapNDrag Pro in your Applications folder, and drag it to the Trash.
- Remove associated files: To ensure the complete removal of SnapNDrag Pro, you should also delete its associated files. These files may include preferences, caches, and other related components. You can do this by searching for SnapNDrag Pro in Finder and deleting any associated files that appear.
- Empty the Trash: Once you successfully uninstall SnapNDrag Pro from Mac with all its associated files, empty the Trash to permanently remove them from your Mac.
It's worth noting that manually uninstalling an application like SnapNDrag Pro can be more time-consuming and may not always ensure the complete removal of all associated files. Therefore, using an automated solution like PowerMyMac's App Uninstaller feature may be a more efficient and reliable option.
In any case, if you're experiencing any issues with SnapNDrag Pro or any other app on your Mac, it's always a good idea to reach out to the app's support team or consult online resources for troubleshooting advice.
Part 4. Conclusion
In conclusion, to uninstall SnapNDrag Pro from Mac can be necessary for various reasons, such as freeing up storage space and resolving technical issues. While manually uninstalling the app is an option, an automated solution like PowerMyMac's App Uninstaller feature can save time and ensure the complete removal of all associated files. Overall, PowerMyMac is a recommended utility tool to consider for a hassle-free and reliable uninstallation process.

