


Now that virtual meetings have gradually integrated into our work and life, learning how to record a Zoom meeting can enhance personal collaboration ability and share with your friends. This can also help you view important details and share information in the absence of colleagues.
In this comprehensive guide, we will share the detailed recording process for you, covering all the contents from the built-in function of the device to the third-party tool, let's start!
Contents: Part 1. Can I Screen Record a Zoom Meeting?Part 2. How to Record Zoom Meeting without Permission?Part 3. How to Record A Zoom Meeting as Host?Part 4. How to Record a Zoom Meeting on the Phone?Part 5. In Conclusion
Part 1. Can I Screen Record a Zoom Meeting?
Yes, you can record the Zoom meeting, because Zoom provides a built-in screen recording function for its participants, which can easily capture the entire meeting. As a participant, you only need to click the "Record" button displayed on the Zoom toolbar to start the recording process, then you can easily capture audio and video content throughout the session.
However, some hosts may limit participants to recording meetings to ensure the privacy and confidentiality of the meeting. In this case, you can contact the host or review the meeting settings to ensure that your recording is permitted. In the next part, we will show you how to record a Zoom meeting with third-party tools, which can provide options that meet your various needs and preferences.
Part 2. How to Record Zoom Meeting without Permission?
Method 1. Record A Zoom Meeting with iMyMac Screen Recorder
If you are unfortunately restricted to the Zoom Meeting recording, then iMyMac Screen Recorder should help you quickly capture the content you need. Below are the easy steps on how to record a Zoom meeting using this tool:
Get A Free Trial Now! Normal Mac M-Series Mac Get A Free Trial Now!
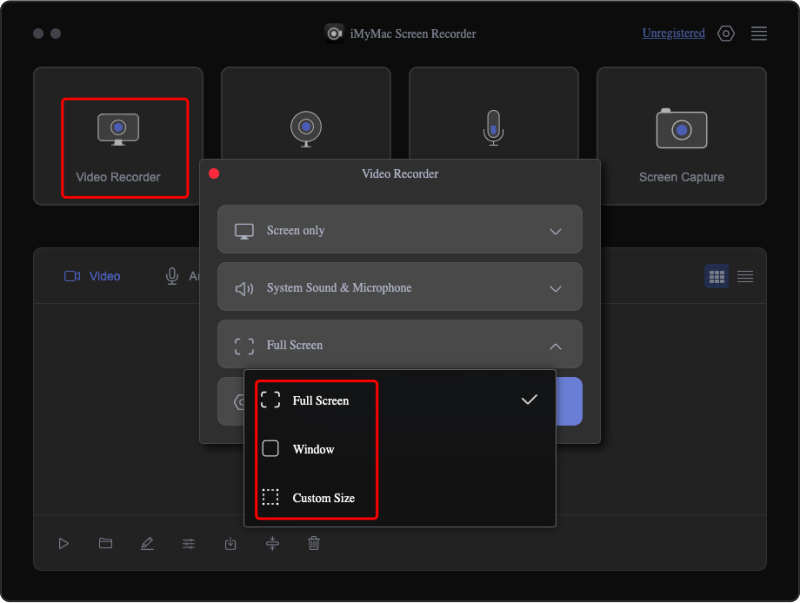
- Download, install, and open iMyMac Screen Recorder on your Mac or Windows computer. Select "Video Recorder" from the main interface.
- You can choose "Screen Only" to capture the entire screen or choose "Screen & Camera" to record both the screen and webcam at the same time. When the Webcam is selected, the program will automatically detect your webcam. In case of non-detection, click "Recheck". And you can choose the recording area from “Full Screen, Window, or a Custom Size” according to your personal needs.
- Set your audio preferences. Click "System Sound & Microphone" to record system sound and microphone input simultaneously. Alternatively, choose "Microphone" or "System Sound" to record only one type of sound. If no sound recording is preferred, select "None".
- Choose "Window" as the recording area, a window will appear displaying various program windows. Simply select the desired window-- Zoom, and the software will automatically identify it. Click "Start Recording" to begin the Zoom meeting recording process.
- Conclude the recording by clicking the red stop button. The recorded file is then saved on your computer. If you wish to pause the recording, use the "Pause" button and resume by clicking it again when you are ready to continue. Click the "Restart" button will discard the previous recording and start again.
Throughout the recording, a floating toolbar with annotation tools and additional buttons will be visible. Click "Edit" to choose annotation colors and utilize tools such as lines, circles, rectangles, triangles, arrows, text, brushes, and erasers. Additionally, Undo, Redo, and Clean buttons facilitate smoother annotation. Besides annotation tools, buttons for activating the webcam or taking screenshots while recording are available.
Following these steps on how to record a Zoom meeting without permission ensures that you can capture and look back at important meeting records without restrictions, not just relying on the authority granted on the Zoom platform.
Method 2. Record A Zoom Meeting with OBS
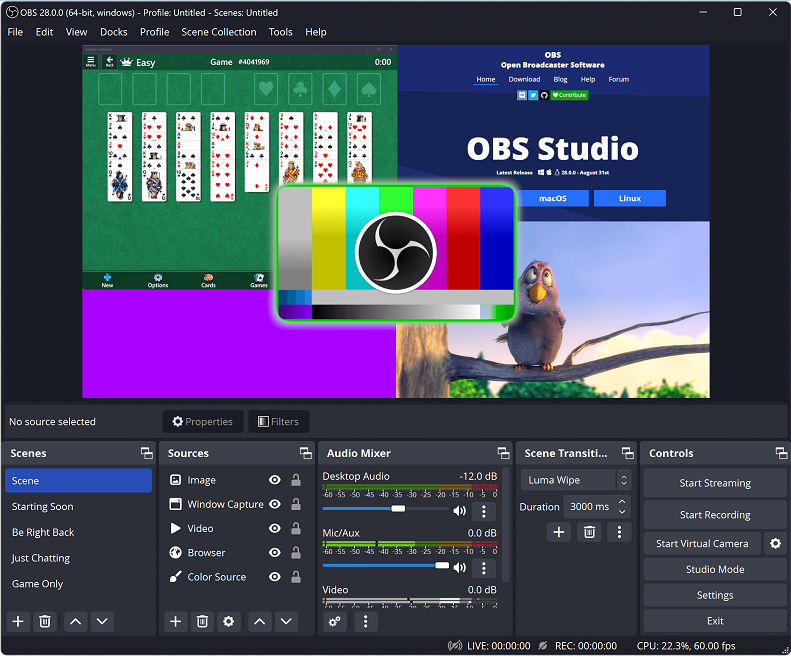
How to record a Zoom meeting when you don’t have the permission on Zoom platform? Another effective method is using OBS (Open Broadcaster Software), a free tool that can be used for live streaming and recording purposes.
- Downloading and installing OBS from its official website (https://obsproject.com/). Then install and set up the software on your computer.
- Launch OBS and adjust the settings from the "Settings" menu, you can set the video and audio quality, format, and other objects to meet your requirements.
- Click on the "+" icon under the "Sources" section. To add Zoom as a source, just need to select "Window Capture" or "Display Capture" to decide the specific Zoom meeting window or the entire display.
- In OBS, you need to ensure that your microphone and system audio are used as the appropriate audio source to configure the audio settings.
- Click on the "Start Recording" button to begin the Zoom meeting record. OBS will capture both video and audio from the Zoom meeting as per your customized settings.
By doing these steps, you can effectively record a Zoom meeting without permission via OBS, providing an alternative solution for situations where built-in recording options may be limited. Stay tuned for more methods and insights in our comprehensive guide on mastering virtual collaboration.
Part 3. How to Record A Zoom Meeting as Host?
If you are indeed a host and you don’t know how to get the Zoom meeting, here are the steps you should follow on how to record a Zoom meeting as a host:
- Start the Meeting:
Begin by hosting the Zoom meeting and make sure you are the designated host with the necessary permissions. During the meeting, locate the toolbar at the bottom of the Zoom window.
- Select "Record":
Click on the "More" button represented by three dots to reveal a dropdown menu and select "Record" to start the recording process, capturing both audio and video content of the ongoing meeting.
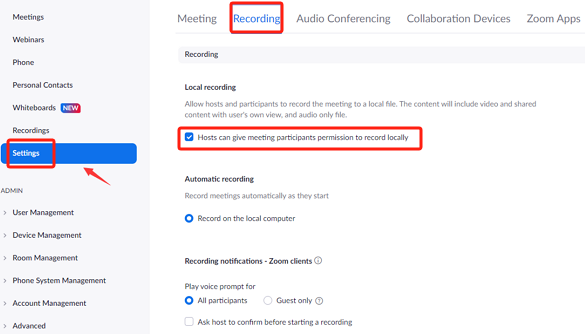
- Check Account Settings:
It's crucial to verify that the recording feature is enabled in your Zoom account settings, go there to check you have the necessary permissions to record meetings.
- Monitor Recording Status:
Once the recording is started, keep an eye on the Zoom interface to check a red dot or a "Recording" label to confirm that the session is being recorded.
FAQs: Common Concerns about Recording as a Host
What Is the Storage Location of Your Recorded Files?
Understanding the default storage location ensures easy access to your recorded meetings for future reference. Users can choose to customize the storage location for Zoom recordings. To check or modify this setting:
- Open the Zoom desktop application.
- Navigate to the settings by clicking on your profile picture.
- Go to the "Recordings" section.
- Here, you can view and change the default storage location for your recorded Zoom meetings.
What Are the Recording Options in Free Zoom Accounts?
Whether the recording feature is available in free Zoom accounts or if it is limited to paid subscriptions. This information helps users make informed decisions based on their Zoom account type. Free Zoom accounts typically allow users to record meetings locally on their devices. This means that the recorded files are saved to the user's computer. Some advanced recording features, such as transcription services and certain integrations, may be available only in paid plans.
How to Record a Zoom Meeting Without Participant Consent?
We should discuss the ethical and legal considerations of recording a Zoom meeting without the consent of participants. This ensures that hosts are aware of the importance of respecting privacy and obtaining necessary permissions.
Through detailed explanation, the host has a more comprehensive understanding of the ZOOM meeting record process, which can effectively use this function to solve the related issues of recording.
Part 4. How to Record a Zoom Meeting on the Phone?
If the device you often use is a mobile phone instead of a computer, we also have a tutorial here that is suitable for you. Follow these steps on how to record a Zoom meeting on your phone:
- Open the Zoom app on your mobile device and make sure that you have signed in to your Zoom account already.
- Join an ongoing meeting or host a new one by tapping the "New Meeting" or "Join" button within the app.
- Once in the meeting, locate the meeting controls. On most mobile devices, this is often found at the bottom of the screen.
- Tap the "More" or "Participants" option to access additional meeting options. From the menu, select "Record".
- Keep an eye on the screen for checking a red dot or a "Recording" label to confirm your meeting is being recorded.
- To stop the recording, tap the "More" or "Stop Recording" option which is located in the same menu where you start your recording.
- After the meeting ends, Zoom automatically saves the recording to your device. You can find the recorded files in the Zoom folder or another designated location on your phone.

By reading the above steps, you can record the Zoom meeting effortlessly on your phone to ensure that you will never miss basic information even if you need to go outside and leave your computer at home.
Part 5. In Conclusion
So how to record a Zoom meeting? Whether on a computer or mobile device, this guide ensures you capture every crucial detail effortlessly. While Zoom offers built-in recording features, you can make use of this function to gain your Zoom recording. For those seeking additional capabilities, iMyMac Screen Recorder stands out as the ideal solution for recording Zoom meetings with its user-friendly interface and multiple options.
