


Owning a computer in this era is definitely a necessity. Whether you are someone who’s working or completing schoolwork, having a Windows PC would always be a good option. But, have you thought of upgrading yours to Windows 11? If you haven’t yet, then you’re missing lots of features!
If you are a new Windows 11 PC user, you probably have several questions in mind. Are you also curious about how to screen record on Windows 11? You don’t have to think too much! There are several options for you to consider or choose from. We have detailed guides on how to record a screen on Windows 11 in this article! Are you excited to finally learn all these guides? Let’s finally delve into them now!
Contents: Part 1. Does Windows 11 Have a Screen Recorder?Part 2. How to Screen Record on Windows 11 without a Game Bar?Part 3. Other Free Screen Recorder on Windows 11Part 4. In Conclusion
Part 1. Does Windows 11 Have a Screen Recorder?
Being a long-time Windows PC user surely made you aware of the existence of the “Xbox Game Bar”. It’s a recorder that’s built-in on Windows computers. Thus, even if you changed your Windows version to Windows 11, you would still be able to use this. To launch the “Xbox Game Bar”, you just have to press the “Windows” + “G” buttons on your keyboard. Other than capturing the screen, this tool can even record audio! Indeed, a good solution to the “How to screen record on Windows 11?” query! Let’s move to the detailed steps to record the screen via this built-in recorder.
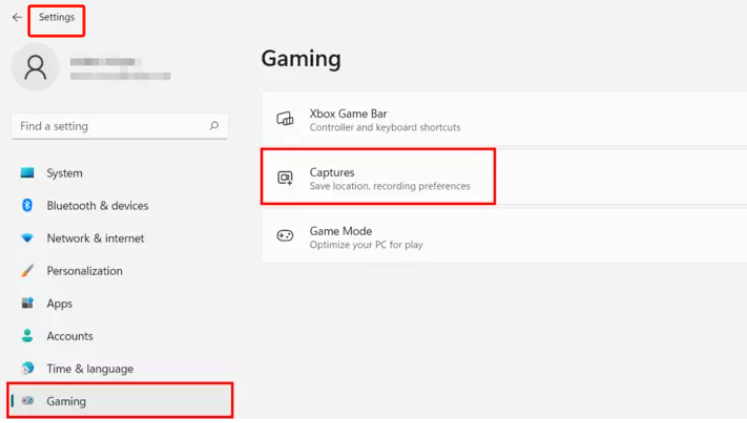
Step #1. Head to the “Settings” Menu
Go to the “Settings” option on your Windows 11 computer. Press the “Gaming” option, then the “Captures” menu. All your screen recordings should be saved by default under “Videos\Captures”. Changing this is also allowed if you’d want to. To record a screen activity that has already happened, you can just switch on the “Record what happened” option. You may even determine the length of time for recording.
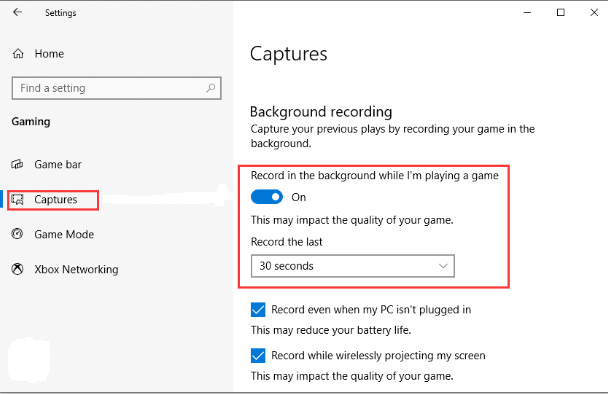
Step #2. Enabling the Recording Options
You must tick the checkboxes next to the “Record even when my PC isn't plugged in” and “Record while wirelessly projecting my screen” options to get them enabled. You shall also see the “Max recording length” dropdown menu. When tapped, you will see the option to set it to 30 minutes, an hour, or up to 4 hours if you’d want to.
Step #3. Turn on the Capture and Control Audio Menu when Screen Recording
Look for the “Record audio when I record a game or Capture audio when recording a game” switch next. This is what would let you set up the audio quality, your microphone’s volume, and even your PC’s.
Step #4. Disable the Capture Mouse Cursor Menu when Recording a Game
For recordings, the usual recommendation is 30 fps. Bumping it up to 60 fps should also be fine but using 30 fps should be the best. By default, the screen recording video quality is set at “standard” but, as mentioned, you can change this if you’d like. You may also turn off the “Capture mouse cursor when recording a game” menu as you wish.
Step #5. Control Keyboard Shortcuts
You should also be aware that there are plenty of keyboard shortcuts that would let you control the Xbox Game Bar. On your Windows 11 PC, to see and change the shortcuts, you have to launch the interface of the Game Bar itself. Here are the important shortcuts to remember for your reference.
- Windows key + G– to launch the Xbox Game Bar
- Windows key + Alt + R– to begin or stop the recording
- Windows key + Alt + G – to capture the last 30 seconds of your screen activity
- Windows key + Alt + B – to turn the HDR on or off
- Windows key + Alt + PrtScn – to get a screenshot of your screen activity

And, that’s it! The abovementioned detailed steps of how to screen record on Windows 11 are what you need to follow when using the Xbox Game Bar on your Windows 11 PC!
Part 2. How to Screen Record on Windows 11 without a Game Bar?
Indeed, using the Xbox Game Bar is a good option when it comes to screen recording on Windows 11, but if you want to capture your screen without a Game Bar? Well, the best screen recording tool should be iMyMac Screen Recorder. It is a tool that would let you ace the screen recording process without watermark restriction. Using this, you can perform customization, enjoy lag-free webcam recording, get great audio quality for your recording outputs (with noise reduction), and have plenty of other benefits!
If you’re wondering how effective on how to screen record on Windows 11 using this recorder tool, then you’ve got to jump into the next section to see the steps.
Get A Free Trial Now! Normal Mac M-Series Mac Get A Free Trial Now!
- On your Windows 11 PC, install the iMyMac Screen Recorder and launch it. Once opened, press the “Video Recorder” menu.
- You can either choose the “Screen Only” option (if you’d like to record the entire screen) or select the “Screen & Camera” menu (if you’d want to record both the screen and camera simultaneously).
- If you opt to choose the latter, the tool should automatically detect your webcam. Just in case it won’t be detected right away, you can tap the “Recheck” menu. You may now specify the recording area by choosing from “Full Screen”, “Window”, or “Custom Size” options.
- The audio preferences can now be fine-tuned. You may select the “System Sound and Microphone” option if you’d want both to be recorded or choose “Microphone” or “System Sound” if you want to capture only one type. If you don’t want to record the audio, you may also select the “None” menu.
- Finally, the screen recording process shall start once the “Start Recording” option is tapped. In case you chose the recording area to be “Window”, you shall see a window showing several program windows. Just choose which one you prefer and it will automatically be identified.
- Once done, you may finish off the process by hitting the red “Stop” button. The output should be saved on your Windows 11 PC automatically. If you’d like to stop for a few minutes and then resume afterward, you may press the “Pause” menu and then just continue by tapping it again when you’re ready to proceed. In case you’d want to start anew, to discard the previous one, you may press the “Restart” button.
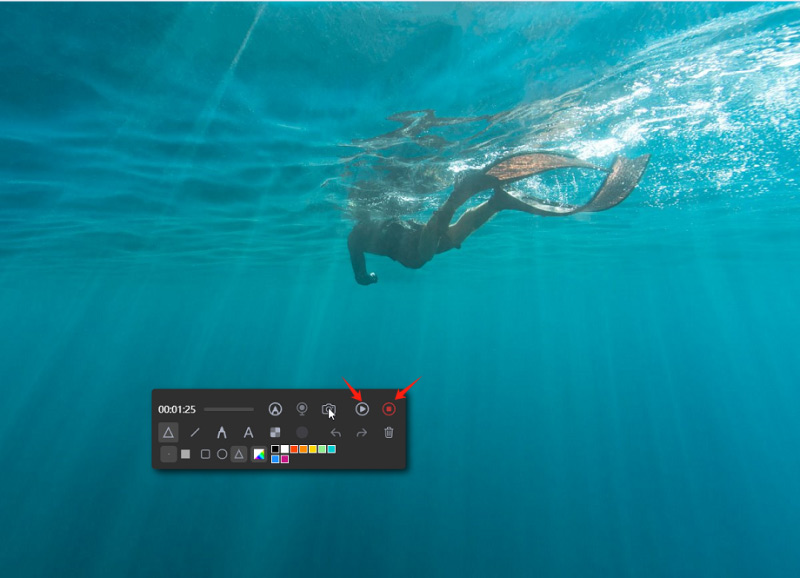
During the screen recording process, you will also notice a toolbar with annotation tools and more buttons. You can take advantage of these to perform customization. Buttons to launch the webcam and get screenshots when recording are also available to use!
Part 3. Other Free Screen Recorder on Windows 11
Learning how to screen record on Windows 11 is an advantage but, in case you’re wondering if there are still other free screen recorders on Windows 11 apart from the previously mentioned in the first and second sections of this post, you have to read what this section has.
#1. OBS Studio
You can also ace the “how to screen record on Windows 11” process by taking advantage of OBS Studio. This is a free tool and is open-source. This tool is said to be best to use when recording live streaming since one can perform live streaming and mix video and audio at the same time. Apart from being a screen recorder, one can utilize the video editing tools it has. It is also said that its outputs are high-quality. Though good enough, some new users are a bit overwhelmed with the configuration options and its interface.
#2. PowerPoint
You may be surprised to learn that the PowerPoint application is also an answer to the “how to screen record on Windows 11” dilemma. Aside from being an app that’s dedicated to presentations, it also has a screen recording feature that Windows 11 users can take advantage of. Take a look at the below simple guide to use it.
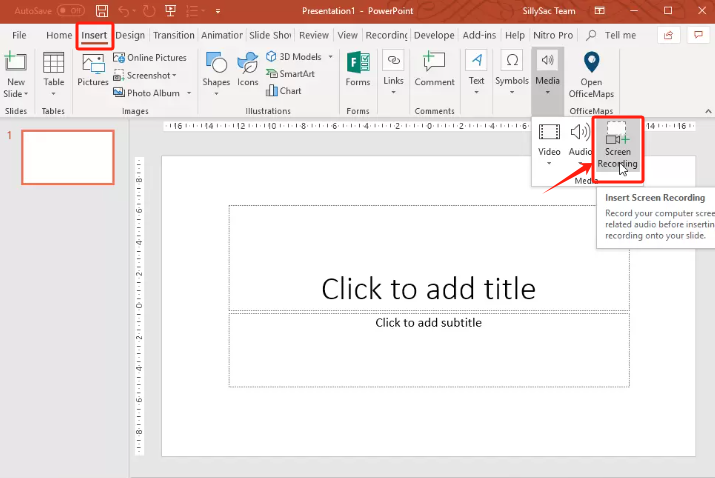
- Launch the window or specific presentation to be recorded. Launch PowerPoint afterward and proceed to create a new slide. Tap the “Insert” menu then choose “Screen Recording”.
- Choose your preferred recording area. To begin recording, tap the “Record” button.
- Once the recording is completed, press the “Stop” button. You shall then see the recording file on the slide.
- To get the recording file saved, select the “Video Frame” and right-click on it. Choose the “Save Media As” menu.
Using PowerPoint to screen record on your Windows 11 is good as it’s also free and pre-installed but, if you’d like to use a webcam and record in high quality, sadly, it isn’t attainable. Using professional tools like the iMyMac Screen Recorder would be the best way to go.
Part 4. In Conclusion
It is delightful to know that there are plenty of options and tools to choose from when it comes to how to screen record on Windows 11. Though there are lots of free tools and some others that are already pre-installed on your Windows 11 PC, it would still be best to rely on professional software apps like the iMyMac Screen Recorder to achieve great results.
