


As time passes by, more and more things are now being accomplished online. Regardless if you are a student or an employee, it would be an advantage to learn technology improvements as they make life a lot easier.
Relative to technological advances, this article will focus on and deal with ways on how to record audio on PowerPoint. If you are someone who has a great need when it comes to creating presentations via Microsoft PowerPoint, this post’s content will surely be beneficial to you especially if you aren’t aware yet of how to do that. Some might find this a dilemma but, it’s simple to resolve. Let’s now try and make your PowerPoint outputs more engaging and more appealing.
Contents: Part 1. Why Can't I Record Audio on PowerPoint Mac?Part 2. How to Record Audio on PowerPoint on Windows?Part 3. How to Record PowerPoint Presentation with Audio and Screen?Part 4. How to Record Audio on PowerPoint Online?Part 5. In Conclusion
Part 1. Why Can't I Record Audio on PowerPoint Mac?
Most Mac users are trying to figure out the reason why they can’t record audio on PowerPoint Mac. This led them to guides like this which tackle methods on how to record audio on PowerPoint using different devices.
If you are one of them, you should know that there could be two probable causes of this issue – outdated microphone permission or user profile problems. All you have to do is to make sure that you allow PowerPoint to access your Mac’s microphone and try creating a new user profile as your old profile could be the culprit.

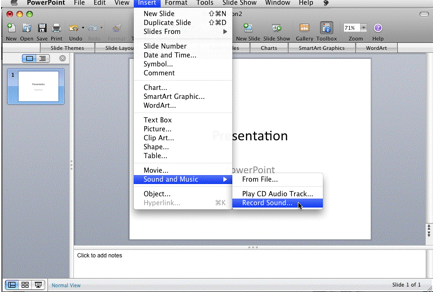
How to Record Audio on PowerPoint on Mac?
Upon addressing the abovementioned issue, you may now go ahead and follow the below tutorial on how to record audio on PowerPoint on your Mac. The built-in “Record Slide Show” function shall be used in this instance.
- Open the PowerPoint on your Mac PC. Head over to “Slide Show”. From here, choose the “Record Slide Show” option.
- Using the icons that you’ll see on the screen’s bottom-right corner, turn on your microphone. Make sure to check your microphone and some other setups via the “Settings” menu.
- Press the “Record” icon to begin recording audio on PowerPoint on Mac. You are allowed to pause, stop, or clear the recordings as you like. Controlling the slides or adding notes can also be done.
- Once you have finished recording, exit from the recording mode. Press the “File” menu, and then choose “Export…” to save the recorded file. You can also go ahead and change the format and quality as you prefer. You just have to ensure that the “Use Recorded Timings and Narrations” menu has been ticked off.
- Upon completing the setup, tap the “Export” button at the bottom of the window. The recorded PowerPoint presentation with audio should be saved to your Mac PC accordingly.
Part 2. How to Record Audio on PowerPoint on Windows?
If you are a Windows PC user and are also thinking of how to record audio on PowerPoint, you’ll be offered a detailed guide as you read this section of the article.
Microsoft PowerPoint’s “Slide Show” recording feature can directly be used. You just have to prepare and open your PowerPoint presentation and then just follow the below.
- From PowerPoint’s menu bar, press the “Slide Show” menu. Look for the “Record Slide Show” button. Tap the dropdown arrow to select the “Start Recording from Beginning…” option.
- Icons at the bottom are provided to switch the microphone and camera on. If video recording has been selected, the “video preview function” (third icon) shall show up.
- To select the microphone (or camera) to record with PPT, you may tap the “Settings” button.
- The recording will begin once the “Record” icon is pressed. You may now narrate through the microphone. While recording, you may utilize the editing bar, control and monitor the slides, clear recordings on any slide as you like, or restart as you wish.
- Once the recording is completed, save the recorded file by tapping “File”, “Export”, then the “Create a Video” option. Specify the quality you want to use, and then press the “Create Video” option. Don’t forget to click “Save” afterward.

Part 3. How to Record PowerPoint Presentation with Audio and Screen?
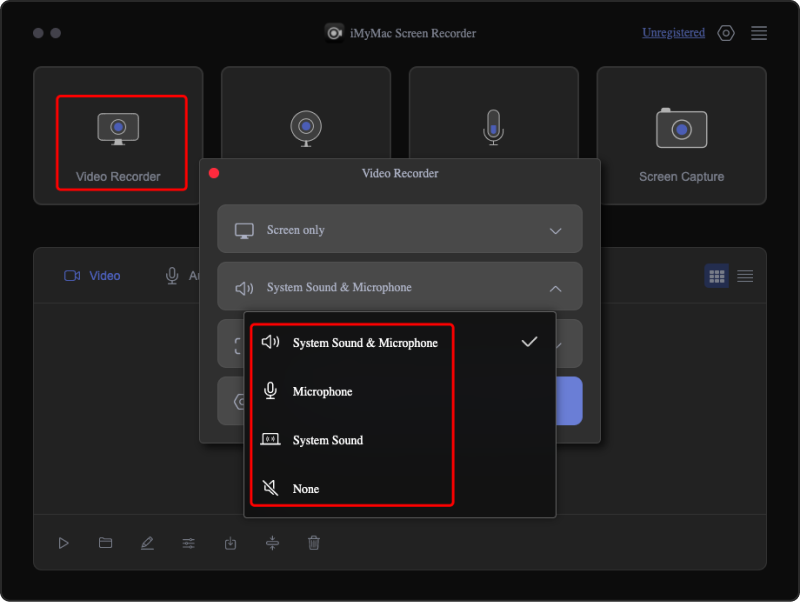
Using PowerPoint to record audio is convenient and simple. However, you might find that it has limited functions. For better results, it is a must to try using a professional tool like the iMyMac Screen Recorder to record your PowerPoint presentations with audio and screen. This software is a powerful tool that lets you screen record high-definition webcam and screen while letting you set your audio preferences. Editing functions, annotation tools, and buttons for taking screenshots or opening the webcam are also available.
If you are curious about how to record audio on PowerPoint presentations with a screen easily, the below guide is what you need the most right now.
Get A Free Trial Now! Normal Mac M-Series Mac Get A Free Trial Now!
- Install the iMyMac Screen Recorder on your computer and open it right after. Look for the “Screen Recorder” option from the app’s main interface and tap it.
- You may record only the screen (via the “Screen Only” option) or both the screen and camera (via the “Screen and Camera” option) simultaneously. If the second one is chosen, the webcam shall automatically be detected. Tap the “Recheck” button if this does not happen. Go ahead and choose the recording area next – Full, Window, or a custom size.
- Proceed to set up the audio settings. Recording only the microphone is possible through the “Microphone” menu or only the system sound through the “System Sound” menu. Alternatively, if you wish both to be captured, you may select “System Sound & Microphone”. If you don’t want any sound at all, choose the “None” button.
- The recording shall comment once the “Start Recording” button is pressed. If “Window” was selected as the recording area, a window displaying multiple window programs shall be shown. Just select the preferred window (PowerPoint).
- You may conclude the recording process by pressing the red “Stop” button. Automatically, the recording will be saved to your computer. Take note that the “Pause” and “Restart” buttons are also available in case you’d like to stop for a while or begin recording from scratch again.
Surely, using this software will lead you to have the best experience when recording PowerPoint presentations with both audio and screen.
Part 4. How to Record Audio on PowerPoint Online?
If you happen not to have access to PowerPoint’s desktop version, would it be possible to do it online? How to record audio on PowerPoint online then?
You must know that unlike when using the desktop version of PowerPoint, audio recording isn’t directly possible if you are to do it online (as it can only be done directly through the PPT app). But you can still add audio to your presentations. It’s just that you have to do the recording separately and then have it embedded in your PPT presentation afterward.
You may check out the below guide.
- On your PC’s browser, head to “office.com”. Make sure to log into your Microsoft account to begin.
- On the left side area of the screen, find the PowerPoint presentation section. Just simply tap it. You may decide to use an existing presentation or create a new one.
- Upon opening a PPT file or creating a new one, go to the “Insert” tab. From here, look for the “Audio” menu.
- Once you press the “Audio” option, there will be a window popup where you will be asked to choose an audio file from your device. You may choose whichever you like.
- After inserting the audio file, a “speaker” icon will be visible on the screen. Moving this to any area on the slide should be fine. Try to click the icon and you’ll see options to adjust the audio or determine how you can better incorporate it into your PPT file.

Part 5. In Conclusion
You are surely delighted knowing that directly recording audio on the PowerPoint app is possible. For Mac and Windows PC users, the procedure is totally simple and even first-timers would find it manageable to do. At this point, you should no longer be asking how to record audio on PowerPoint because aside from the PowerPoint app itself.
You may also take advantage of professional tools like the iMyMac Screen Recorder when recording your PPT presentations (with both audio and screen). With this powerful tool, customization on the recorded files can be achieved as well as the flexibility to define your audio preferences. There are even annotation tools and buttons for additional functions. Additionally, just in case you are wondering if you can record audio on PowerPoint online, it’s a bit sad knowing that it’s not allowed. Fortunately, embedding audio files into the presentations can be done online.
