


With technology improvements, more users are trying to move away from the classic and usual way of doing things. However, there could still be a lot who would like to keep things as they used to be perhaps because they find it convenient. This also applies to updates on PCs. If you happen to be one of those who prefer keeping Windows 7 than upgrading to a later version, you surely have various questions in mind such as the process of how to record screen on Windows 7.
In this article, the main discussion will be about the abovementioned. If you are also one of those Windows 7 PC users who are asking the same, you’ll be offered tutorials here that you can surely use.
Contents: Part 1. How to Screen Record on Windows 7 with Key Shortcut?Part 2. How to Screen Record on Windows 7 with Audio?Part 3. How to Screen Record on Windows 7 without Any Software?Part 4. In Conclusion
Part 1. How to Screen Record on Windows 7 with Key Shortcut?
Actually, the process of how to record screen on Windows 7 is just as simple as taking snapshots. You can do it by using key shortcuts. If you aren’t aware of Xbox Game Bar, this tool can help you with screen recording on your computer. All you need to do is just to press your “Windows” + “Alt” + “R” keys to launch it and start your recording journey. Alternatively, just to open it, you can resort to holding your “Windows” + “G” buttons.
Once the recording is completed, you should be able to see the output file on your PC as well.
Part 2. How to Screen Record on Windows 7 with Audio?
Using the Game Bar is good. However, if you are aiming for a more advanced workaround when it comes to how to record screen on Windows 7 and a tool that can help you even with audio recording, then the best move is to use iMyMac Screen Recorder. This is an excellent choice as it provides benefits, features, and functions that make the screen recording activity handy enough even for beginners.
This software program is a professional tool that ensures lag-free and high-definition screen and webcam recording that even lets one set up his audio settings preferences. There are menus for real-time annotation, editing for customization, and options to take screenshots or launch a webcam if needed. Of course, its UI is simple and easy to navigate.
To start recording using this program with audio, check out the below guide.
Get A Free Trial Now! Normal Mac M-Series Mac Get A Free Trial Now!
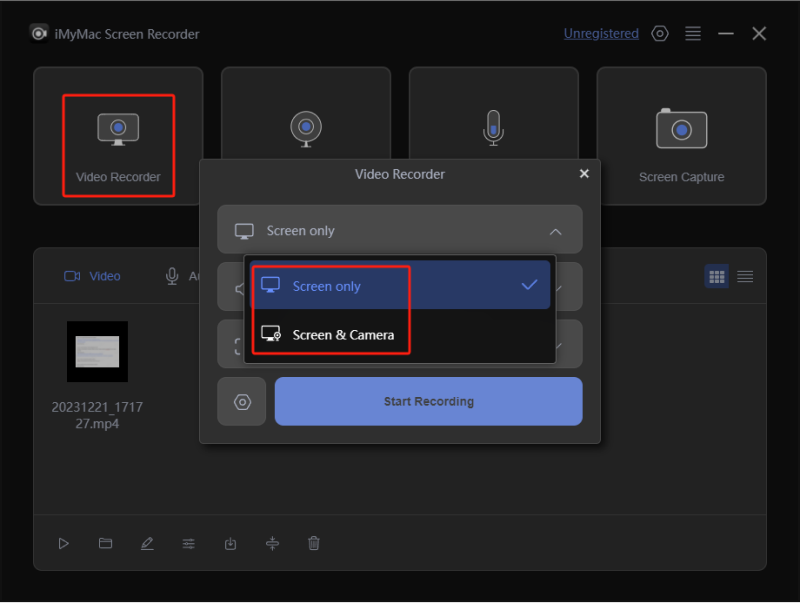
- Once this app has been installed on your Windows 7 computer, immediately open it and look for the “Video Recorder” function on the main interface.
- To capture the whole screen only, press the “Screen Only” menu. Otherwise, if you’d like to capture your webcam as well, select “Screen & Camera”. In case the webcam wasn’t detected automatically, tap “Recheck”. Proceed and select your preferred recording area.
- Set up your audio settings. You may decide on whether to capture both the system sound and microphone (“System Sound & Microphone” menu) or just select any of the two (“Microphone” or “System Sound”). Take note that the “None” option is also available.
- Press the “Start Recording” menu to commence. Once done, click the red “stop” button to save the recording to your PC. In case you’d like to pause for a few minutes or restart the process, buttons to easily do so are readily accessible.
Part 3. How to Screen Record on Windows 7 without Any Software?
As always, with regards to how to record screen on Windows 7, our recommendation is to stick to using professional options such as the tool mentioned in the previous part. However, if you are looking for a way to still screen record on your Windows 7 without installing any software apps, then you might want to read more of what this section has.
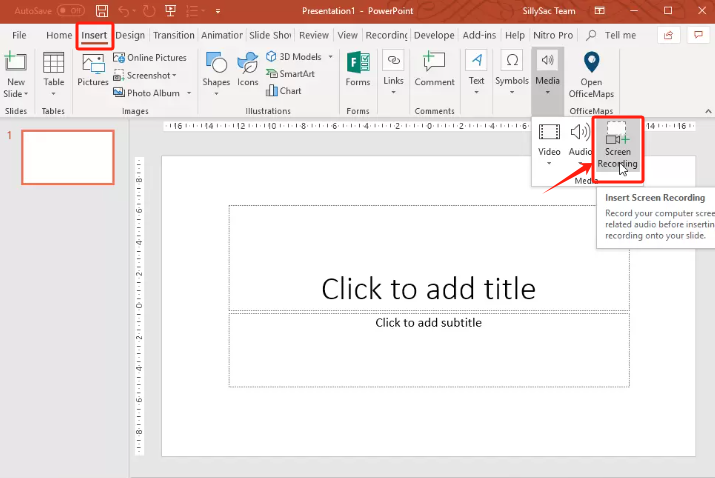
Using Microsoft PowerPoint
Microsoft PowerPoint is a pre-installed app on Windows PCs that can aid in the screen recording process on Windows 7. Apart from having the ability to record your screen with audio, one could utilize this to save the output file as a separate video doc. The recording process is pretty simple as you just have to go to the “Record” tab and look for the “Screen Recording” menu.
Using Problem Steps Recorder
Problem Steps Recorder is another embedded tool that you can see on Windows 7. You might think of this as a normal video recording tool but it indeed has the power to capture all your screen activities – step by step. This is usually used for tutorial purposes. It can be found under one’s PC’s “Accessories” menu.
Just take note that it is only capable of recording up to 100 steps in a file. Thus, if you are looking at recording a long process, it’s better to move to another tool.
Using an Online Recorder
If you are wondering how to record screen on Windows 7 via an online option, worry no more. There are tools like Screen Capture that can help you in this instance. It can record your screen, capture sounds, and even your webcam. This can be used for free but one should make sure that his PC is connected to a stable network to achieve the best results.
