


A lot of us are surely familiar with VLC Media Player as it has been one of the most popular programs that cater to the users’ needs when it comes to accessing and playing video and audio files. Apart from being a media player itself, it can even be used to convert files to some of its supported formats. Do you know that it is also capable of recording your screen activities? If you want to know how VLC record screen, you’ll find out more about that as you endeavor each section of this article!
Contents: Part 1. Can VLC Record a Live Stream?Part 2. How to Use VLC Record Screen with Audio?Part 3. How to Use VLC Record a Webcam?Part 4. Best Alternative for VLC When It Is Not WorkingFAQs
Part 1. Can VLC Record a Live Stream?
Being fond of watching live streaming videos perhaps made you think if recording them would be possible. Luckily, you can rely on using the VLC Media Player as it supports network streaming recording! Check out the below steps to learn how this media player can help you.
- Open the VLC Media Player. Press the “View” option and then choose “Advanced Controls”.
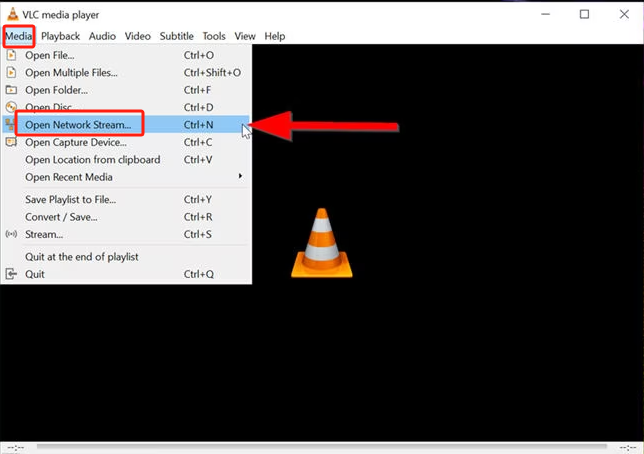
- Tap “Media/File”, then “Open Network Stream”.
- Make sure to copy the live stream link. Paste it into the bar that you’ll see on VLC.
- Press the “Play” button. It shall then play.
- Head to the recording toolbar. Tap the “Record” option. Once the video ends, just click the square “stop” button.
Part 2. How to Use VLC Record Screen with Audio?
Since our goal here is to share with you how VLC record screen, we have this part in the article. Keep on reading to finally know more about the topic.
Record Normal Video
You probably have not realized before that VLC can do screen recording since this feature is set “off” by default. Let’s find out how you can have this enabled to finally get to record video content.
Enable the Record Button
- On your Mac or Windows PC. Open the VLC Media Player.
- Press the “View” menu.
- Click the “Advanced Controls” option.
- The “record” button will then successfully be enabled.
Start Recording
Upon enabling the recording function, you’ll now get to begin the recording process through this program. Here are the steps that must be followed.
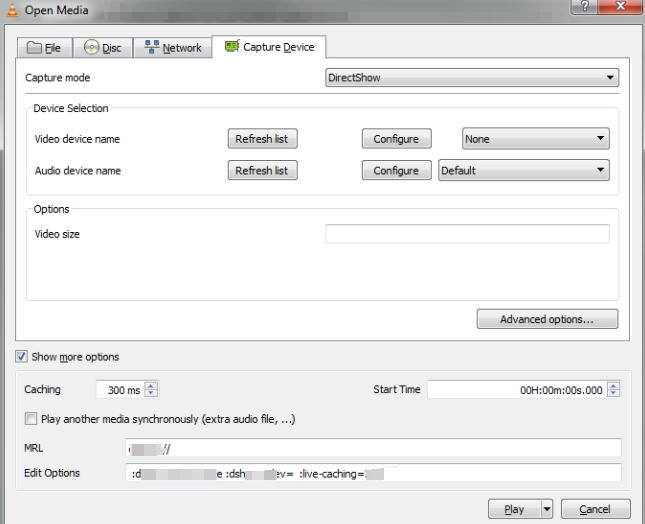
- Go to “Media/File then press “Open Capture Device”.
- Choose the “Capture Device” tab next.
- From the “Capture mode” dropdown menu, select “Desktop”. Make sure to set your desired frame rate for capture.
- Tap “Convert/Save” next.
- Select your output preferences by navigating to the “Profile” dropdown menu.
- Set up the destination to use and name your file. Don’t forget to click “Save”.
- To begin the “VLC record screen” process with audio, press “Start”.
- To end, just tap the square “stop” menu. Just simply head to the destination folder you recently chose to see the recorded file.
Capture from a Disc
VLC Media Player seems to be so sufficient. It does not stop at offering one the ability to record normal videos. If you wish to capture from a disc, that’s possible through this media player as well! Rather than spending lots of your time looking for another software to rip videos from your disc, you may just rely on using VLC! As long as the record button has been enabled, the process should be easy.
- Play the disc via the VLC Media Player.
- Next to the “Play” button, look for the “Record” menu and click it.
- To end, press the same button (“Record”) again.
You should be able to see the recorded file as you head over to the “Videos” folder on your VLC Media Player.
How Do I Record Only One Screen in VLC?
If you are looking at how VLC record screen but only certain parts of a specific video, you’ll get to find out about that in this section. If you only want to record some favorite clips as videos could be long, cutting could help. Here’s how you can do that with ease.
- Head to the “View” tab and look for “Advanced Controls”.
- Press “Media/File”, then “Open File”.
- Drag the bar where you want to cut the video. To start recording, press “Record”.
- Just let the video continue until you arrive at the segment where you wish to finish. Alternatively, you may utilize the “Frame by Frame” function to identify a specific location.
- Once completed, stop by pressing the square button.
Part 3. How to Use VLC Record a Webcam?
In addition to learning how VLC record screen, it is also good to find out how you can use this media player to record a webcam. This is useful when recording reactions on games or for one’s online presentation. If you’d like to know more details about how it can be done, just check out the below.
- From the top area of the VLC window, choose the “Media” tab.
- Press the dropdown menu on “Capture Mode”.
- Select “DirectShow”.
- Select your audio and video devices next. Click “Video Device Name”. Afterward, select your webcam.
- Choose your microphone upon pressing “Audio Device Name”.
- You may or may not modify other settings. Go to the “Advanced Options” menu to select your desired frame rate. You may also choose “Device properties” to let the program use the preset frame rate of your webcam.
- Tap “Okay” then click the “Record” button next.

Part 4. Best Alternative for VLC When It Is Not Working
Indeed, knowing how VLC record screen is beneficial given that one can enjoy plenty of benefits and other functions. Plus, it’s free to use and is easy to install. However, in case VLC isn’t working as expected, it is good that you have a tool that can ace the screen recording process and give the best results. Professional software apps like iMyMac Screen Recorder can help.
This program ensures lag-free and high-definition screen and webcam recording, allows one to set his audio preferences, has an interface that’s simple enough for beginners, and has functions for customization and real-time annotations. While recording through this tool and one wishes to take screenshots or launch the webcam (if hasn’t been opened yet), it can easily be done via the available menus. To use this app, we have detailed a guide below for your easy reference.
Get A Free Trial Now! Intel Mac M-Series Mac Get A Free Trial Now!
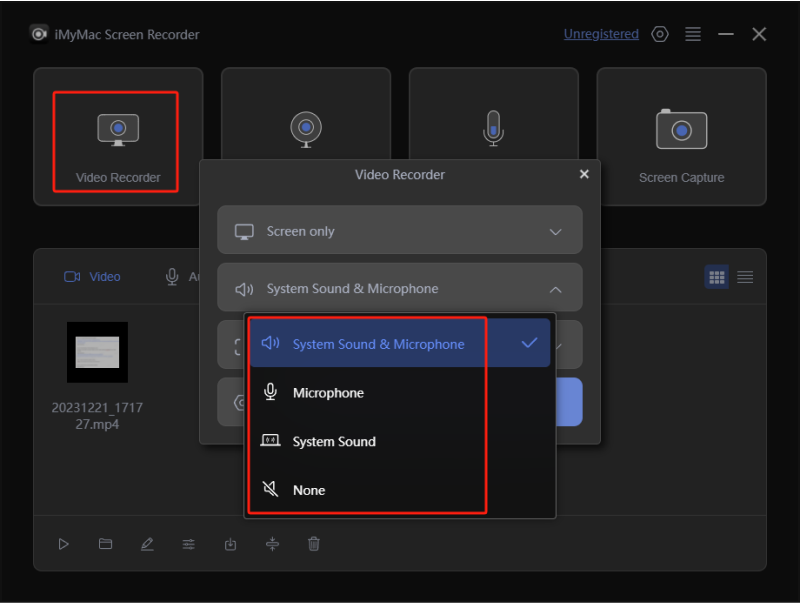
- Upon installing this app on your PC, head over to the “Video Recorder” menu from the main interface.
- Choose to capture the entire screen via the “Screen Only” option or both the screen and webcam through the “Screen & Camera” button. If the second option is selected, the webcam should automatically be detected by this app. In case not, click “Recheck”. Afterward, choose the recording area.
- Proceed to decide whether to capture only the system sound (“System Sound” button), the microphone sound (“Microphone” button), or both (“System Sound & Microphone” menu). There is even a “None” option in case no audio is preferred to be recorded.
- The recording will start once the “Start Recording” option is tapped. If “Window” was selected as the recording area, various program windows will be seen on the screen. Choose the one desire to use.
- To finish off, press the “Stop” menu. Options to pause or restart recording are also available in case needed.
FAQs
Upon reading this post, you could still have some questions in mind that you wish to be answered. In this section, we have the answers to FAQs about the “VLC record screen”.
- Where will the VLC recording be saved?
During the recording process, you are allowed to set up the destination where the recorded files will be saved. If you do so, you may check the location set after the process. If you don’t remember it, just head to “Tools”, choose “Preferences”, then “Input/Codes”. The location should be in the “Record directory or filename”. In case no output path was initially set, by default, the files will be saved to this location – “C:\Users\[your username]\Videos” on Windows PCs and in the “Movies” folder on Mac.
- Is there a time limit when recording via VLC Media Player?
You are probably wondering about the time limitation when recording via the VLC Media Player given that it’s free to use. You will surely be happy knowing that there isn’t a time limit at all! Users can take advantage of VLC’s recording feature as they wish as long as the device in use has enough storage space to save long recordings.
Though capable of recording for a long time, most people still do not recommend doing so as the player could lag and become unstable while handling huge files. Thus, for the best results and experience, it is always suggested that one uses professional apps like iMyMac Screen Recorder.