


In today's world, learning the skill to easily record and share what's happening on your computer screen like pictures and videos, has become an indispensable part of our life. Whether you're a teacher, or an expert in a certain industry, knowing how to screen record on Mac with audio can really help your job. In this guide, we'll dive into all the ins and outs of recording your Mac screen, making sure you not only catch what's on your screen but also the sounds that go with it.
Contents: Part 1. How Do You Screen Record on A Mac with Sound?Part 2. How to Screen Record on Mac with Audio Using QuickTime?Part 3. Best Screen Recorder for Mac with Internal AudioPart 4. In Conclusion
Part 1. How Do You Screen Record on A Mac with Sound?
Apple has a built-in tool that can record the screen, which can support recording sound at the same time. Such a simple and fast method of how to screen record on Mac with audio is to use the keyboard shortcuts. You only need to press "Command + Shift + 5" to enable the recording toolbar. This command opens a multi-function menu at the bottom of the screen so that you can access various recording options. You can click the "Record Entire Screen" or "Record Selected Portion" button according to your needs.
After selecting the recording area, make sure to tick the "Capture Audio" box to ensure that the system audio is recorded together. Then, click the "Record" button, and your Mac will start to capture the content on the screen as well as the sound. This easy-to-operate method can help you quickly create screen records on Mac without relying on other tools.
Part 2. How to Screen Record on Mac with Audio Using QuickTime?
Although the “keyboard shortcuts” way provides a fast solution for the Mac screen recording with audio, QuickTime Player provides a more customized method. Because this app comes with Apple is not only a multimedia player but also has a powerful feature of screen recording. Please check the following steps on how to screen record on Mac with audio:
- Open QuickTime Player by searching for it in Spotlight, or just find it in your Applications folder.
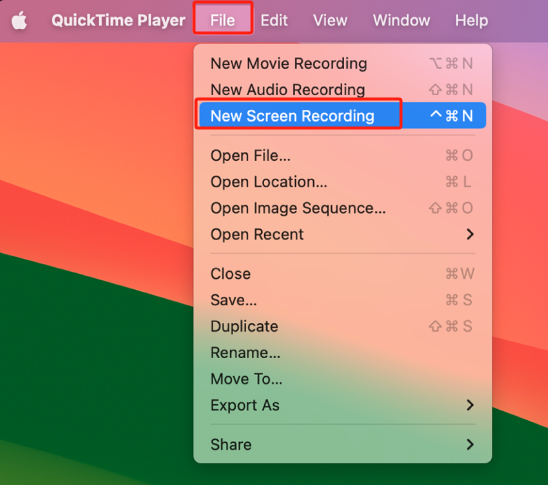
- From the top menu of the app, click on "File" and then select "New Screen Recording".
- You may need to set the audio preferences before your recording. To do this, just access this setting by clicking the tiny arrow located next to the record button. Then you can start to choose the microphone to add your system sounds or your voice to the screen recording.
- To start the recording, just click the red record button and then you need to select the recording area.
- Press the Stop button if your recording is complete, and QuickTime will open your recorded video automatically. Then you can choose a desired location to save your recording.
QuickTime Player provides solutions for those who seek user-friendly but powerful screen recording methods on their Mac since it has more selectivity for audio settings.
Part 3. Best Screen Recorder for Mac with Internal Audio
For those who are looking for a dedicated and complex screen recording solution on Mac, the iMyMac Screen Recorder can meet your needs. This multi-functional tool can capture screens and internal audio at the same time, making it the first choice for content creators and educators.
It provides a user-friendly interface that can let you customize the recording options and provide effective editing tools to enrich your recording. This improves the screen recording experience, ensuring that your recording not only looks very professional but also has attractive and high-quality internal audio.
Here are the steps on how to screen record on Mac with audio using iMyMac Screen Recorder:
Get A Free Trial Now! Normal Mac M-Series Mac Get A Free Trial Now!
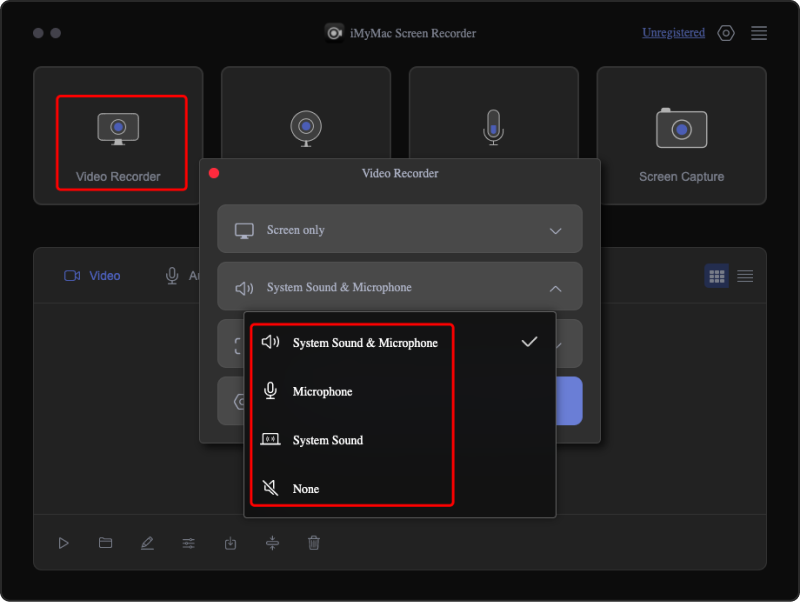
- Launch the application and select "Video Recorder" from the main interface.
- Choose your recording area. If you want to record the entire screen just pick "Screen Only". If you want to record both the screen and webcam, then select "Screen & Camera".
- If "Screen & Camera" is selected, the program will automatically detect your webcam. If it's not detected, click "Recheck".
- Choose the specific recording area from Full Screen, Window, or Custom Size.
- Select your preferred audio recording options:
- "System Sound & Microphone": Record both system sound and microphone audio.
- "Microphone": Record only microphone audio.
- "System Sound": Record only system sound.
- "None": Record without any audio.
- Click "Start Recording" to begin the process of how to screen record on Mac with audio. If you chose "Window" as the recording area, select the specific window you want to record.
- Click the red stop button to end the recording and your recorded file will be saved on your computer.
- You can also pause the recording using the "Pause" button and resume by clicking it again. Or discard the current recording and start over using the "Restart" button.
During the recording, you can access annotation tools and additional buttons on a floating toolbar. Such as choosing annotation colors, using tools like lines, shapes, text, brushes, and erasers, editing annotations via Undo, Redo, and Clean buttons, and using buttons to activate the webcam, or take screenshots while recording.
Part 4. In Conclusion
Now let’s start to summarize the methods of how to screen record on Mac with audio. Whether you like the fast convenience of keyboard shortcuts, the multifunctional feature of the QuickTime player, or the special feature of tools such as the iMyMac Screen Recorder, you can make a choice depending on your specific needs.
Whether you are creating tutorials or presentations, you need to consider high-quality audio while mastering the screen recording on Mac. No matter which method or tool you choose, the key is to try and find the most suitable one for you. I hope the knowledge shared in this guide can make you record happily!
